Mug Magic: Whip Up a Quick Chocolate Protein Cake
Mug Magic: Whip Up a Quick Chocolate Protein Cake is the ultimate go-to dessert when craving something indulgently chocolaty yet perfectly balanced with wholesome nutrition.Born from the fusion of fitness and foodie passion, this quick mug cake transforms humble protein powder into a decadent treat that feels like a delightful cheat without sacrificing your health goals.Whether it’s a late-night craving or a speedy post-workout boost, this cake promises moist, fluffy, chocolate-rich satisfaction in under five minutes.
Prep and Cook Time
Prep Time: 5 minutes | Cook Time: 2 minutes | Total: 7 minutes
Yield
Serves: 1 decadent mug cake
difficulty Level
Easy – Perfect for beginners and busy bakers alike
Ingredients
- 3 tbsp chocolate protein powder (whey or plant-based)
- 2 tbsp all-purpose flour or oat flour (for gluten-free)
- 1 tbsp unsweetened cocoa powder
- 1 tbsp coconut sugar or brown sugar
- 1/4 tsp baking powder
- 3 tbsp unsweetened almond milk (or preferred milk)
- 1 tbsp melted coconut oil or butter
- 1/2 tsp vanilla extract
- Pinch of salt
- Optional: 1 tbsp mini chocolate chips or chopped nuts
Instructions
- Combine dry ingredients: In a small mixing bowl,whisk together the chocolate protein powder,flour,cocoa powder,coconut sugar,baking powder,and salt to ensure even distribution and prevent clumps.
- Add wet elements: Stir in the almond milk, melted coconut oil, and vanilla extract. Mix until smooth and thick but scoopable – the batter should not be too runny to guarantee a fluffy crumb.
- Fold in optional mix-ins: Gently incorporate chocolate chips or chopped nuts if desired, adding texture and an extra flavor burst.
- Transfer batter to mug: Spoon the mixture into a 12-ounce microwave-safe mug, spreading it evenly. Avoid filling more than halfway to prevent overflow during baking.
- Microwave and watch: Microwave on high for 90 to 120 seconds. Start checking at 90 seconds to avoid overcooking. The top should look set but moist. Use a toothpick inserted in the center to confirm doneness; it should come out mostly clean with a few moist crumbs.
- Cool and enjoy: Allow the cake to cool for 2 minutes before diving in.This resting time lets the texture firm up to a perfectly tender and fluffy finish.
Choosing the Perfect Protein Powder for a Decadent Mug Cake
The secret to elevating your quick chocolate protein mug cake lies in the protein powder. Opt for a quality chocolate protein powder that strikes a harmonious balance between rich cocoa flavor and smooth texture.Whey protein delivers creaminess and a delicate crumb, while pea or brown rice powders make this recipe vegan-friendly with a slightly nuttier undertone.
Be mindful of powders with a chalky aftertaste or excessive artificial sweeteners-they can overpower your dessert. A natural, lightly sweetened chocolate protein powder will enhance the cake’s inherent decadence while contributing muscle-friendly nutrition. For an extra indulgence, consider a blend enriched with collagen or added fiber, which supports digestion and skin health.
Balancing Flavors and Nutrition in Your Chocolate Protein Treat
This recipe marries the luxuriously deep flavor of cocoa with subtle sweetness and a touch of vanilla, creating an irresistible harmony that pleases your palate and nourishes your body. The pinch of salt accentuates the chocolate, while coconut sugar provides nuanced caramel notes without a sugar spike.
By blending your chocolate protein powder with whole-food ingredients like almond milk and coconut oil, you achieve a moist crumb and a satisfyingly rich mouthfeel. These healthy fats not only elevate taste but also improve nutrient absorption, making your indulgent mug cake nourishing and guilt-free.
Step by Step Guide to Baking a Moist and Fluffy mug Cake
Follow these key baker’s tips for perfect results every time:
- Measure precisely: Accurate ingredient ratios ensure the cake rises well without becoming dense or dry.
- Mix gently: Over-mixing can lead to toughness; stir just until combined for tender crumb.
- Adjust cook time based on microwave strength: High wattage ovens cook quickly; watch the cake for doneness starting at 90 seconds.
- Let it rest: Cooling brightens flavor and firms the texture for that fluffy, sponge-like feel.
Creative Toppings and Add-Ins to Elevate Your Protein Dessert
Your mug cake is a canvas for creativity-try these delicious ways to personalize your protein dessert:
- nut butters: Swirl peanut or almond butter on top for creamy richness and extra protein.
- Fresh berries: Raspberries or strawberries add brightness and a fruity contrast.
- Greek yogurt or coconut whipped cream: Dollop generous spoonfuls for luxurious creaminess.
- Crunchy toppings: Toasted coconut flakes, chia seeds, or crushed nuts add texture and visual appeal.
- Drizzles: Dark chocolate sauce or a touch of honey enhances sweetness with gloss and depth.
Chef’s Notes
- Protein powder swap: If using vanilla or unflavored protein powder, increase cocoa powder to 2 tbsp to deepen chocolate flavor.
- Milk alternatives: Any plant-based milk works; coconut milk yields extra moistness and subtle sweetness.
- texture fix: If the batter feels too thick, add a splash more milk; too thin, dust in a pinch more flour.
- Make ahead: While it’s quick to prepare fresh, you can mix dry ingredients in a jar for a ready-to-go mug cake mix – just add wet ingredients when craving dessert.
Serving Suggestions
Serve your protein mug cake straight from the mug for a cozy solo treat or transfer to a small plate for a more formal presentation. Garnish with a sprinkle of cocoa powder or a few chocolate shavings. Pair it with a fresh mint leaf or a side of mixed berries to balance the richness. For a real indulgence, warm a spoonful of berry compote or drizzle with melted dark chocolate.

| Nutrient | Amount per Serving |
|---|---|
| Calories | 220 |
| Protein | 20g |
| Carbohydrates | 18g |
| Fat | 8g |
For more protein-packed desserts to fuel your fitness journey, check out our Protein-Packed Desserts collection.Also, explore expert nutritional insights at the Academy of Nutrition and Dietetics.
Q&A
Q&A: Mug Magic – Whip up a quick Chocolate Protein Cake
Q1: What exactly is a chocolate protein mug cake?
A1: Think of it as a single-serving dessert that’s both indulgent and nutritious. it’s a quick, microwaveable cake packed with protein powder and rich chocolate flavor-a perfect balance of treat and fuel!
Q2: Why choose a mug cake over a traditional chocolate cake?
A2: Mug cakes are speed demons! They take just minutes from mixing to mug to microwave, eliminating the wait and the mess of baking a whole cake.Plus, they’re perfectly portioned for solo snacking or a guilt-free dessert.
Q3: Can I use any type of protein powder in the recipe?
A3: Absolutely! Whey, plant-based, casein-pick your favorite. Just keep an eye on flavor and sweetness levels, as they can affect the final taste and texture. Chocolate or vanilla flavors usually blend seamlessly.
Q4: What ingredients make this mug cake so healthy yet tasty?
A4: Besides protein powder, typical ingredients include cocoa powder for that deep chocolate hit, a bit of flour or oat flour for structure, a natural sweetener like honey or maple syrup, and maybe an egg or Greek yogurt for moisture and extra protein. A splash of milk (dairy or plant-based) ties it all together.
Q5: How can I avoid a dry or rubbery texture?
A5: Microwave times can be tricky-start with 60 seconds, than add 10-second bursts if needed. Also, don’t overload on dry ingredients; balance moisture with yogurt or milk. The protein powder can be thirsty, so the right liquid ratio is key.
Q6: Can I customize my mug cake?
A6: Go wild! Add a handful of dark chocolate chips, a sprinkle of nuts, a dash of cinnamon, or even swirl in some peanut butter. Fresh raspberries or a dollop of Greek yogurt on top can add a refreshing twist.
Q7: Is this recipe suitable for special diets?
A7: Many versions can be adapted-use gluten-free flour for gluten sensitivities, plant-based protein and milk for vegan options, and a sugar substitute if you’re watching carbs. The mug cake world is wonderfully flexible!
Q8: What makes this recipe “magical”?
A8: It’s the fusion of convenience, nutrition, and decadence-transforming simple pantry staples into a warm, fluffy chocolate cake in under two minutes. Mug magic means deliciousness without fuss!
Q9: How can I incorporate this cake into my fitness routine?
A9: It’s a fantastic post-workout treat to aid muscle recovery thanks to its protein content. Pair it with a serving of fruit or a handful of nuts to round out your snack and keep energy levels steady.
Q10: Any tips for serving or storing leftovers?
A10: Mug cakes are best enjoyed fresh and warm straight from the microwave. If you do have leftovers, cover and refrigerate for up to two days-reheat briefly or enjoy cold for a brownie-like experience.
Ready to cast your own mug magic? Gather your ingredients and conquer the quick, chocolaty protein cake that fits perfectly into your busy, balanced lifestyle!
Concluding Remarks
Whether you’re racing against the clock or simply craving a swift sweet fix, this chocolate protein cake in a mug proves that indulgence and nutrition can coexist in perfect harmony. With just a handful of pantry staples and minutes to spare, you’ve unlocked a deliciously easy way to fuel your day without sacrificing flavor. so next time the craving strikes or post-workout hunger hits, remember: magic isn’t only found in spellbooks-it’s in your mug, too. Whip it up, savor every bite, and let the cozy warmth of chocolate and protein power you through!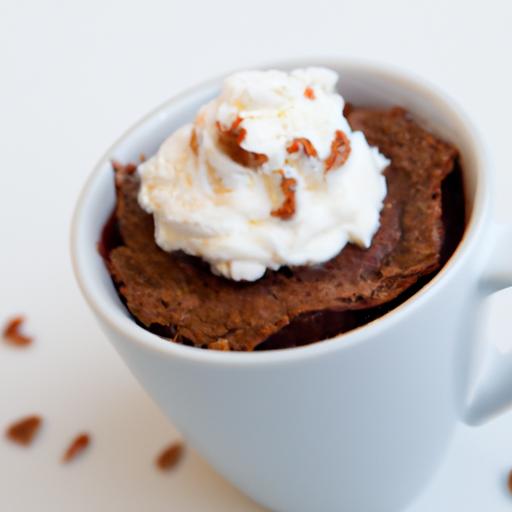
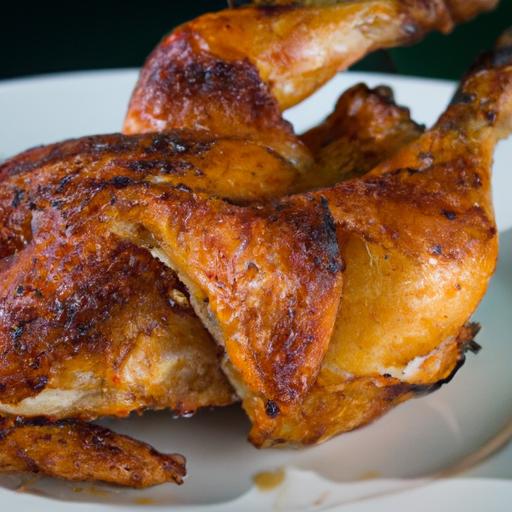
Sizzling fajita grilled chicken breasts from Whole Foods USA bring the authentic, bold flavors of Tex-Mex cuisine right to your plate. Known for their vibrant marinades and fast, high-heat grilling, fajitas are a festivity of spice, zest, and irresistible char. Personally, I’ve found that the freshest chicken breasts from Whole Foods USA, paired with a fiery marinade, create a mouthwatering experience that effortlessly transforms any meal into a fiesta. Whether enjoyed alfresco on a sunny afternoon or as the centerpiece of a cozy dinner, these sizzling fajitas never fail to impress.
Prep and Cook Time
- Readiness: 20 minutes (plus 2-4 hours marinating time)
- Cooking: 12-15 minutes
Yield
Serves 4 generous portions
Difficulty Level
Easy to Medium – perfect for grilling enthusiasts and beginners alike
Ingredients
- 4 boneless,skinless chicken breasts (fresh,organic from Whole Foods USA recommended)
- 3 tbsp olive oil
- 2 medium bell peppers (1 red,1 yellow,thinly sliced)
- 1 large onion (thinly sliced)
- 3 cloves garlic (minced)
- juice of 2 limes
- 1 tbsp chili powder
- 1 tbsp smoked paprika
- 1 tsp cumin
- 1 tsp oregano (preferably Mexican oregano)
- 1 tsp crushed red pepper flakes (adjust for heat preference)
- 1 tbsp brown sugar
- Salt and freshly cracked black pepper,to taste
- Fresh cilantro,chopped for garnish
- Flour or corn tortillas,warmed,for serving
Instructions
- Prepare the marinade: In a medium bowl,whisk together olive oil,lime juice,chili powder,smoked paprika,cumin,oregano,minced garlic,brown sugar,crushed red pepper flakes,salt,and pepper. The balance between acidity and spice ensures your chicken breasts soak up vibrant flavor.
- Marinate the chicken: Place chicken breasts in a zip-top bag or shallow dish and pour marinade over them.Seal tightly and refrigerate for at least 2 hours, ideally 3-4 hours for deeper infusion. Never skip this step – it’s the secret to tender, juicy fajita chicken.
- Preheat the grill: Heat your grill or grill pan to medium-high. A hot surface creates those signature sear marks and locks in juices.
- Grill the chicken: Remove chicken from marinade and pat lightly dry to prevent flare-ups. Grill for 6-8 minutes per side,or until the internal temperature reaches 165°F (74°C). Avoid pressing down on the breasts to retain moisture.
- Sauté the vegetables: While chicken rests, heat a tablespoon of olive oil in a large skillet over medium-high heat. Add bell peppers and onion slices, sauté until softened and slightly charred, about 5 minutes. Stir occasionally to avoid sticking and burn spots.
- Slice and serve: Thinly slice the grilled chicken against the grain for maximum tenderness. Layer on warmed tortillas with peppers and onions, garnish with freshly chopped cilantro.
Tips for success
- Choosing the perfect cut: Whole Foods USA offers high-quality chicken breasts that are thick and uniform-perfect for even grilling. If you prefer, butterfly thicker breasts for quicker cooking.
- Marinating magic: Let your chicken sit in marinade overnight if your schedule allows. The lime juice tenderizes while the spices deeply penetrate the meat.
- Grilling alternatives: no grill? Use a grill pan or broiler-just watch closely to avoid burning the spices.
- Make-ahead option: Marinate chicken up to 24 hours ahead and store covered in the fridge. Sauté peppers and onions the morning of and reheat gently before assembling fajitas.
- Vegetarian twist: Swap chicken breasts with thick portobello mushrooms or grilled tofu using the same marinade and cook times.
Serving Suggestions to Complete Your Fiesta Feast
For an elevated meal, serve these sizzling fajita grilled chicken breasts alongside vibrant sides that complement their smoky spice. Classic pairings include warm flour or corn tortillas, freshly made guacamole with chunks of ripe avocado, and a zesty pico de gallo bursting with ripe tomatoes and fresh cilantro. Spice lovers will relish a drizzle of tangy salsa verde to elevate the fajitas further.
For crunch and freshness, a crisp shredded cabbage slaw dressed with lime juice and a pinch of salt is ideal. Don’t forget a dollop of cool sour cream or Greek yogurt to balance the heat. Round out the meal with simple sides like Mexican rice or grilled street-style corn with cotija cheese and chili powder.
| Nutrient | Per Serving (approx.) |
|---|---|
| calories | 350 kcal |
| Protein | 42 g |
| Carbohydrates | 12 g |
| Fat | 10 g |

For a deeper dive into grilling techniques that bring out the best in chicken, be sure to check our Grilling tips for Perfect Chicken Breasts guide. Combining the best cuts from Whole Foods USA with these expert tips will ensure your fajita feast always shines.
Q&A
Q&A: Sizzling Fajita Grilled Chicken Breasts from whole Foods USA
Q: What makes the Sizzling Fajita Grilled Chicken Breasts from Whole foods USA special?
A: These chicken breasts bring the vibrant flavors of a classic fajita straight to your plate. Marinated in a zesty blend of southwestern spices,peppers,and a hint of citrus,they’re grilled to juicy perfection – delivering that irresistible smoky char and a burst of flavor with every bite.
Q: Are these chicken breasts ready to eat, or do they require cooking?
A: The Sizzling Fajita Grilled Chicken breasts are fully cooked and ready to enjoy, making them a convenient and tasty option for quick meals. Just heat and serve – no grilling required!
Q: Can I customize this chicken for my own fajita recipes?
A: Absolutely! These chicken breasts are incredibly versatile.Slice them thinly for classic fajitas with sautéed peppers and onions,dice them into salads,or shred for flavorful tacos. Their bold seasoning pairs beautifully with a variety of sides and sauces.
Q: How does Whole Foods ensure the quality of these chicken breasts?
A: Whole Foods USA is committed to high-quality ingredients. The chicken is sourced from trusted farms that prioritize animal welfare, and the product is free of unnecessary preservatives or artificial flavorings, giving you a wholesome, clean-eating experience.
Q: Are there any nutritional benefits to choosing this product?
A: yes! Packed with lean protein and seasoned with natural spices,these chicken breasts make a flavorful,protein-rich option that supports a balanced diet. Plus,grilling locks in juices without adding excess fat.
Q: What are some easy meal ideas using the Sizzling Fajita Grilled Chicken breasts?
A: Think beyond the tortilla! Try them in grain bowls with quinoa and avocado, topped on fresh greens with a citrus dressing, or tossed with roasted veggies for a speedy dinner that’s both satisfying and vibrant.
Q: Where can I find the Sizzling Fajita Grilled Chicken Breasts in Whole Foods stores?
A: You’ll typically find them in the prepared foods section, nestled alongside other marinated and grilled options.They’re a perfect grab-and-go item for busy days when flavor and convenience collide.
Ready to bring the fiesta home? These Sizzling Fajita Grilled Chicken Breasts from Whole Foods USA offer a mouthwatering shortcut to tasty meals bursting with southwestern flair.
In Retrospect
In the vibrant world of flavor-packed meals, these Sizzling Fajita Grilled Chicken breasts from Whole Foods USA stand out as a deliciously convenient way to bring bold, smoky spices right to your table. Whether you’re hosting a casual weeknight dinner or craving a quick,satisfying bite,this ready-to-enjoy option captures the essence of a classic fajita with minimal effort. So next time you want to turn up the heat without turning on every burner, let these vibrant, tender chicken breasts be your secret ingredient to a fiesta of fresh, wholesome taste. Your taste buds-and your schedule-will thank you.
]]>Black bean noodles captivate with their bold heritage and deep umami punch, a dish rooted in East Asian culinary traditions that has transcended borders to delight palates worldwide.Originating from Korea’s iconic jajangmyeon and the rich Chinese zhajiangmian, this savory staple embodies history and culture on every slurp. My first taste was during a bustling Seoul street market visit, where the harmony of fermented black bean sauce and tender wheat noodles created a symphony of flavors that lingered long after the last bite.
Prep and Cook Time
- Preparation: 20 minutes
- Cooking: 25 minutes
- Total: 45 minutes
Yield
Serves 4 hearty portions
Difficulty Level
Medium – perfect for adventurous home cooks eager to master authentic flavors
Ingredients
- 8 ounces fresh wheat noodles (or dried, cooked according to package)
- 3 tablespoons fermented black bean paste (chunjang or douchi-based)
- 2 tablespoons vegetable oil
- 1/2 pound ground pork (optional, for richer umami)
- 1 medium yellow onion, finely diced
- 1 small zucchini, diced
- 1/2 cup diced potato (adds subtle sweetness and texture)
- 3 cloves garlic, minced
- 1 teaspoon ginger, freshly grated
- 1 tablespoon sugar (balances savory depth)
- 1 cup chicken broth (or water for vegan version)
- 1 teaspoon soy sauce
- 1 tablespoon cornstarch, mixed with 2 tablespoons water (for thickening)
- Green onions, thinly sliced (for garnish)
- Julienned cucumber and toasted sesame seeds, optional garnish
Instructions
- Prepare the noodles: Cook the wheat noodles following package instructions until al dente.Drain and rinse briefly under cold water to stop cooking and set aside.
- Sauté aromatics and pork: Heat vegetable oil over medium heat in a large skillet. Add minced garlic and ginger, cooking until fragrant, about 1 minute. Add ground pork and cook until browned, breaking it apart with a spatula.
- Add vegetables: Stir in diced onion, zucchini, and potato. Sauté until softened, about 5-7 minutes, stirring frequently.
- Incorporate black bean paste: Stir in the fermented black bean paste and sugar.Cook for 2-3 minutes to allow the paste to caramelize slightly without burning, enhancing the sauce’s depth.
- Create the sauce base: Pour in chicken broth and soy sauce, bring to a gentle simmer. Cook until the potatoes are tender and the sauce thickens slightly, about 8 minutes.
- Thicken the sauce: Slowly whisk in the cornstarch slurry, stirring constantly until the sauce achieves a luscious, glossy consistency.
- Combine and serve: Toss the cooked noodles thoroughly in the sauce to coat every strand. Serve hot,garnished with sliced green onions,julienned cucumber,and a sprinkle of toasted sesame seeds for contrast and brightness.
Tips for Success
- Fermented black bean paste: Use a quality paste like Korean chunjang for optimal authenticity. Adjust quantity according to your taste preference to avoid overwhelming saltiness.
- Vegetarian adaptation: Swap ground pork with diced tofu or mushrooms for a plant-based twist without sacrificing texture.
- Texture balance: Avoid overcooking noodles; they should remain firm to provide a pleasant bite against the thick sauce.
- Make ahead: Prepare the sauce in advance and refrigerate.Reheat gently,adding a splash of broth to loosen it before tossing with freshly cooked noodles.
Serving Suggestions
Present your black bean noodles on deep bowls to hold the rich sauce beautifully. Complement the dish with crisp side kimchi or pickled radish to cut through the savory richness. A chilled glass of light lager or jasmine tea pairs exceptionally well to cleanse the palate between bites, elevating the overall dining experience.

| Nutritional Info (per serving) | Calories | Protein | Carbohydrates | Fat |
|---|---|---|---|---|
| Black Bean Noodle Delight | 420 kcal | 23 g | 58 g | 9 g |
For more inspiring noodle recipes and authentic Asian cooking techniques, check out our Homemade Noodle Recipes collection. To deepen your understanding of fermented black bean paste and its cultural roots, visit this thorough resource from Encyclopedia Britannica.
Q&A
Q&A: Discover the Rich Flavors of Black Bean Noodle Delight
Q1: what exactly is Black Bean Noodle Delight?
A: Black Bean Noodle Delight is a savory and hearty dish that centers around noodles tossed in a luscious black bean sauce. Originating from East Asian cuisine, this dish harmonizes the deep umami flavors of fermented black beans with fresh vegetables and sometimes tender meats or tofu, resulting in a feast for both the palate and the eyes.
Q2: How does the black bean sauce contribute to the dish’s flavor?
A: The black bean sauce is the soul of this noodle dish. Made from fermented black soybeans, it delivers a rich, slightly salty, and complexly earthy flavor that’s both bold and comforting. This sauce elevates the noodles,creating layers of taste that linger delightfully with every bite.
Q3: What types of noodles are traditionally used?
A: Traditionally, chewy and slightly thick wheat-based noodles are preferred because they hold up well under the dense sauce. However,variations exist using different noodles like udon or even rice noodles,depending on regional preferences and textures desired.
Q4: Are there vegetarian or vegan options available?
A: Absolutely! Black Bean Noodle Delight is incredibly versatile. For a plant-powered version, omit meat and load up on vegetables such as zucchini, mushrooms, carrots, and green onions.Tofu or tempeh can add protein while soaking up the vibrant sauce perfectly.
Q5: What makes this dish stand out from othre noodle recipes?
A: Unlike lighter noodle dishes, Black Bean Noodle Delight embraces boldness. Its depth comes from fermentation, which imparts umami far beyond simple seasoning. The interplay of sweet,salty,and savory notes creates a balanced yet complex experience that transforms humble ingredients into something unforgettable.
Q6: Can Black Bean Noodle Delight be customized to suit different taste preferences?
A: Definitely! You can adjust the heat by adding chili flakes or fresh peppers, tweak sweetness with a drizzle of honey or sugar, or incorporate aromatic garlic and ginger for extra punch. This adaptability means it’s easy to tailor the dish to your unique flavor cravings.
Q7: What occasions are ideal for enjoying this dish?
A: Black Bean Noodle Delight is perfect anytime you crave comfort with a gourmet twist. Whether it’s a quick weeknight meal, a casual dinner party, or a special treat after a long day, its satisfying richness makes it a versatile choice for sharing and savoring.
Q8: How can I start making Black Bean Noodle Delight at home?
A: Begin with sourcing quality fermented black bean paste-this is your flavor foundation.Cook your chosen noodles al dente, stir-fry your vegetables and protein, than combine everything with the black bean sauce. With a little patience and love, you’ll have a restaurant-worthy dish right in your kitchen.
embark on a culinary adventure with Black Bean Noodle Delight-where tradition meets bold flavors and every forkful tells a story of rich heritage and flavorful innovation!
To Conclude
As you journey through the rich flavors of Black Bean noodle Delight, you uncover more than just a meal-you discover a tapestry of tradition, culture, and culinary artistry woven into every bite. Whether enjoyed in a bustling street market or recreated in the comfort of your own kitchen, this dish invites you to savor the bold, hearty essence of fermented black bean sauce paired with tender noodles, fresh vegetables, and savory toppings. So next time hunger calls, let Black Bean Noodle Delight be your flavorful gateway to a world of taste that’s as comforting as it is unforgettable. Dive in, explore, and let your palate celebrate!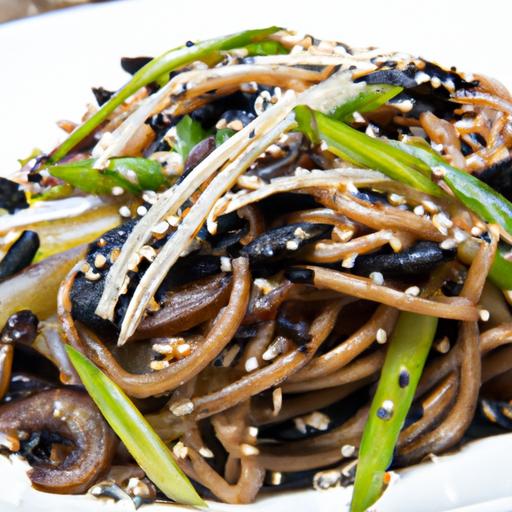
Sweetgreen’s Miso-Glazed Salmon is a delightful harmony of deep umami flavors and vibrant nutrition that effortlessly elevates any meal into a nourishing adventure. Drawing inspiration from Japanese culinary traditions, the sweet-savory miso glaze highlights the salmon’s inherent richness while layering complex notes that awaken the palate. This recipe invites you to balance wholesome ingredients with bold taste, offering an accessible way to recreate Sweetgreen’s signature Power Bowl in your own kitchen.
Prep and Cook Time
Readiness: 15 minutes | Cooking: 12 minutes | Total: 27 minutes
Yield
4 servings
Difficulty Level
medium
ingredients
- 4 salmon fillets, skin-on, about 6 oz each
- 3 tablespoons white miso paste
- 2 tablespoons maple syrup or honey
- 1 tablespoon tamari (or low-sodium soy sauce)
- 1 tablespoon rice vinegar
- 1 teaspoon sesame oil
- 1 clove garlic, minced
- 1 teaspoon fresh ginger, grated
- 2 cups cooked brown rice or quinoa
- 2 cups baby spinach, roughly chopped
- 1 avocado, sliced
- 1 cup edamame, shelled and cooked
- 1 cup shredded carrots
- 2 tablespoons toasted sesame seeds, for garnish
- 2 green onions, thinly sliced, for garnish
Instructions
- Prepare the miso glaze: In a small bowl, whisk together white miso paste, maple syrup, tamari, rice vinegar, sesame oil, garlic, and ginger until silky smooth. Set aside to allow the flavors to meld.
- Marinate the salmon: Pat dry the salmon fillets with paper towels. Gently brush each fillet with half of the miso glaze. Let sit at room temperature for 10 minutes to nurture flavor infusion.
- Preheat your oven: Set to 400°F (200°C). Line a baking sheet with parchment paper or foil for easy cleanup.
- Roast the salmon: Place salmon fillets skin-side down on the prepared sheet. Spoon the remaining miso glaze evenly over the tops. Bake for 10-12 minutes, or until the fish flakes easily with a fork but remains moist inside.
- prepare the bowl base: While the salmon roasts, divide cooked brown rice evenly into four bowls. Arrange the baby spinach, edamame, shredded carrots, and avocado slices beautifully around the rice for a colorful, balanced presentation.
- Assemble and garnish: Place a miso-glazed salmon fillet atop each bowl. Sprinkle with toasted sesame seeds and sliced green onions for a burst of texture and visual appeal.
- Serve: Drizzle a light splash of tamari or fresh lemon juice if desired, and enjoy immediately for the best experience.
Tips for Success
- For a charred finish, broil the salmon for the last 1-2 minutes, keeping a close eye to prevent burning.
- Substitute wild-caught salmon for enhanced flavor and nutrition.
- If miso paste is unavailable, use a blend of tahini and soy sauce paired with a touch of maple syrup to mimic the umami sweetness.
- Make the glaze ahead and store it in an airtight container in the fridge for up to one week-perfect for quick weeknight meals.
- Don’t skip resting the salmon post-cooking for a few minutes; it retains moisture and intensifies flavor.
- Add fresh herbs like cilantro or shiso leaves for an herbaceous lift.
Serving Suggestions
this bowl is a vibrant canvas to express your culinary creativity. Consider serving sweetgreen’s miso-glazed salmon with a side of pickled ginger or toasted nori strips to deepen the umami profile. A sprinkle of crushed peanuts or a drizzle of chili oil can introduce delightful contrasts. Pair with a crisp cucumber salad dressed in rice vinegar for refreshing brightness. This dish shines best when served warm but can also be enjoyed chilled as a nourishing lunchbox treat.
| Nutrient | Per Serving |
|---|---|
| Calories | 520 kcal |
| Protein | 38 g |
| Carbohydrates | 40 g |
| Fat | 18 g |

For more inspired bowl recipes, explore our Wholesome Bowls Guide. To deepen your understanding of miso’s health benefits and culinary origins,visit Britannica’s Miso Overview.
Q&A
Q&A: Sweetgreen’s Miso-Glazed salmon – A Flavorful Power Bowl
Q1: What makes Sweetgreen’s Miso-Glazed Salmon bowl stand out?
A1: Sweetgreen’s Miso-Glazed Salmon bowl is more than just a meal-it’s a harmonious blend of umami-rich miso glaze, tender salmon, and vibrant fresh ingredients that together create a power-packed flavor experience. this bowl balances taste, nutrition, and creativity in every bite, elevating a typical salad into a culinary adventure.
Q2: What are the key ingredients in the Miso-Glazed Salmon bowl?
A2: At its heart, the bowl features succulent salmon fillets glazed with savory miso paste, roasted to perfection. It’s paired with nutrient-dense grains, crisp veggies like cucumber and radish, leafy greens, and often garnished with sesame seeds and scallions for that subtle crunch and fresh zing. The combination fosters both texture and taste harmony.
Q3: How does the miso glaze enhance the salmon?
A3: Miso, a traditional Japanese fermented soybean paste, infuses the salmon with a deep, salty-sweet umami flavor. When caramelized during roasting, the miso glaze creates a glossy, slightly sticky coating that locks in moisture and adds complexity, turning an ordinary piece of fish into a flavor symphony.Q4: Is this bowl suitable for someone looking for healthy options?
A4: Absolutely. The Miso-Glazed Salmon bowl is a prime choice for health-conscious diners. Salmon provides high-quality protein and omega-3 fatty acids essential for heart health, while the bowl’s fresh vegetables supply vitamins, minerals, and fiber. Paired with whole grains, it’s a well-rounded meal supporting sustained energy and wellness.
Q5: Can this bowl fit into specific dietary preferences or restrictions?
A5: This bowl caters well to pescatarians and those seeking balanced, clean eating. It’s naturally gluten-free when made with gluten-free miso and grains, and free from processed additives. For vegans or vegetarians, while the salmon is a key feature, Sweetgreen offers customizable bowls inspired by similar flavor profiles.
Q6: How does Sweetgreen’s approach to bowls like this reflect modern food trends?
A6: Sweetgreen taps into the growing appetite for flavorful, nutrient-dense, and visually appealing meals that are easy on the environment and the body. The Miso-Glazed Salmon bowl embraces global flavors, sustainability by sourcing responsibly, and the rising demand for meals that serve both taste buds and wellbeing.
Q7: Any tips for enjoying or customizing the Miso-Glazed Salmon bowl?
A7: Sure! To amplify the flavors, squeeze a bit of fresh lime or drizzle extra sesame dressing if available. For added texture, toss in some toasted nuts or crunchy seaweed. Those who love spice can add a dash of chili flakes or sriracha. Sweetgreen’s bowls are highly customizable, so tailoring it to your palate is part of the fun.
Q8: Were can one find sweetgreen’s Miso-Glazed Salmon bowl?
A8: The Miso-Glazed Salmon bowl is available at Sweetgreen locations nationwide, often featured seasonally or as a staple in the menu depending on the store.Check Sweetgreen’s app or website for the latest availability and to order this delicious power bowl for delivery or pickup.
Whether you’re a flavor enthusiast or health seeker, Sweetgreen’s Miso-Glazed Salmon bowl is a vibrant, nourishing choice that makes every meal feel like a power-packed celebration of taste and nutrition.
Key Takeaways
In the ever-evolving landscape of health-conscious dining, Sweetgreen’s Miso-Glazed Salmon power bowl stands out as a vibrant testament to the harmony of flavor and nutrition.This bowl isn’t just a meal-it’s a carefully crafted experience where umami-rich miso meets tender, perfectly glazed salmon atop a fresh, nutrient-packed canvas. Whether you’re seeking a midday boost or a satisfying dinner,this power bowl offers a delicious reminder that eating well can be both exciting and effortless. Next time you crave a bowl that balances bold taste with wholesome ingredients, Sweetgreen’s Miso-Glazed Salmon might just become your go-to for a flavorful journey that feeds both body and soul.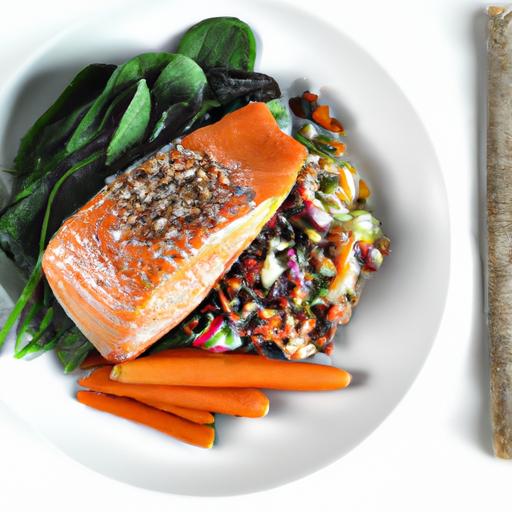
The Nutritional Powerhouse Behind Coconut Chia Pudding
Creamy Coconut Chia Pudding is more than just a luscious treat-it’s a nutrient-dense marvel that combines the wholesome benefits of chia seeds and coconut milk into a velvety dessert or breakfast option. Chia seeds, native to Central America, are tiny nutritional gems packed with omega-3 fatty acids, dietary fiber, and essential minerals like calcium, magnesium, and iron. When soaked in rich coconut milk, they transform into a creamy, satisfying pudding that fuels your body and delights your palate.
What sets this pudding apart is its remarkable texture and versatility, making it an excellent option for anyone embracing wellness without sacrificing indulgence.
Prep and Cook Time
- Prep Time: 10 minutes
- Chill Time: At least 4 hours (or overnight for best results)
- Total Time: Approximately 4 hours 10 minutes
Yield
Serves 4 generous portions
Difficulty Level
Easy – perfect for beginners and seasoned cooks alike
Ingredients
- 1/2 cup organic chia seeds
- 2 cups full-fat coconut milk (shake well before using)
- 2 tbsp pure maple syrup or honey (adjust to taste)
- 1 tsp vanilla extract
- Pinch of fine sea salt
- Optional superfoods and flavor twists: 1 tbsp hemp seeds, 1 tsp spirulina powder, 1 tbsp cacao nibs, or a dash of cinnamon
- Fresh toppings: sliced mango, shredded coconut, berries, toasted nuts, or edible flowers
Instructions
- Combine the base: In a medium bowl, whisk together coconut milk, maple syrup, vanilla extract, and a pinch of sea salt until smooth and well-blended.
- Add chia seeds: Slowly stir in the chia seeds ensuring none clump together. For an ultra-smooth texture, you can briefly blend the mixture (optional).
- Incorporate superfoods: Mix in any desired optional add-ins like hemp seeds or spirulina for enhanced nutrition and unique flavor depths.
- Refrigerate: Transfer the mixture into four serving jars or bowls. Chill uncovered for 30 minutes, then stir thoroughly to break up any settling seeds.
- Final chill: Cover and refrigerate for at least 4 hours or overnight to allow the chia seeds to fully absorb the liquid, achieving that signature creamy pudding consistency.
- Serve with flair: Before serving, top with your favorite fresh fruit, a sprinkle of toasted nuts, or a dusting of cacao nibs for texture and contrast.
Chef’s Notes and tips for Success
- Texture perfection: Stirring the pudding 2-3 times during the first hour of chilling prevents clumps and ensures uniform gelatinous texture.
- Dairy-free swap: Use any plant-based milk like almond or oat for diffrent flavor profiles, but full-fat coconut milk guarantees the creamiest results.
- Sweetener variations: Palm sugar, agave, or stevia can be used, but adjust sweetness to your preference.
- Make-ahead magic: This pudding keeps well for up to 4 days in the fridge, making it an excellent meal-prep choice for busy mornings.
- Boost protein: Add a scoop of collagen powder or plant-based protein powder when mixing the liquid for an extra nutritional punch.
Serving suggestions and Storage tips for Lasting Freshness
Present your creamy coconut chia pudding in clear glass jars or elegant bowls to highlight the silky texture and vibrant toppings. Try layering the pudding with berry compote or mango puree for eye-catching parfaits that awaken your senses. Garnish with toasted coconut flakes, a sprinkle of chia seeds, or fresh mint leaves to elevate the experience visually and flavor-wise.
Store your pudding airtight in the refrigerator to maintain freshness and prevent absorption of other fridge odors. If the pudding thickens too much after a couple of days, simply add a splash of coconut milk and stir to loosen the texture. For traveling or on-the-go, portion into small mason jars with secure lids.
Nutritional Benefits Table
| Nutrient | Per Serving |
|---|---|
| Calories | 250 kcal |
| Protein | 6 g |
| carbohydrates | 18 g (of which 12 g fiber) |
| Fat | 16 g (mostly healthy MCTs) |
For readers eager to dive deeper into the amazing nutrient profile of chia seeds, the Healthline guide on chia seeds offers insightful research-backed benefits.
explore related nourishing recipes like our Healthy Oatmeal Bowl Ideas to keep your mornings vibrant and full of creative, wholesome options.

Q&A
Q&A: Creamy Coconut Chia Pudding – A Healthy Delight Unveiled
Q1: What exactly is creamy coconut chia pudding?
A: Imagine the smooth, velvety texture of coconut milk mingling with tiny, gel-like chia seeds to create a luscious pudding that’s as nourishing as it is indeed delicious. Creamy coconut chia pudding is a simple,plant-based dessert or breakfast treat made by soaking chia seeds in rich coconut milk until they swell and thicken into a creamy,pudding-like consistency.
Q2: Why chia seeds and coconut milk? what makes this combo so special?
A: Chia seeds are tiny nutritional powerhouses packed with omega-3 fatty acids, fiber, and protein. When combined with coconut milk’s natural creaminess and healthy fats, the result is a satisfying, nutrient-dense dish that supports digestion, heart health, and sustained energy. Plus, the tropical flavor of coconut turns every spoonful into a mini-vacation for your taste buds!
Q3: Is creamy coconut chia pudding suitable for special diets?
A: Absolutely! it’s naturally vegan, gluten-free, and dairy-free, making it a perfect fit for a wide range of dietary preferences and restrictions. Whether you’re vegan, lactose intolerant, or simply seeking a wholesome snack, this pudding checks all the boxes.Q4: How do you make creamy coconut chia pudding at home?
A: It’s incredibly easy! Combine chia seeds with coconut milk and a touch of natural sweetener like maple syrup or honey. Stir well, let the mixture rest in the refrigerator for at least 4 hours or overnight, and watch as the chia seeds soak up the liquid to create a creamy, satisfying dessert. Customize with vanilla extract, fresh fruits, nuts, or spices for an extra flavor boost.
Q5: What health benefits can I expect from eating creamy coconut chia pudding?
A: Besides being a delicious treat,this pudding supports digestive health thanks to chia’s fiber content,promotes heart health with omega-3s,and provides steady energy from healthy fats and proteins. Coconut milk also offers lauric acid, known for its antimicrobial properties. Together, these ingredients nourish your body and keep you feeling full and energized.
Q6: Can creamy coconut chia pudding be part of weight management?
A: Definitely! The high fiber and protein content help you feel satiated longer,reducing cravings and unneeded snacking. Plus, it’s naturally low in calories and free from processed sugars (when sweetened mindfully), aligning perfectly with mindful eating habits.
Q7: Are there creative ways to enjoy this pudding beyond just eating it plain?
A: Oh yes! Layer it in parfaits with fresh berries and granola, blend it into smoothies for creaminess, or even use it as a base for healthy dessert tarts. The creamy texture and subtle coconut flavor make it incredibly versatile – a canvas for endless culinary creativity.
Q8: What’s the best way to store creamy coconut chia pudding?
A: Store your pudding in an airtight container in the refrigerator for up to 4-5 days. It thickens over time, so you may wont to stir in a splash of coconut milk before serving to refresh its creamy texture.
Q9: Can I substitute coconut milk with other plant-based milks?
A: You can, but keep in mind coconut milk is what gives this pudding its signature creaminess and tropical flavor. Almond, oat, or soy milk will work, but the texture might be lighter and the flavor less rich.For that authentic creamy coconut experience, sticking with coconut milk is best!
Q10: What’s the takeaway about creamy coconut chia pudding?
A: Creamy coconut chia pudding is not just a trendy superfood snack; it’s a delightful, wholesome dish that nourishes both body and soul. Easy to prepare, customizable, and packed with health benefits, it’s a gentle invitation to embrace wellness with every spoonful.Give it a try-you might just find your new favorite healthy indulgence!
The Conclusion
As the final spoonful of this creamy coconut chia pudding melts on your tongue, you’re left with more than just a delicious flavor – you’re savoring a harmonious blend of nutrition and indulgence. This simple yet satisfying treat proves that healthy eating doesn’t have to be boring or bland. With its luscious texture and nourishing ingredients, creamy coconut chia pudding invites you to embrace a wholesome lifestyle, one delightful bite at a time. So go ahead, let this vibrant pudding inspire your mornings, energize your afternoons, or sweeten your evenings – because wellness tastes best when it feels like a delicious discovery.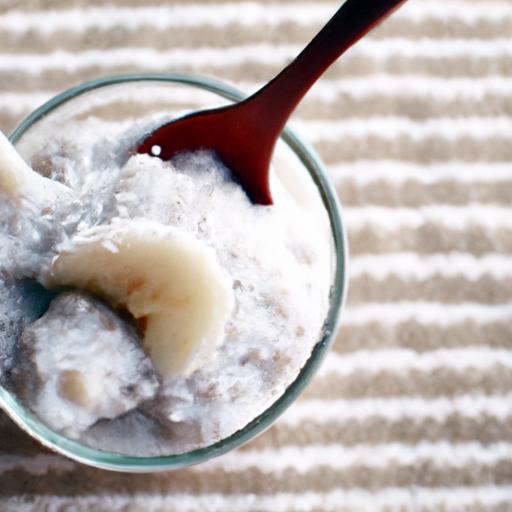
Power-Packed Flourless Banana Pancakes with 40g+ Protein redefine breakfast by combining wholesome ingredients into a vibrant, nourishing start to your day. Rooted in clean eating and grain-free traditions, these pancakes transform simple bananas and protein-rich staples into fluffy, satisfying stacks that fuel your body and delight your taste buds. Whether you’re an athlete, a busy professional, or simply a pancake lover seeking a nutritious twist, this recipe delivers a powerhouse of flavor and energy, all without flour or guilt.
Prep and Cook Time
- Prep Time: 10 minutes
- Cook Time: 10 minutes
- Total Time: 20 minutes
Yield
Serves 2 hearty portions (makes approximately 6 medium pancakes)
difficulty Level
Easy – perfect for beginners and fast weekday mornings.
Essential Ingredients for Maximum Protein and Flavor
- 2 large ripe bananas (for natural sweetness and moisture)
- 4 large eggs (high-quality protein and structure)
- 1 scoop (30g) vanilla whey or plant-based protein powder (adds depth and boosts protein content)
- 2 tbsp almond flour (grain-free base, enhances texture)
- 1 tsp baking powder (for a gentle rise and fluffy consistency)
- 1/2 tsp ground cinnamon (warmth and aroma)
- Pinch of sea salt (balances sweetness)
- 1 tsp vanilla extract (intensifies flavor)
- Coconut oil or avocado oil, for greasing
Crafting the Perfect Protein-Boosted Pancake Batter
Begin by thoroughly mashing the bananas in a mixing bowl until smooth but slightly chunky-it creates a natural sweetness and moist base without any flour. Crack in the eggs, whisking briskly to incorporate air, giving the pancakes a lighter texture. Next, sift in the protein powder, almond flour, baking powder, cinnamon, and salt to ensure even mixing and clump-free batter. Add the vanilla extract last for a fragrant finish.
Combine everything with a spatula or hand mixer until you achieve a thick, slightly elastic batter that holds together when scooped. This batter’s richness, courtesy of eggs and protein powder, means every bite is indulgent yet balanced with natural banana flavor.
Tips for Cooking and Serving High-Protein Banana Pancakes
Heat a non-stick skillet over medium heat and lightly grease with coconut or avocado oil. Pour 1/4 cup spoonfuls of batter onto the pan, leaving space between each pancake. Cook each side for 2-3 minutes or until golden brown spots appear and edges look set. Flip carefully using a thin spatula to maintain the pancake’s delicate structure.
To keep pancakes warm and soft, place them on a baking tray in a low oven (around 90°C / 200°F) while cooking subsequent batches.
Serving Suggestions
- Top with fresh berries,chopped nuts,and a drizzle of pure maple syrup or almond butter.
- For an extra protein hit, add a dollop of Greek yogurt or a spoonful of cottage cheese.
- Sprinkle chia seeds or hemp hearts for added crunch and omega-3 benefits.
- Serve alongside a green smoothie or a glass of your favorite nut milk to round out the meal.
Chef’s Notes: tips for Success
- Ingredient swaps: Use pea or rice protein powder for plant-based alternatives; oat flour can replace almond flour if preferred.
- Consistency check: If batter feels too thick,add a splash of almond milk or water to loosen slightly.
- Flipping finesse: Wait until bubbles form on the batter’s surface before flipping to avoid breaking.
- Make ahead: Batter can be mixed and refrigerated overnight; just stir gently before cooking.
- Storage: Leftover pancakes freeze well; reheat in a toaster or skillet for a quick reprise.
| Nutrient | Per Serving (3 pancakes) |
|---|---|
| calories | 320 kcal |
| Protein | 42g |
| Carbohydrates | 25g |
| fat | 9g |
Elevate your breakfast routine with these power-packed flourless banana pancakes, a nourishing blend of natural ingredients designed to satisfy cravings and fuel your day with more than 40 grams of protein.For more wholesome breakfast ideas,check out our High-Protein Breakfast Recipes. Learn more about the benefits of plant-based proteins at EatRight.org.

Q&A
Q&A: Power-Packed Flourless Banana Pancakes with 40g+ Protein
Q1: What makes these banana pancakes “power-packed”?
A1: These pancakes are not your average breakfast treat-they pack over 40 grams of protein per serving! By using protein-rich ingredients like eggs,Greek yogurt,and a high-quality protein powder,you get a fluffy,flavorful stack that fuels your body and satisfies your hunger for hours.
Q2: Why flourless? isn’t flour essential for pancakes?
A2: Traditional flour provides structure, yes-but these pancakes rely on the natural binding power of mashed bananas, eggs, and protein powder.Eliminating flour makes them gluten-free,lighter on carbs,and frequently enough easier to digest,all while keeping texture and taste on point.
Q3: Can I use any banana for these pancakes?
A3: Ripe bananas are your best friends here! The riper,the sweeter and softer,which means easier mashing and natural sweetness without the extra sugar. Overripe bananas with brown spots are perfect-they add depth of flavor and moisture.Q4: What type of protein powder works best?
A4: Whey or plant-based protein powders both do the trick, but pick one with a neutral or complementary flavor. Vanilla-flavored powders add a nice sweetness and aroma, while unflavored keep things simple. Avoid powders with artificial additives to keep your pancakes clean and wholesome.
Q5: Are these pancakes suitable for meal prep?
A5: Absolutely! They reheat beautifully in a toaster or skillet, making them a great grab-and-go option for busy mornings. Plus, their high protein content keeps you energized, helping you power through your day.
Q6: can I customize these pancakes with add-ins?
A6: Of course! Toss in cinnamon, nutmeg, or a handful of chopped nuts or berries for extra flavor and texture. Just be mindful of added calories if you’re tracking macros, but a little creativity makes breakfast even more enjoyable.
Q7: How do these pancakes fit into a fitness or weight-loss plan?
A7: The notable protein count helps build and repair muscle, supports metabolism, and keeps you feeling full longer. Plus,the natural sugars in banana provide lasting energy without a crash. they’re a balanced choice that supports both performance and healthy eating.
Q8: What’s the secret to getting the perfect pancake texture without flour?
A8: It’s all about mixing gently and letting the batter rest a few minutes so the protein powder hydrates. Cooking on medium-low heat allows the pancakes to cook through without burning. The banana and eggs create a tender, moist crumb that rivals any traditional pancake!
Q9: Can kids enjoy these pancakes too?
A9: Definitely! Kids love the sweet banana flavor and fluffy texture. Plus, it’s a sneaky way to slip extra protein and nutrients into their breakfast. Just adjust portion sizes and toppings to suit their taste.Q10: Where can I find a reliable recipe for these protein-packed flourless banana pancakes?
A10: Look for recipes that balance simple whole-food ingredients with effective protein sources-think ripe bananas, eggs, Greek yogurt, and your favorite protein powder. Many fitness and nutrition blogs offer tested recipes, or you can experiment yourself using these principles!
To Conclude
As you savor the last bite of these power-packed flourless banana pancakes, remember you’re not just indulging in a delicious breakfast treat-you’re fueling your body with over 40 grams of muscle-loving protein and natural, wholesome ingredients. Perfectly balancing taste and nutrition, this recipe transforms ordinary mornings into energizing starts, proving that healthy can be both simple and satisfying. So, next time you crave pancakes, skip the flour and embrace a stack that powers you through busy days and workouts alike. Your taste buds-and your muscles-will thank you!
]]>Crunchy roasted pumpkin seeds with smoky paprika twist unlock an irresistible snack experience that marries bold, smoky warmth with a satisfyingly crisp texture. Once a humble byproduct of jack-o’-lantern carving, pumpkin seeds have transformed into culinary treasures celebrated worldwide for their flavor and nutritional punch. Whether enjoyed during cozy autumn evenings or as anytime munchies, these seeds embody the art of perfect roasting that elevates a simple ingredient into a gourmet delight.
Prep and Cook Time
- Preparation: 10 minutes
- cooking: 25 minutes
- total Time: 35 minutes
Yield
Approximately 2 cups of crunchy roasted pumpkin seeds (serves 4 as a snack)
Difficulty Level
Easy – perfect for beginners and seasoned home cooks alike
Ingredients
- 1 ½ cups raw pumpkin seeds (cleaned and patted dry)
- 2 tablespoons olive oil or avocado oil
- 1 teaspoon smoked paprika (for that signature smoky depth)
- ½ teaspoon garlic powder
- ½ teaspoon sea salt
- ¼ teaspoon ground black pepper
- Optional: pinch of cayenne pepper for a spicy kick
Instructions
- Preheat your oven to 325°F (165°C).Line a baking sheet with parchment paper to prevent sticking and enhance even roasting.
- Prepare the pumpkin seeds: If starting with fresh seeds, rinse thoroughly to remove pulp. Pat dry completely with a kitchen towel-moisture will steam the seeds instead of roasting them, compromising crunchiness.
- Toss the seeds in a medium bowl with olive oil,ensuring each seed is lightly coated for optimum roasting and flavor adherence.
- Sprinkle the smoked paprika, garlic powder, salt, black pepper, and optional cayenne over the seeds. Toss again until the seeds are evenly covered in the vibrant spice blend.
- Spread the seeds in a single layer on the prepared baking sheet.This ensures every seed gets equal heat and crisps up uniformly.
- Roast in the oven for 20-25 minutes, stirring once halfway through. Watch carefully towards the last 5 minutes to prevent burning; the seeds should turn a golden brown with a tantalizing smoky aroma.
- Remove from the oven and let cool completely on the pan-the seeds will continue to crisp as they cool.
- Transfer to an airtight container for storage. enjoy promptly for peak crunch, or keep for up to a week as a flavorful, nutritious snack.
Tips for Success
- Dry seeds thoroughly: Any remaining moisture will steam them,resulting in soggier seeds. Use paper towels or a clean cloth to get them bone dry.
- Use smoked paprika: This is your flavor hero! It imparts the smoky depth that turns ordinary seeds unusual.
- Uniform single layer: Avoid overlapping seeds on the baking sheet; crowding causes uneven cooking.
- Adjust roast time by seed size: If the seeds are particularly large, add 3-5 extra minutes, but watch closely to avoid burning.
- Make-ahead option: Roast extra batches and keep them in sealed jars. They make perfect pantry snacks or garnishes.
Creative Serving Ideas to elevate Your Smoky Pumpkin seed Treats
These crunchy roasted pumpkin seeds with smoky paprika twist are a versatile snack that can enhance your meals or snack routines in inspired ways.Here are some delicious suggestions:
- Salad topper: Sprinkle over mixed greens with grilled chicken for textural contrast and flavor boost.
- Trail mix booster: Combine with dried cranberries, dark chocolate chips, sunflower seeds, and nuts for a wholesome trail mix.
- Soups and stews: Garnish creamy pumpkin or roasted tomato soup with a sprinkle for crunch and smoky flair.
- Breakfast boost: Add to oatmeal or yogurt bowls along with fresh fruit for a tantalizing crunch.
- Baked goods: Fold into cornbread or savory muffins for a pleasant surprise of texture.
| Nutritional Info (per ¼ cup) | Amount |
|---|---|
| Calories | 180 |
| Protein | 9g |
| Carbohydrates | 5g |
| Fat | 14g |
For more tips on homemade roasted snack recipes, check out our detailed guide on DIY Spiced Nuts and Seeds. Discover the science behind roasting techniques and spice blends that bring out maximum crunch and flavor.
Understanding the rich nutritional benefits and culinary versatility of pumpkin seeds helps you appreciate them beyond a mere snack. According to Healthline, pumpkin seeds are packed with magnesium, zinc, and healthy fats that support heart and bone health. Elevate your homemade crunchy roasted pumpkin seeds with smoky paprika twist today, and savor a snack that is as nourishing as it is indeed delicious.

Q&A
Q&A: Crunchy Roasted Pumpkin Seeds with Smoky Paprika Twist
Q1: Why should I consider roasting pumpkin seeds instead of buying pre-packaged snacks?
A1: Roasting pumpkin seeds at home allows you to tailor the flavors, control the salt and oil, and enjoy a fresher, crunchier snack. Plus, it’s a clever way to reduce food waste after carving a pumpkin!
Q2: What makes the smoky paprika twist special in this recipe?
A2: The smoky paprika adds a warm, earthy depth that transforms plain pumpkin seeds into an irresistibly savory treat. It’s like a campfire hug in every bite-smoky, slightly sweet, and just the right amount of spice.
Q3: How do I prepare pumpkin seeds for roasting? Do I need to wash or dry them first?
A3: Absolutely! Start by rinsing the seeds under cold water to remove pumpkin pulp. Spread them out on a clean towel or baking sheet to dry thoroughly-this helps them roast up crispy rather than soggy.
Q4: What’s the secret to getting my roasted pumpkin seeds extra crunchy?
A4: Dry seeds,high oven temperature (around 350°F/175°C),and stirring halfway through roasting are key. Also, don’t overcrowd the pan-give each seed some breathing room for even crisping.
Q5: Can I make this recipe vegan and gluten-free?
A5: Definitely! Pumpkin seeds are naturally vegan and gluten-free. Just use plant-based oil like olive or avocado oil for roasting, and confirm your paprika is pure and free from additives.
Q6: How long do these roasted pumpkin seeds keep their crunch?
A6: Stored in an airtight container at room temperature, they stay crunchy for up to two weeks. If you want to keep them even longer, refrigerate to maintain freshness.
Q7: Any creative serving ideas for crunchy smoky paprika pumpkin seeds?
A7: Sprinkle them over salads, mix into trail mix, or use as a garnish for soups and roasted veggies. They also make a bold, healthy snack on their own-perfect for movie night or midday fuel.
Q8: Can I experiment with other spices besides smoky paprika?
A8: Absolutely! Try cumin and chili powder for a southwest vibe, curry powder for an exotic touch, or even cinnamon and cayenne for a sweet-heat combo. The possibilities are endless-get crunchy,get creative!
The Conclusion
Whether you’re seeking a nutritious snack to power your afternoon or a flavorful appetizer to impress guests,these Crunchy Roasted Pumpkin Seeds with a Smoky Paprika Twist deliver in every bite. Their perfect balance of earthy crunch and smoky warmth makes them not only a tasty treat but also a versatile addition to your pantry. Next time you carve a pumpkin, save those seeds and transform them into this addictive snack-your taste buds will thank you, and you’ll rediscover just how exciting simple ingredients can be. Happy roasting!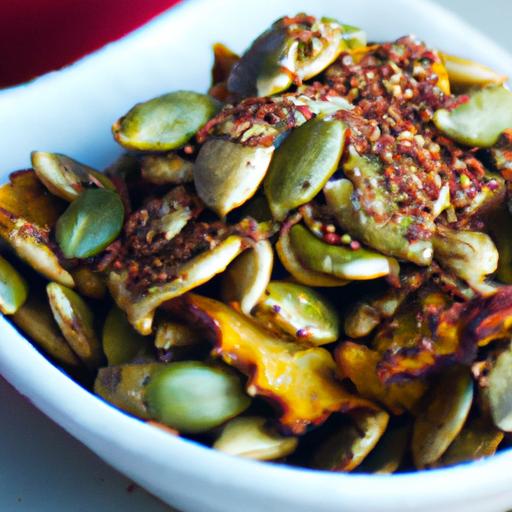
Choosing the Perfect Wild Rice for Maximum Flavor
Savor the Comfort with every spoonful by starting your soup with the best wild rice available. Wild rice isn’t just a grain; it’s a flavor powerhouse with a nutty,earthy aroma that deepens the overall taste of your dish. when selecting wild rice, opt for whole, unprocessed grains rather than pre-cooked or instant varieties. These maintain their chewy texture and complex flavor once cooked. Black or Canada wild rice varieties are especially prized for their robust, smoky undertones, perfect for anchoring a hearty mushroom soup.
Rinse your wild rice thoroughly under cold water to remove any debris, then soak it for at least 30 minutes to reduce cooking time – this step ensures tender, yet distinct kernels that burst with flavor.
Mushroom Varieties that Elevate Your Soup Experience
The star of this soup is the melding of wild rice with earthy mushrooms that bring umami depth and velvety richness. for maximum flavor, choose a mix of mushrooms – this adds complexity and visual appeal. Cremini mushrooms offer a mild, woodsy base, while shiitake brings a meaty, intense savoriness. Oyster mushrooms lend a delicate texture, and dried porcini rehydrates into an aromatic elixir infusing your broth with mushroom magic.
Cleaning your mushrooms gently with a damp cloth preserves their texture and flavor, avoiding waterlogging. Slice thicker mushrooms into bite-sized pieces to ensure every spoonful bursts with a meaty bite.
Crafting the Richest Broth with Simple Ingredients
The heart of any soulful soup is its broth. Here, simplicity reigns to let natural flavors shine. Start by sautéing fresh garlic, shallots, and onions in a drizzle of olive oil until translucent and fragrant. Deglaze with a splash of dry white wine or sherry to add a subtle tang and lift the mushroom aromas. Adding vegetable or chicken stock provides deep savoriness – homemade or low-sodium store-bought works beautifully.
For an added layer of richness, a small knob of unsalted butter swirled in at the end brings silkiness without overpowering. Fresh herbs like thyme and bay leaf steep in the simmering broth, releasing woodsy, aromatic notes that harmonize with the earthy wild rice and mushrooms.
Tips for Serving and storing Your Hearty Wild Rice and Mushroom Soup
This robust soup is perfect for cozy evenings or impressive enough to serve guests seeking comfort in a bowl. Ladle it into rustic bowls and garnish with freshly chopped parsley or chives,a drizzle of truffle oil,or a sprinkle of freshly grated Parmesan for an elegant finishing touch. Crusty artisan bread or a warm slice of sourdough makes a lovely accompaniment to soak up every flavorful drop.
To store,transfer cooled soup into airtight containers and refrigerate for up to 4 days. The flavors deepen over time, making leftovers even more satisfying. This soup also freezes exceptionally well – portion into freezer-safe containers and thaw overnight in the fridge before reheating gently on the stovetop. Avoid boiling to preserve texture.
Prep and cook Time
- Preparation: 20 minutes
- Cooking: 1 hour 10 minutes
- Total Time: 1 hour 30 minutes
Yield
Serves 6 hearty bowls
Difficulty Level
Medium – perfect for home cooks looking to deepen their kitchen confidence with a rewarding, layered soup.
Ingredients
- 1 cup wild rice, rinsed and soaked for 30 minutes
- 2 tablespoons olive oil
- 1 small yellow onion, finely chopped
- 3 cloves garlic, minced
- 8 ounces cremini mushrooms, sliced
- 4 ounces shiitake mushrooms, stems removed and sliced
- 2 ounces dried porcini mushrooms, soaked in ½ cup hot water
- 6 cups vegetable stock (or chicken stock)
- ½ cup dry white wine (optional)
- 2 sprigs fresh thyme
- 1 bay leaf
- Salt and freshly ground black pepper, to taste
- 2 tablespoons unsalted butter
- Fresh parsley, chopped for garnish
- Truffle oil or grated Parmesan, optional garnish
Instructions
- Prepare the wild rice: drain soaked wild rice, then place it in a pot with 3 cups water. Bring to a boil, reduce heat to simmer, cover, and cook until the grains are tender but not mushy, about 45-50 minutes. Drain excess water and set aside.
- Sauté aromatics: while the rice cooks,heat olive oil over medium heat in a large pot. Add chopped onion and garlic, cooking until translucent and fragrant, about 5 minutes.
- Cook mushrooms: Add cremini, shiitake, and rehydrated porcini mushrooms (including soaking liquid, strained through a fine sieve) to the pot.Sauté until golden brown and their juices evaporate, approximately 8-10 minutes, stirring occasionally.
- Deglaze and build broth: Pour in white wine if using, and let it reduce by half. Add vegetable stock, thyme sprigs, and bay leaf. Bring to a simmer and cook for 20 minutes, allowing flavors to meld.
- Add cooked wild rice: Stir in the prepared wild rice and simmer for another 10 minutes.Season generously with salt and pepper to taste.
- Finish with butter: Remove thyme and bay leaf. Stir in butter to enrich and balance the flavors with creamy silkiness.
- Serve and garnish: Ladle soup into bowls. Garnish with chopped parsley and a drizzle of truffle oil or sprinkle Parmesan if desired.
Chef’s Notes
- For a vegan version, omit butter or substitute with a plant-based choice.
- Try adding a splash of soy sauce or tamari to amplify umami depth.
- Using leftover cooked wild rice saves time-just add it during the last 10 minutes of simmering.
- The soup thickens as it cools; reheat gently with a splash of broth or water to loosen.
- Make-ahead tip: Prepare base broth and sautéed mushrooms in advance; combine and finish with rice just before serving.
Serving Suggestions
Enjoy this hearty wild rice and mushroom soup with a side of warm crusty bread. A simple green salad dressed with lemon vinaigrette complements the earthy flavors beautifully. For extra comfort, serve with a dollop of sour cream or a sprinkling of toasted pine nuts for texture contrast.
| Nutritional Information (per serving) | Calories | Protein | Carbs | Fat |
|---|---|---|---|---|
| Wild Rice & mushroom Soup | 250 kcal | 7 g | 40 g | 6 g |

Discover more ways to elevate your soups by visiting our Ultimate Mushroom Soup Guide and for deep insights on wild rice nutrition, see this USDA nutrition resource.
Q&A
Q&A: Savor the Comfort – Hearty Wild Rice & Mushroom Soup Recipe
Q1: What makes this wild rice and mushroom soup so comforting?
A1: this soup is a perfect harmony of earthy mushrooms and nutty wild rice, simmered slowly to develop deep, warming flavors. The creamy broth wraps around every spoonful like a cozy blanket, making it ideal for chilly days or whenever you crave a nurturing meal.
Q2: Can I use any type of mushrooms for this recipe?
A2: Absolutely! While cremini or button mushrooms work well, wild varieties like shiitake, oyster, or porcini can elevate the earthiness of the soup. Combining a mix adds texture and complexity, turning every bite into a foresty delight.
Q3: Is wild rice difficult to cook compared to regular rice?
A3: Wild rice does take a bit longer to cook-usually about 45-50 minutes-but it’s well worth the wait. Its chewy texture and unique nutty aroma add character that ordinary rice can’t match.Pre-soaking the wild rice can help reduce cooking time if you’re short on patience.
Q4: how can I make this soup vegan or dairy-free?
A4: To keep it plant-based, swap out butter for olive oil or vegan butter, and use coconut cream or cashew cream instead of dairy cream. Nutritional yeast can add a cheesy depth without dairy, enhancing the soup’s savoriness.
Q5: What are some great toppings or garnishes to add?
A5: Fresh herbs like thyme,parsley,or chives bring vibrant freshness.A drizzle of truffle oil can add a luxurious aroma, while toasted pumpkin seeds or crispy shallots contribute delightful crunch. A sprinkle of freshly ground black pepper seals the deal.Q6: Can I prepare this soup ahead of time?
A6: Yes! This soup tastes even better the next day as the flavors meld. Store it in an airtight container in the fridge for up to 3 days. When reheating, add a splash of broth or water to revive its creamy consistency.
Q7: What dishes pair well with this hearty soup?
A7: Crusty artisan bread or garlic herb focaccia are brilliant for dipping. A crisp green salad with a tangy vinaigrette offers a refreshing contrast. For a fuller meal, serve alongside roasted root vegetables or a light apple and walnut slaw.
Q8: Why choose wild rice over other grains in this recipe?
A8: Wild rice brings a distinctive chewy bite and smoky undertone that complements mushrooms beautifully. Unlike white rice,its robust flavor adds substance and texture,turning a simple soup into a soulful,satisfying bowl.
Q9: How can I make this recipe gluten-free?
A9: This soup is naturally gluten-free as long as you use gluten-free broth. double-check any added ingredients like soy sauce or seasonings to ensure they don’t contain hidden gluten.
Q10: Any tips for perfectly balancing flavors in the soup?
A10: Take your time sautéing the mushrooms to caramelize them slowly; this step builds rich umami depth. Season gradually and taste often-wild rice and mushrooms absorb salt differently. A splash of acid,such as lemon juice or a dash of white wine vinegar at the end,brightens the entire dish beautifully.
Enjoy your journey into this bowl of comfort – hearty,wholesome,and utterly soul-satisfying!
To Conclude
As the steam rises from your bowl of hearty wild rice and mushroom soup,you’re not just savoring a meal-you’re embracing a moment of comfort and nourishment,crafted from nature’s earthiest flavors. This recipe invites you to slow down, appreciate the rich textures, and relish the warmth that only a well-made soup can provide. Whether enjoyed on a chilly evening or as a wholesome centerpiece to your weeknight dinner, this comforting blend of wild rice and mushrooms is proof that simple ingredients, when combined with care, can create something truly soul-satisfying. So next time you crave both flavor and comfort,let this soup be your go-to embrace in a bowl.
How long to cook cod for flaky fish starts with understanding the perfect cut,precise oven control,and timing-keys to unlocking a tender,flaky texture that melts on your tongue. Cod’s mild flavor and firm white flesh make it a versatile canvas, but selecting the ideal piece and respecting its delicate nature transforms a simple bake into an unforgettable dish. Whether you’re inspired by coastal cuisines or seeking the perfect family dinner, mastering these elements will give you confident, restaurant-quality results every time.
Prep and Cook Time
- Readiness: 10 minutes
- Cooking: 12-15 minutes
- Total Time: 22-25 minutes
Yield
- Serves 4
Difficulty Level
- Easy – Perfect for beginner and intermediate home cooks
Ingredients
- 4 cod fillets, each about 6 oz, skin removed
- 2 tbsp extra-virgin olive oil
- 1 lemon, zested and juiced
- 2 garlic cloves, minced
- 1 tsp sea salt
- ½ tsp freshly ground black pepper
- 1 tbsp fresh dill, finely chopped
- 1 tbsp fresh parsley, chopped
Instructions
- Choose Your Cod Cut: Select uniformly sized fillets to ensure even cooking. Thicker cuts (around 1 inch) hold moisture best without drying out.
- Preheat the oven: Set your oven to 400°F (200°C), a sweet spot that cooks cod quickly while preserving its delicate texture.
- Prepare the marinade: In a small bowl, whisk olive oil, lemon zest and juice, garlic, salt, and pepper. This mixture will keep your fish moist and impart bright, fresh flavors.
- Brush fillets with marinade: Place fillets in a shallow baking dish and generously coat each with the marinade on both sides.
- Let it rest: Allow the fish to sit for 5 minutes so flavors penetrate and the cod firms slightly for better texture.
- Bake the cod: Place in the preheated oven and bake for 12-15 minutes. avoid opening the oven frequently to maintain heat and ensure consistent cooking.
- Check doneness early: Start testing at 12 minutes. The cod should be opaque and flake easily with a gentle nudge of a fork.
- Remove and garnish: Once flaky but still moist, remove from oven and sprinkle fresh dill and parsley on top. Serve immediately for best texture.
Tips for Success
- Cod cut preference: If your cod fillets vary in thickness, cut the thicker ones in half horizontally for even baking.
- Oven calibration: Use an oven thermometer to verify your actual baking temperature; oven dials can be inaccurate.
- Test doneness carefully: Instead of pressing hard, gently pull the flesh apart with a fork at the thickest point-overcooking results in dry, chalky fish.
- Make ahead: Marinate cod fillets up to 30 minutes before baking to deepen flavor without breaking down the fish.
- Ingredient swaps: Swap fresh dill with tarragon or basil for a different herbal twist.
- Texture tips: Rest cooked cod for 2 minutes before serving to let residual heat finish cooking and fibers relax.
Serving Suggestions
Plate your perfectly baked cod on a bed of creamy mashed potatoes or herbaceous quinoa salad. Drizzle with extra virgin olive oil or a splash of fresh lemon juice to add brightness. Garnish with thin lemon slices, additional fresh dill, and a sprinkle of flaky sea salt to heighten the sensory experience. Pair with steamed asparagus or roasted cherry tomatoes for a vibrant,balanced meal.

| Nutrient | Per Serving |
|---|---|
| Calories | 220 |
| Protein | 30g |
| Carbohydrates | 1g |
| Fat | 9g |
For a deeper dive into seafood baking techniques, explore our Guide to Baking Fish, and consult the Food and Agriculture Organization for expert insights on seafood preparation here.
Q&A
Q&A: The perfect Bake – How Long to Cook Cod for Flaky Fish
Q: Why is cod such a popular choice for baking?
A: Cod’s mild flavor and tender, flaky texture make it a superstar in the kitchen. It’s versatile, absorbs marinades beautifully, and bakes quickly-perfect for both a weeknight dinner or an elegant meal.
Q: How do I no when cod is perfectly baked?
A: When cod flakes easily with a fork yet remains moist and opaque, you’ve nailed it. Overcooked cod turns rubbery and dry, so timing is key to that perfect, delicate flake.
Q: What’s the ideal baking temperature for cod?
A: A moderate oven at around 375°F (190°C) is your best bet. This temperature cooks the fish evenly without drying it out, giving you tender flakes every time.
Q: How long should I bake cod fillets?
A: For standard cod fillets about 1-inch thick, plan on 12 to 15 minutes. Thinner pieces may only need 8 to 10 minutes, while thicker cuts could require up to 20 minutes. The rule of thumb: bake 10 minutes per inch of thickness!
Q: Does marinating or seasoning affect baking time?
A: While marinating enhances flavor and moisture, it won’t significantly extend cooking time. Though, acidic marinades (like lemon or vinegar-based) can slightly “cook” the fish beforehand, so keep an eye on it to avoid overcooking.
Q: Should I cover the cod while baking?
A: Covering with foil creates steam, keeping the fish moist but can soften any crispy toppings or skin. For a delicate, flaky texture with a touch of crust, bake uncovered. You can tent foil loosely if you want extra moisture without losing that slight crispness.
Q: Can I bake cod from frozen? How does that change timing?
A: Yes! When baking from frozen, add about 5 to 8 minutes to the baking time and bake covered to prevent the dryness.Just make sure it reaches the same flaky, opaque consistency before serving.
Q: Are there any tips to enhance the flakiness of baked cod?
A: Absolutely! Pat the fish dry before seasoning to avoid steaming, and resist the urge to flip during baking. Let the heat work its magic undisturbed for the most tender flakes.
Q: What’s the internal temperature for perfectly baked cod?
A: Aim for an internal temperature of 135°F to 140°F (57°C to 60°C). This range ensures the cod is cooked through but still juicy and flaky.
Q: Any final secret to the perfect baked cod?
A: Let your cod rest for a couple of minutes after taking it out of the oven. This brief pause lets the juices redistribute, giving you that melt-in-your-mouth texture you crave.
Baking cod to flaky perfection isn’t rocket science-it’s all about timing,temperature,and a little patience. With these tips, your cod will come out of the oven every time as a flavorful, flaky masterpiece!
Closing Remarks
Mastering the art of cooking cod to flaky perfection is less about guesswork and more about timing and technique. With the right cooking time-whether you’re baking, steaming, or pan-searing-you can unlock cod’s delicate texture and subtle flavor every time. Remember, a few extra minutes can turn tender, flaky fish into a dry disappointment, so keep a close eye on that timer. Armed with these tips,you’re now ready to bring perfectly cooked cod to your table,making every bite a testament to culinary precision and simple,savory delight. Happy cooking!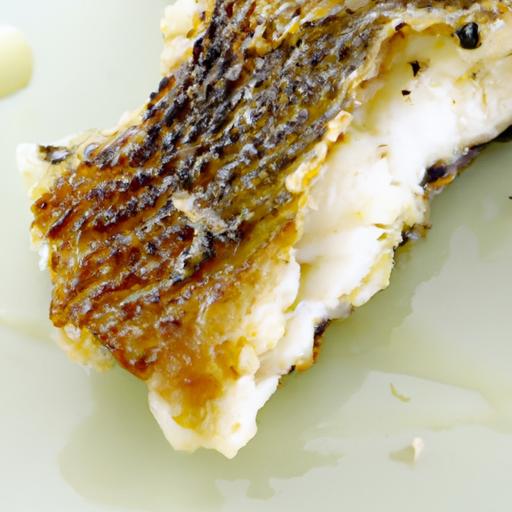
Crispy & Juicy: Mastering Air Fryer Grilled Chicken
Crispy & Juicy: Mastering Air fryer Grilled Chicken brings the best of both worlds-crispy, golden skin paired with tender, flavorful meat-right into your kitchen without the hassle of outdoor grilling. Inspired by classic barbecue techniques and elevated by modern air fryer magic, this method ensures that each bite bursts with savory delight and unbeatable texture.
Choosing the Perfect Chicken Cuts for Ultimate crispiness
Begin your journey by selecting chicken cuts that naturally lend themselves to crispiness and juiciness. bone-in, skin-on options like chicken thighs or drumsticks develop a rich, caramelized exterior while retaining moisture inside. The skin acts like a natural barrier, crisping beautifully when air fried and locking in flavorful juices.
For a leaner option, split chicken breasts with skin also work well but require careful marination and precise cooking to avoid drying out. Avoid boneless, skinless pieces if ultimate crispiness is your goal-they tend to dry and lack the textural contrast we crave.
marinating Magic Unlocking Juicy Flavors in Every Bite
A vibrant marinade is essential to infuse deep flavors and tenderize the meat. Consider a blend of olive oil, lemon juice, garlic, smoked paprika, and a hint of cayenne for an exciting, smoky heat. The oil helps with crisping, while the acid tenderizes, giving each bite a luscious, juicy quality.
For best results, marinate your chicken for at least 2-4 hours, or overnight if possible, covered and refrigerated. This step not only builds layers of flavor but also prepares the skin to crisp beautifully when air fried.
Setting Your Air Fryer for Ideal Heat and Timing
The magic of this technique lies in the air fryer settings. Start by preheating your appliance to 400°F (204°C). This high heat jumpstarts the Maillard reaction, creating that signature golden crust.
Arrange the chicken in a single layer without overcrowding-air circulation is key to crispiness.Cook for about 22-25 minutes, flipping halfway to ensure even browning. Depending on your air fryer model, adjust time slightly but watch closely near the end to avoid drying out.
Pro Tips for Achieving That Authentic Grilled Texture and Taste
Create authentic grilled flavor by incorporating subtle smoky and charred notes. Adding a small amount of liquid smoke to your marinade can replicate grill smokiness, or briefly finishing the cooked chicken under a broiler for 1-2 minutes adds a delicate charred touch.
Lightly patting the skin dry before marinating and air frying ensures crispiness, while a quick spritz of oil midway through cooking encourages even browning. rest your chicken for 5 minutes after air frying to seal juices and maximize tenderness.
Prep and Cook Time
- Prep: 15 minutes (plus 2-4 hours marinating)
- Cook: 22-25 minutes
- Total: Approximately 2.5 to 4.5 hours including marination
Yield
Serves 4 hungry guests
Difficulty level
easy to Medium – Perfect for home cooks aiming for restaurant-quality grilled chicken without the grill
Ingredients
- 4 bone-in, skin-on chicken thighs (about 1.5 lbs)
- 3 tbsp extra virgin olive oil
- 2 tbsp freshly squeezed lemon juice
- 4 cloves garlic, minced
- 1 tsp smoked paprika
- ½ tsp cayenne pepper (adjust to taste)
- 1 tsp kosher salt
- ½ tsp freshly ground black pepper
- ½ tsp dried thyme
- Optional: 1 tsp liquid smoke (for smoky flavor)
Instructions
- Prepare the marinade: In a medium bowl, whisk together olive oil, lemon juice, minced garlic, smoked paprika, cayenne pepper, salt, black pepper, thyme, and liquid smoke if using.
- Pat chicken dry: Use paper towels to remove excess moisture from chicken skin for optimum crispiness.
- Marinate: Place chicken thighs in a zip-top bag or a shallow dish. Pour marinade over and coat evenly.Seal or cover and refrigerate for 2-4 hours, preferably overnight.
- Preheat the air fryer: Set to 400°F (204°C) and let it come to temperature while you prep the chicken.
- Arrange chicken: Place thighs skin-side down in the air fryer basket in a single layer without overlapping.
- Cook: Air fry for 12 minutes, then flip the chicken to skin-side up and cook for another 10-13 minutes until skin is crisp and the internal temperature reaches 165°F (74°C).
- Optional broiling: For extra char, place chicken under the broiler for 1-2 minutes, watching carefully to avoid burning.
- Rest and serve: Let chicken rest on a wire rack for 5 minutes to redistribute juices before plating.
Tips for Success
- Don’t overcrowd: cook in batches if necessary to maintain proper airflow and crisp texture.
- Experiment with spice blends: Try cumin, coriander, or sumac for different flavor profiles.
- Make ahead: Marinate the chicken the night before to deepen flavor and streamline cooking day.
- Check doneness: use a meat thermometer to avoid overcooking and dryness.
- Oil spritz: Lightly spritz chicken with oil halfway through air frying for even crisping.
Serving Suggestions
This chicken shines alongside a vibrant, crunchy slaw or a refreshing cucumber yogurt salad to cut through richness.Garnish with fresh chopped parsley or cilantro and a squeeze of lemon for brightness. Serve with fluffy couscous or grilled vegetables for a complete, colorful plate perfect for sharing.

| Nutrient | Per Serving |
|---|---|
| Calories | 320 kcal |
| Protein | 28 g |
| carbohydrates | 1.5 g |
| Fat | 22 g |
Discover more on how to elevate your home-cooked meals in our Ultimate Grilled Chicken Marinades Guide, or explore Serious eats’ expert insights on air frying chicken for advanced techniques that guarantee success every time.
Q&A
Q&A: Crispy & Juicy – Mastering Air Fryer Grilled Chicken
Q1: Why use an air fryer for grilled chicken rather of a traditional grill?
A1: Air fryers offer a perfect marriage of convenience and flavor.Unlike traditional grills, they deliver intense, even heat with circulating hot air, creating that signature crispy exterior while locking in juicy tenderness-all without the need for charcoal, open flames, or inclement weather worries. it’s grilling magic in a compact countertop appliance!
Q2: How do I achieve the perfect crispy skin without drying out the chicken?
A2: The secret lies in balance and planning. Start by patting your chicken dry to remove excess moisture-this is key for crispiness. A light coating of oil (olive, avocado, or even a spritz of cooking spray) helps promote that golden-brown crunch. Temperature matters too: air fry at around 375°F for skin-on pieces, ensuring the skin crisps up while the interior stays juicy and tender.
Q3: What’s the best way to season air fryer grilled chicken?
A3: Think layers of flavor. Begin with a simple brine or marinade to infuse moisture and seasoning deep into the meat. Then, apply a rub packed with aromatic spices-smoky paprika, garlic powder, cumin, and a touch of brown sugar work wonders.Don’t forget salt and pepper; they’re the foundation of flavor. The air fryer crisps the seasoned exterior, creating a flavor-packed crust.
Q4: Can boneless chicken breasts be as juicy as bone-in pieces when air fried?
A4: absolutely! Boneless breasts can be incredibly juicy when handled right. The trick? Don’t overcook them. Use an instant-read thermometer to pull the chicken at about 160°F (it will rise to 165°F resting). Consider pounding the breasts to an even thickness for uniform cooking and marinating beforehand to boost moisture retention.
Q5: How do I prevent the chicken from sticking to the air fryer basket?
A5: A little prevention goes a long way. Lightly oiling the air fryer basket or lining it with perforated parchment paper designed for air fryers can help. Also, give your chicken a thin coating of oil; this not only promotes crispiness but acts as a natural non-stick agent. Avoid overcrowding to ensure airflow and easy release.
Q6: Is it necessary to flip the chicken during cooking?
A6: For even browning and crispiness, flipping midway through cooking is recommended. This allows both sides to get direct exposure to the circulating hot air, ensuring balanced texture and color. However, thinner cuts like tenders may cook evenly without flipping-just keep an eye on them.
Q7: What sides pair best with air fryer grilled chicken?
A7: The juicy, crispy nature of air fryer grilled chicken pairs beautifully with a variety of sides. Consider vibrant, crunchy salads with tangy dressings to cut through richness, roasted or air-fried veggies for complementary textures, or creamy mashed potatoes for ultimate comfort. Grains like quinoa or couscous with fresh herbs can round out a well-balanced meal.
Q8: can I reheat air fryer grilled chicken without losing its crispiness?
A8: Yes! Reheating in the air fryer at a lower temperature (around 300°F) for 3-5 minutes refreshes the crispy exterior without drying out the juicy interior. Steer clear of microwave reheating, which tends to make the skin soggy and the meat rubbery.
Mastering air fryer grilled chicken isn’t just about cooking-it’s about creating that crave-worthy combination of crispy skin and juicy meat in your own kitchen. With these tips,you’re well on your way to grilled chicken glory anytime!
in summary
As you close your air fryer door and wait for that irresistible sizzle to fade into perfectly crisped,juicy grilled chicken,remember that mastering this art is all about balancing heat,time,and seasoning. With each attempt, you’ll unlock new levels of flavor and texture-crispy on the outside, tender and succulent on the inside. So grab your favorite spices, prep your chicken with care, and let your air fryer do the magic. The journey to mouthwatering, guilt-free grilled chicken has never been this simple or satisfying. Happy cooking and even happier eating!