Banana Pudding Bliss: Creamy Layers with Crunchy Wafers
Banana Pudding Bliss combines the luscious silkiness of homemade pudding with the irresistible crunch of perfectly chosen wafers, creating a dessert that feels both nostalgic and indulgently fresh.This classic Southern treat is elevated with expert layering and texture contrast,making each spoonful a journey of creamy decadence punctuated by crisp,buttery wafers. The magic lies in balancing flavors and textures to deliver a dreamy mouthfeel that captures the heart of any dessert lover.
Prep and Cook Time
- Prep: 20 minutes
- Cook: 15 minutes
- Chill Time: 3 hours (recommended for best texture)
Yield
Serves 8 generous portions
Difficulty Level
Easy to Medium
Ingredients
- 4 cups whole milk
- 3/4 cup granulated sugar
- 1/3 cup cornstarch
- 4 large egg yolks
- 2 teaspoons pure vanilla extract
- 5 large ripe bananas, sliced thinly
- 12 oz vanilla wafer cookies (choose wafer options below)
- Pinch of salt
Instructions
- Heat the milk: In a medium saucepan, warm 3 1/2 cups of milk over medium heat until just simmering. Stir occasionally to prevent scorching.
- Mix dry ingredients: In a separate bowl, whisk together sugar, cornstarch, and salt.
- Combine egg yolks: Lightly beat the egg yolks, then slowly add the remaining 1/2 cup milk, stirring continuously.
- Temper and thicken: Gradually add a ladle of hot milk to the egg mixture to temper, then return everything to the saucepan.
- Cook pudding: Stir constantly over medium heat until the mixture thickens and comes to a gentle boil, about 6-8 minutes. Remove from heat and stir in the vanilla extract.
- Cool pudding: Pour into a clean bowl, cover the surface with plastic wrap to prevent skin formation, and chill for at least 1 hour.
- Choose wafers wisely: Opt for sturdy vanilla wafers with a crisp texture that can hold up under moist pudding without sogginess-recommendations include King’s Hawaiian vanilla crisp wafers or homemade thin butter wafers.
- Assemble layers: In your serving dish, start with a layer of pudding, then add sliced bananas, followed by a generous scattering of wafers for maximum crunch.
- Repeat layering: Continue layering pudding, bananas, and wafers, finishing with a topping of wafers to maintain crispiness on the top.
- chill again: Refrigerate the assembled pudding for at least 2 more hours before serving, allowing flavors to meld without sacrificing wafer crunch.
Tips for Success
- Use ripe but firm bananas to avoid mushiness that can weigh down the layers.
- Homemade pudding texture: Stir constantly to avoid lumps, and don’t rush the thickening process. The silky smooth base is key to delightful Banana Pudding bliss.
- Wafers: Add wafers at the last possible moment if you prefer extra crunch. Alternatively,lightly toast wafers for an aromatic,warm crunch.
- Make-ahead: The pudding can be made a day in advance and layered just before serving for the freshest texture contrast.
- For a twist, try incorporating a hint of cinnamon or a splash of bourbon into the pudding base to deepen flavor layers.
- Storage: Cover leftover pudding tightly; however, wafers will soften overnight, so it’s best enjoyed within 24 hours.
Serving Suggestions
Serve this dessert chilled in clear glass bowls or a trifle dish to showcase the lovely layers of creamy pudding, pale yellow bananas, and golden wafers. Garnish with a fresh banana slice, a sprig of mint, or a delicate dusting of crushed wafers on top for added texture. Complement with a cup of rich coffee or a light sparkling wine for an elevated experience.

| Nutrient | Per Serving |
|---|---|
| Calories | 280 kcal |
| Protein | 6g |
| Carbohydrates | 39g |
| Fat | 9g |
For more expert dessert layering techniques, check out our Classic Trifle Layering Tips or visit Serious Eats’ guide to banana pudding mastery.
Q&A
Q&A: Banana Pudding Bliss – Creamy layers with Crunchy Wafers
Q1: What makes banana pudding such a beloved dessert?
A1: Banana pudding captivates dessert lovers with its comforting blend of creamy, silky custard, sweet ripe bananas, and the nostalgic crunch of vanilla wafers. It’s a symphony of textures and flavors-smooth, fruity, and delightfully crunchy-wrapped in a luscious, melt-in-your-mouth experience that feels like a warm hug from the inside out.
Q2: Why are vanilla wafers essential in banana pudding?
A2: Vanilla wafers are the unsung heroes of banana pudding. Their subtle vanilla flavor complements the sweetness of the bananas and custard, while their crunchy texture provides the perfect contrast to the dessert’s creamy layers. As the pudding sets, the wafers soak just enough to soften slightly without losing their delicate bite, creating an irresistible balance.
Q3: How do you achieve the perfect creamy layer in banana pudding?
A3: the secret lies in making a rich, silky custard using fresh milk, egg yolks, sugar, and a touch of vanilla. Whisking gently yet thoroughly ensures a velvety texture without curdling. Cooling the custard before assembling the pudding helps the layers remain distinct, allowing each spoonful to deliver that signature creamy bliss.
Q4: Can I customize my banana pudding recipe?
A4: Absolutely! Banana pudding is wonderfully versatile. you can add a sprinkle of toasted coconut for extra crunch, a drizzle of caramel for sweetness, or even swap vanilla wafers for graham crackers or shortbread cookies for a new twist.Freshly whipped cream topping adds a light, airy finish that elevates the dessert to pure indulgence.
Q5: What’s the best way to serve banana pudding for maximum enjoyment?
A5: serve banana pudding chilled to let the flavors meld harmoniously and the layers set beautifully. Present it in a glass trifle bowl or individual mason jars so the creamy layers and crunchy wafers are on full display-as we eat with our eyes first. A garnish of banana slices or a sprig of mint adds a final touch of elegance.
Q6: how far in advance can banana pudding be prepared?
A6: Banana pudding actually improves when prepared ahead, allowing the flavors to infuse and the wafers to soften just right. Ideally, make it a few hours before serving or even the night before. Just remember to cover it tightly and refrigerate, ensuring that the pudding stays fresh and the banana slices don’t brown too much.
Q7: Is banana pudding suitable for special dietary needs?
A7: Conventional banana pudding contains dairy and eggs, but it can be adapted! Use plant-based milk and egg substitutes to create a vegan version, and choose gluten-free cookies instead of vanilla wafers if needed. With a little creativity, everyone can experience the creamy, crunchy bliss of this classic dessert.
Banana Pudding Bliss is more than just a dessert-it’s a celebration of textures and flavors that invites you to indulge in each luscious, layered bite. Whether made for family gatherings or solo treats, it promises a timeless joy wrapped in creamy sweetness and wafer crunch.
In Retrospect
As the final spoonful melts away,the magic of banana pudding reveals itself-not just as a dessert,but as an experience where creamy layers and crunchy wafers dance in perfect harmony.Whether you’re savoring it at a family gathering or indulging in a quiet moment of sweet solitude, this classic treat reminds us that simple ingredients, when combined thoughtfully, can create bliss in every bite. So next time you crave comfort in a bowl, let banana pudding be your guide to a delectable journey of texture and flavor, inviting you to savor the timeless joy of creamy sweetness with a satisfying crunch.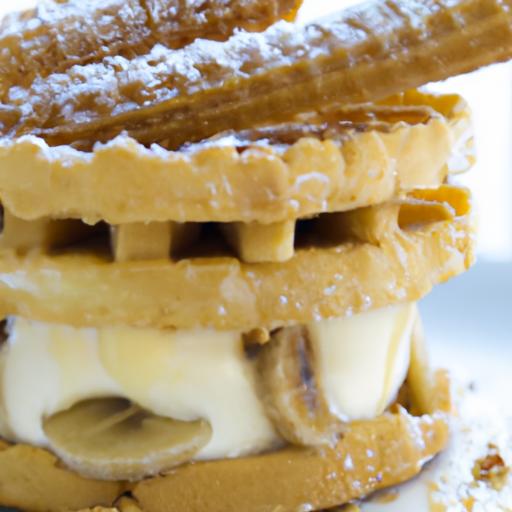
Choosing the Ideal Sweetness and Texture for Your Cinnamon Roll icing
Sweet Swirls: Crafting the Perfect Cinnamon Roll Icing begins with understanding the delicate dance between sweetness, texture, and flavor depth. The icing is more than just a sugary glaze-it’s the luscious finishing touch that can elevate your cinnamon rolls from simple comfort food to an unforgettable indulgence. Achieving the right balance means customizing sweetness levels to complement your rolls without overpowering their warm cinnamon notes, while also creating a glaze so smooth it melts on the tongue.
Prep and Cook Time
- preparation: 10 minutes
- Cooking: 5 minutes (for glaze adjustments)
- Total Time: 15 minutes
Yield
Enough icing for 12 standard-sized cinnamon rolls
Difficulty Level
Easy to Medium – perfect for bakers at any stage aiming for professional results
Ingredients
- 1 cup powdered sugar, sifted for smoothness
- 2 tablespoons unsalted butter, melted and slightly cooled
- 2 tablespoons whole milk (or heavy cream for richer texture)
- 1/2 teaspoon pure vanilla extract
- A pinch of fine sea salt to balance sweetness
- Optional spices: 1/4 teaspoon ground cinnamon, 1/8 teaspoon ground nutmeg
- Optional zest: 1 teaspoon freshly grated orange or lemon zest
Instructions
- Sift the powdered sugar
- Add the melted butter
- Slowly drizzle in the milk
- Mix in the vanilla extract
- If desired, blend in your selected spices and zest. This is where you can experiment-cinnamon intensifies the familiar warmth, nutmeg adds a comforting hint, and zests brighten the glaze with citrus freshness.
- Whisk vigorously
- For a silkier finish, strain the icing through a fine sieve
- Pour generously over warm cinnamon rolls
Techniques for Achieving a Silky Smooth Icing Consistency
Achieving the perfect glaze texture in your sweet swirls involves paying close attention to liquid ratios and whisking technique. Powdered sugar tends to clump, so always sift it before mixing to guarantee a velvety base. Incorporating melted butter instead of cold helps the icing bind smoothly and lends a glossy surface. Use whole milk or cream for a luscious mouthfeel; skim milk can leave the glaze too thin or matte.Stirring continuously as you add liquids avoids lumps and air pockets, preserving that dreamlike silkiness. If your glaze feels too thick, add milk one teaspoon at a time rather than all at once-this precision control ensures your icing flows just right for drizzling or spreading.
Balancing Flavors with Spices and Zests to Elevate Your Glaze
To take your sweet swirls beyond basic vanilla sweetness, layering complementary spices and citrus zests is key. classic cinnamon builds on the rolls’ inherent flavor, creating a harmonized, warm profile. Nutmeg, clove, or cardamom can add intrigue and depth, but always start with a pinch-they are potent and can overwhelm the delicate balance. Citrus zest, especially fresh orange or lemon, injects brightness and contrast, cutting through the sugar-rich sweetness with a fresh tang that awakens your palate. For a elegant twist, consider a subtle splash of maple syrup or almond extract, but keep these aromatic enhancers light so the cinnamon roll’s comforting essence shines through.
Creative Variations and Tips for Decorating with Style
Once your icing is ready, it’s time to let creativity bloom. Drizzle the glaze over warm rolls with a spoon or use a small piping bag for artistic swirls and patterns. For a textured look, sprinkle crushed nuts, delicate edible flowers, or a dusting of cinnamon sugar instantly after glazing. Adding a few drops of food coloring can create seasonal or themed effects, turning your sweet swirls into show-stopping masterpieces. For an ultra-decadent finish, gently fold in melted white chocolate or softened cream cheese into the base glaze, transforming it into a tangy, creamy topping.
Chef’s Tips for Success
- Make Ahead: Prepare the icing up to 4 hours in advance and cover tightly; re-whisk lightly before use.
- Consistency fix: If icing hardens too quickly, stir in a few drops of warm milk to reincorporate fluidity.
- Gluten-free Adaptation: Use gluten-free powdered sugar and ensure no cross-contamination for special diets.
- Substitutions: Dairy-free butter and almond or oat milk work well for vegans without compromising texture.
- Customization: Tailor sweetness by adjusting powdered sugar-use less for a less sweet finish, perfect for rich doughs.
Serving Suggestions
Serve your cinnamon rolls fresh and warm, iced generously with your perfectly crafted glaze. for an inviting presentation, plate them on a rustic wooden board or a stylish porcelain platter garnished with fresh mint leaves, star anise, or a gentle dusting of ground cinnamon. Pair with a creamy latte, chai tea, or freshly brewed coffee to complement the spice and sweetness. Leftovers can be briefly warmed and re-glazed for that “just-baked” feel any time of day.

| Nutrient | Per Serving (1 Roll with Icing) |
|---|---|
| Calories | 220 kcal |
| protein | 3 g |
| Carbohydrates | 35 g |
| Fat | 7 g |
Explore related recipes for homemade cinnamon rolls to pair perfectly with your glaze. For an expert dive into the science and art of icing textures, visit the Serious Eats icing guide.
Q&A
Q&A: Sweet Swirls – Crafting the Perfect Cinnamon Roll Icing
Q1: What makes cinnamon roll icing truly magical?
A1: The magic lies in the balance-a luscious blend of creamy sweetness with a hint of tang or warmth that complements the cinnamon-spiced roll beneath. The perfect icing isn’t just sugary glaze; it’s a finishing touch that turns a simple pastry into a melt-in-your-mouth delight.
Q2: What are the basic ingredients needed for classic cinnamon roll icing?
A2: At its core, classic cinnamon roll icing combines powdered sugar, cream cheese, butter, vanilla extract, and a splash of milk or cream. This simple quartet creates a smooth, velvety topping that’s rich yet light enough to cascade effortlessly over warm rolls.
Q3: How vital is the temperature of the cinnamon rolls when applying the icing?
A3: Temperature is a key player! The rolls should be warm-not piping hot-when you spread the icing. Warmth helps the icing soften and spread nicely, creating those beautiful swirls and drips. Too hot,and the icing melts into a thin glaze; too cool,and it won’t spread smoothly.
Q4: Can I customize the icing for different flavor profiles?
A4: Absolutely! Add a pinch of cinnamon or cardamom for a spice boost, a dash of citrus zest for brightness, or swap cream cheese for mascarpone for a silky twist. Drizzle in some maple syrup or honey to deepen the sweetness. The canvas is yours to craft.
Q5: What tips help achieve that perfectly smooth and spreadable frosting?
A5: Start by sifting your powdered sugar to avoid lumps. Use softened (but not melted) butter and cream cheese,then beat them together until silky before adding sugar slowly. Adjust the consistency with milk-too thick and it’s hard to spread; too thin and it runs off.
Q6: How long can I store cinnamon roll icing, and what’s the best way to keep it fresh?
A6: Keep your icing refrigerated in an airtight container for up to one week. Before use, bring it to room temperature and give it a speedy stir. This keeps the flavors vibrant and texture just right for your next sweet swirl session.
Q7: Is it possible to make the icing vegan or dairy-free without sacrificing flavor?
A7: yes! Swap cream cheese with a coconut-based or cashew cream alternative, use vegan butter, and choose plant-based milk like almond or oat.Sweeten with powdered sugar as usual, and you’ll have a creamy, indulgent icing that’s kind to all diets.
Q8: What common mistakes should be avoided when making cinnamon roll icing?
A8: Avoid overheating your dairy ingredients-they should be soft, not melted. Don’t rush adding liquid; add it gradually to control consistency. Skipping the sifting of powdered sugar can create gritty icing, and applying the frosting on cold rolls makes spreading tough and less visually appealing.
Q9: How does the icing enhance the overall cinnamon roll experience?
A9: Beyond sweetness, the icing adds moisture, richness, and a glossy finish that tempts the eyes and palate alike. It melts into the crevices of each swirl, creating layers of flavor and texture that turn a humble roll into a decadent indulgence.
Q10: Any creative finishing touches to elevate my cinnamon roll icing presentation?
A10: Sprinkle crushed pecans or toasted coconut for crunch,drizzle caramel or chocolate sauce for contrast,or garnish with fresh berries and a dusting of cinnamon. Each addition tells a story, inviting your guests into a world of sweet swirls and cozy comfort.
The Way Forward
As the final drizzle of that glossy, sweet icing settles over your perfectly baked cinnamon rolls, you’ve not just crafted a treat-you’ve created a moment of joy, one swirl at a time. Mastering the art of cinnamon roll icing is about more than just flavor; it’s about balance, texture, and that irresistible shine that invites the first bite. Armed with these tips and tricks, your next batch will carry the signature sweet swirl that turns simple pastries into unforgettable delights. So go ahead-glaze, drizzle, and savor the magic that makes every cinnamon roll a little slice of heaven.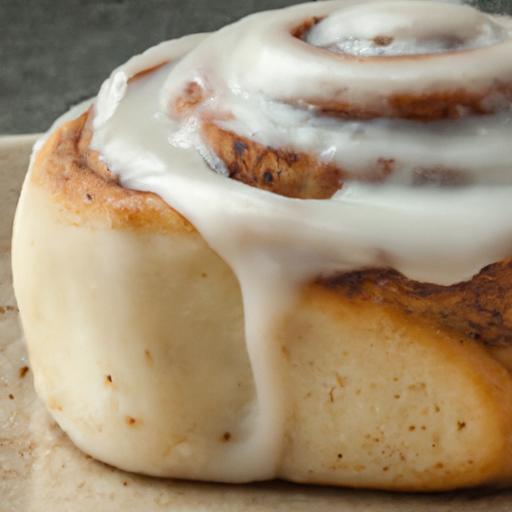
Decadent Chocolate Peanut Butter Cheesecake Cake Recipe begins with selecting the finest ingredients that transform a simple dessert into an indulgent experience. The secret to the cake’s rich and creamy texture lies in the perfect harmony between premium cream cheese, smooth peanut butter, and high-quality chocolate. Opting for full-fat cream cheese ensures a velvety base, while natural peanut butter (unsweetened or lightly salted) brings depth without overpowering sweetness. For the chocolate layers, use bittersweet or semisweet chocolate with at least 60% cocoa content to balance the peanut butter’s richness and add an intense cocoa punch.
Prep and Cook Time
- Preparation: 30 minutes
- Baking: 1 hour 15 minutes
- Cooling and Chilling: 6 hours (preferably overnight)
Yield
Serves 10-12 slices
Difficulty Level
Medium – Ideal for bakers familiar with layered cheesecakes seeking a rewarding challenge.
Ingredients
- For the Crust:
- 1 ½ cups chocolate graham cracker crumbs
- 5 tbsp unsalted butter, melted
- 2 tbsp granulated sugar
- for the Peanut Butter Cheesecake Layer:
- 16 oz full-fat cream cheese, softened
- ¾ cup smooth natural peanut butter
- ¾ cup powdered sugar, sifted
- 2 large eggs, room temperature
- 1 tsp pure vanilla extract
- ¼ cup sour cream
- For the Chocolate Cheesecake Layer:
- 16 oz full-fat cream cheese, softened
- 1 cup granulated sugar
- 3 tbsp unsweetened cocoa powder
- 4 oz bittersweet chocolate, melted and slightly cooled
- 3 large eggs, room temperature
- 1 tsp vanilla extract
- ¼ cup sour cream
- For the Ganache Topping:
- 6 oz bittersweet chocolate, chopped
- ½ cup heavy cream
- 2 tbsp peanut butter (optional, for swirls)
Instructions
- Prepare the crust: In a medium bowl, combine chocolate graham cracker crumbs, melted butter, and sugar. press the mixture firmly into the base of a 9-inch springform pan. Place in the fridge while preparing the cheesecake layers.
- Make the peanut butter cheesecake layer: Beat softened cream cheese and peanut butter until smooth. Gradually add powdered sugar, then eggs one at a time. Mix in vanilla and sour cream until silky. Pour evenly over the chilled crust.
- Create the chocolate cheesecake layer: Beat cream cheese with sugar and cocoa powder until fully combined. Stir in the melted chocolate. Blend in eggs one at a time, then add vanilla and sour cream. Pour carefully over the peanut butter layer.
- Bake the cake: Place the springform pan in a water bath (wrap bottom with foil to prevent leaks) and bake at 325°F (160°C) for 1 hour 15 minutes,or until the edges are set but the centre slightly jiggles. This gentle baking prevents cracks and ensures moistness.
- Cool and chill: Turn off the oven and leave the cheesecake inside with the door ajar for 1 hour. Remove and cool to room temperature, then refrigerate for at least 6 hours or overnight to let the flavors meld.
- Prepare ganache: heat heavy cream until simmering and pour over chopped chocolate. Let sit 2 minutes,then stir until glossy and smooth. Swirl in peanut butter if desired for an extra flavor punch.
- Decorate and serve: Spread ganache over the chilled cheesecake surface, using a spatula to create gentle peaks. Chill for 15 minutes before slicing. Garnish with chopped roasted peanuts, chocolate shavings, or a drizzle of melted peanut butter for stunning presentation.
Tips for Success
- Always use room-temperature ingredients to ensure a smooth batter and avoid lumps.
- To prevent cheesecake cracks, avoid overmixing and don’t open the oven during the first 45 minutes of baking.
- If peanut butter is too thick, microwave it for 15 seconds for easier blending.
- Make the cheesecake a day in advance to enhance flavor complexity and ease serving.
- For a gluten-free option, substitute chocolate graham cracker crumbs with almond flour or gluten-free biscuit crumbs.
Serving Suggestions
Serve this rich chocolate peanut butter cheesecake cake chilled, accompanied by fresh raspberries or a light raspberry coulis to cut through the richness. Complement each slice with a dollop of whipped cream dusted with cocoa powder or finely chopped dark chocolate. For an elegant finish, add edible gold leaf accents or toasted peanut halves along the edges. Pair with a bold espresso or a creamy milk stout to elevate the indulgence.

| Nutrition (per slice) | Calories | Protein | Carbs | Fat |
|---|---|---|---|---|
| Chocolate Peanut Butter cheesecake Cake | 520 kcal | 10 g | 40 g | 35 g |
For more decadent dessert inspirations, explore our Ultimate Chocolate Desserts Collection or discover expert baking tips at Serious Eats: How to Make Cheesecake.
Q&A
Q&A: Decadent Chocolate Peanut Butter Cheesecake Cake Recipe
Q1: What makes this Chocolate Peanut Butter Cheesecake Cake so decadent?
A1: The decadence lies in the harmonious layering of rich, velvety chocolate cake, creamy peanut butter cheesecake, and luscious ganache. Each bite offers an indulgent mix of smooth textures and bold flavors that elevate a simple dessert into a show-stopping treat.
Q2: How challenging is this recipe for a beginner baker?
A2: While this recipe involves multiple components-chocolate cake layers, peanut butter cheesecake filling, and a glossy chocolate glaze-it’s broken down into straightforward steps. With a bit of patience and basic baking tools, even novice bakers can achieve stunning results.
Q3: can I substitute the peanut butter for a different nut butter?
A3: Absolutely! Almond butter, cashew butter, or even hazelnut spread can be delicious alternatives. Just keep in mind that each nut butter has its own flavor profile and texture, which may subtly alter the overall taste of your cake.
Q4: what type of chocolate works best for the cake and ganache?
A4: for a rich chocolate flavor, opt for high-quality bittersweet or semi-sweet chocolate with at least 60% cocoa. This balances the sweetness of the peanut butter and cheesecake while providing a luscious depth to both the cake layers and the ganache topping.
Q5: How should I store the cheesecake cake to keep it fresh?
A5: Because it contains cream cheese, it’s best stored in the refrigerator, tightly covered with plastic wrap or placed in an airtight container. It can last up to 4-5 days chilled,but for peak flavor and texture,enjoy within 2-3 days.
Q6: Can I make this cake ahead of time for a party?
A6: Yes! This cake actually benefits from some resting time in the fridge, allowing the flavors to meld and the cheesecake layer to set beautifully. Prepare it a day in advance,keep it chilled,and bring it out just before serving.
Q7: What sides or drinks pair well with this rich dessert?
A7: To balance the cake’s richness, consider serving with a scoop of vanilla ice cream or fresh berries to add brightness. Beverage-wise, a strong cup of black coffee, espresso, or even a smooth glass of cold milk complements the chocolate-peanut butter extravaganza perfectly.
Q8: Is there a gluten-free version of this recipe?
A8: You can create a gluten-free variant by replacing the all-purpose flour with a gluten-free baking blend. Just ensure the blend includes xanthan gum or another binder to maintain the cake’s structure and texture.
Q9: What tips help achieve a flawless peanut butter cheesecake layer?
A9: Use room-temperature cream cheese and peanut butter to ensure smooth mixing without lumps. Avoid overmixing to prevent cracking, and bake the cheesecake layer gently in a water bath or on a lower oven rack to maintain moisture and prevent browning.
Q10: What’s the best way to cut and serve this layered marvel?
A10: Use a sharp knife warmed under hot water and dried before slicing. This helps create clean, defined slices without dragging ganache or cheesecake layers. Serve on chilled plates to keep the cheesecake firm and mess-free.
This Q&A brings you the insider scoop on making- and savoring- the ultimate decadent Chocolate Peanut Butter Cheesecake Cake. Ready to bake? Let the delicious adventure begin!
To Conclude
As you savor each bite of this decadent chocolate peanut butter cheesecake cake, you’ll discover a perfect harmony of rich, creamy textures and bold, irresistible flavors. Whether you’re celebrating a special occasion or simply indulging a sweet craving, this recipe promises to elevate your dessert game to new heights.So go ahead-bake it, share it, and watch as this luscious masterpiece becomes a beloved favorite around your table. because when chocolate and peanut butter unite in cheesecake form, every forkful is a celebration of pure, blissful indulgence.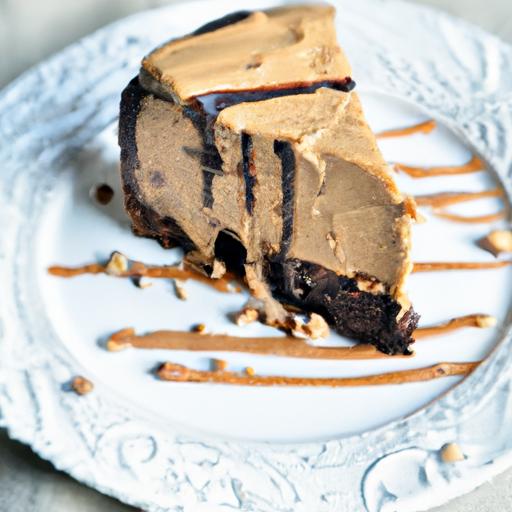
Irresistible blueberry Cheesecake Bars capture the enchanting harmony of tangy blueberries woven into a decadently smooth cheesecake, resting on a perfectly crisp, buttery crust.This delightful dessert invites you to savor every bite, where texture and flavor marry flawlessly. Whether enjoyed as a celebratory treat or a comforting weekend indulgence, these bars elevate classic cheesecake to an accessible, handheld delight.
Prep and cook Time
- Preparation: 20 minutes
- Baking: 40 minutes
- Cooling/Chilling: 3 hours (preferably overnight)
Yield
12 generous bars, perfect for sharing or savoring over several days.
Difficulty Level
Medium – Ideal for bakers with basic experience looking to impress with a visually striking and delicious dessert.
Ingredients
- For the crust:
- 1 ½ cups graham cracker crumbs (about 10 full sheets), finely crushed
- 6 tbsp unsalted butter, melted
- 2 tbsp granulated sugar
- For the cheesecake filling:
- 24 oz (3 packages) cream cheese, softened to room temperature
- 1 cup granulated sugar
- 3 large eggs, at room temperature
- 1 tsp pure vanilla extract
- 1 cup sour cream
- 2 tbsp all-purpose flour
- For the blueberry swirl:
- 1 cup fresh or frozen blueberries
- 2 tbsp granulated sugar
- 1 tsp fresh lemon juice
Step by Step guide to Baking Flawless Blueberry Cheesecake Bars
- Prepare the crust: Preheat your oven to 325°F (160°C). In a medium bowl, combine the graham cracker crumbs, melted butter, and 2 tablespoons sugar untill the mixture resembles wet sand. Press it evenly into the bottom of a greased 9×13 inch baking pan. For the ultimate crispness,use the bottom of a flat glass to compact the crust firmly.
- Bake the crust: Place the pan in the oven and bake for 10 minutes. remove and let cool slightly while you prepare the filling. This step ensures the crust stays crisp and prevents sogginess.
- Make the blueberry swirl: In a small saucepan over medium heat, combine blueberries, 2 tablespoons sugar, and lemon juice. Simmer gently for 5 minutes until the berries burst and the mixture thickens slightly.Let cool entirely. Optionally, purée half the mixture for a smoother swirl texture.
- Create the cheesecake batter: Using a hand or stand mixer, beat cream cheese and sugar at medium speed until creamy and smooth, about 2-3 minutes. Add eggs one at a time, beating just until incorporated. Mix in vanilla, sour cream, and flour until just combined.Avoid overmixing to keep the batter light and creamy.
- Assemble the layers: Pour half the cheesecake filling over the cooled crust and spread evenly.Spoon half of the blueberry mixture over the batter in small dollops. Use a knife or skewer to gently swirl the blueberries into the filling, then repeat with the remaining cheesecake batter and blueberry topping to create a marbled effect.
- Bake the bars: Place the pan on the center rack and bake for 35-40 minutes, or until the filling is set around the edges but still slightly jiggly in the center.Avoid opening the oven door during baking to prevent cracks.
- Cool and chill: Remove from oven and cool to room temperature.Refrigerate for at least 3 hours or overnight to allow the bars to fully set and develop their rich flavor.
- Slice and serve: Use a sharp knife warmed in hot water and wiped dry between each cut for clean edges. serve chilled or at room temperature for optimal creaminess.
expert Tips for Stunning Presentation and Flavor Enhancements
- Choose your blueberries wisely: Use fresh, ripe blueberries for the brightest color and juiciest flavor. Frozen berries are a convenient choice but thaw thoroughly and drain excess liquid to avoid sogginess.
- Customize the crust: For a nutty twist, swap half the graham crackers for finely crushed pecans or almonds. Add a pinch of cinnamon or lemon zest for a subtle depth.
- Texture perfection: Beat the cream cheese mixture until ultra-smooth to avoid lumps. Room temperature ingredients blend best and deliver a silky texture.
- Enhance the swirl: Add a teaspoon of cornstarch to the blueberry mix if you prefer a thicker, jam-like consistency that holds distinct swirls.
- Presentation flair: Garnish individual bars with a sprig of fresh mint, a dusting of powdered sugar, or a few whole blueberries. Serve on a white or pastel plate to make the vibrant blues pop visually.
- Make ahead: these cheesecake bars improve in flavor overnight and keep well refrigerated for up to 4 days-perfect for prepping in advance.
Serving Suggestions
These Irresistible Blueberry Cheesecake Bars shine best when accompanied by a dollop of lightly whipped cream or a drizzle of homemade blueberry sauce. Pair them with a fresh berry salad or a scoop of vanilla bean ice cream for an elevated dessert experience. For gatherings, arrange on a decorative platter with edible flowers or a sprinkle of lemon zest to complement the tangy blueberry notes beautifully.

| Nutrient | Per serving |
|---|---|
| Calories | 320 kcal |
| Protein | 6 g |
| carbohydrates | 30 g |
| Fat | 20 g |
For further inspiration on classic cheesecake recipes, check out our Ultimate Classic Cheesecake guide. To learn more about the health benefits of blueberries, visit the Healthline blueberry Benefits article.
Q&A
Q&A: Irresistible Blueberry Cheesecake Bars – A sweet Delight
Q1: What makes blueberry cheesecake bars so irresistible?
A1: It’s the perfect trifecta of flavors and textures – a buttery, crumbly crust, a luxuriously creamy cheesecake layer, and a vibrant blueberry topping bursting with sweetness and tartness. Each bite delivers a harmonious blend that feels both indulgent and refreshing.
Q2: Are blueberry cheesecake bars difficult to make at home?
A2: Not at all! While they might sound fancy,these bars are surprisingly straightforward. With simple ingredients like cream cheese,fresh blueberries,sugar,and basic baking staples,anyone can whip up this dessert. Plus, making cheesecake bars means no tricky slicing or fancy plating-just bake, cool, and enjoy!
Q3: Can I use frozen blueberries, or do fresh berries work best?
A3: Both work beautifully! Fresh blueberries provide a naturally luminous and juicy flavor, but frozen berries are equally convenient and often more budget-friendly. Just be sure to thaw and drain frozen berries well to avoid excess moisture in your bars.
Q4: What’s the best crust for blueberry cheesecake bars?
A4: A classic graham cracker crust is the go-to for that gently sweet, crunchy base.You can also experiment with digestive biscuits, shortbread, or even a nutty pecan crust to add extra depth and texture.
Q5: How do I achieve that flawless,creamy cheesecake texture?
A5: Keep cream cheese at room temperature before mixing to ensure a smooth batter. Also, avoid overmixing once you add eggs; gently blend until just combined to prevent cracking and to keep the filling silky and dense.
Q6: Can these bars be made ahead of time?
A6: Absolutely! Blueberry cheesecake bars actually taste better after sitting overnight. chilling allows the flavors to meld and the bars to firm up perfectly. They keep well in the fridge for up to 3-4 days and can be frozen for longer storage.
Q7: Are there any fun twists to personalize this dessert?
A7: Definitely! Swirl in some lemon zest or lemon curd for a citrusy zing. Top with toasted almonds or drizzle with white chocolate for added decadence. You can even mix in other berries like raspberries or blackberries to craft your own signature version.
Q8: What occasions are blueberry cheesecake bars perfect for?
A8: From casual picnics and afternoon teas to festive holiday gatherings, these bars are a crowd-pleaser that’s both elegant and homey. Their portable bar shape makes them ideal for potlucks, bake sales, or even a sweet surprise treat anytime.
Q9: Any tips for serving blueberry cheesecake bars?
A9: Serve chilled or at room temperature with a dollop of whipped cream, a sprinkle of powdered sugar, or a scoop of vanilla ice cream for an extra touch of indulgence. Garnishing with fresh mint leaves or additional fresh berries adds a pop of color and freshness.
Q10: Why should blueberry cheesecake bars be your next baking adventure?
A10: Because they encapsulate the magic of summer berries with the luscious comfort of cheesecake,all in a convenient handheld form.Baking these bars is a delightful journey of flavors that promises to impress and satisfy, no matter your baking skill level!
Key Takeaways
Whether you’re a seasoned baker or a curious kitchen adventurer, these Irresistible Blueberry Cheesecake Bars offer a perfect harmony of creamy richness and fruity brightness that’s hard to resist. Easy to make and even easier to enjoy, they’re ideal for sharing at gatherings or savoring as a personal treat. So next time you crave a sweet delight, remember that a slice of blueberry cheesecake bliss is just a bake away-ready to transform any day into a celebration of flavor.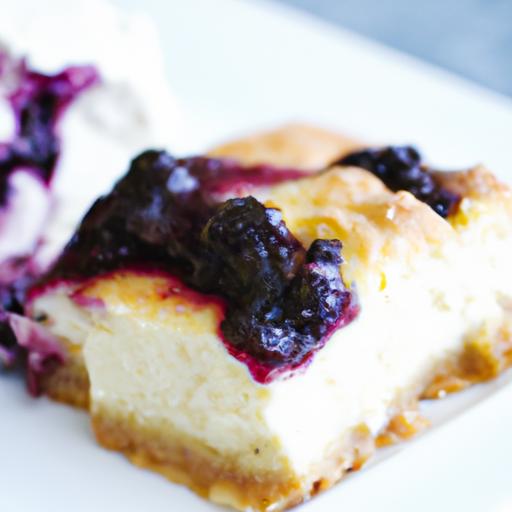
How to Make Irresistible Pecan Pie Bars: A Sweet Treat Guide
How to make irresistible pecan pie bars begins with selecting the finest ingredients that work in harmony to create a dessert bursting with rich, buttery flavour and nutty sweetness. These bars combine the elegance of a traditional pecan pie with the convenience of a handheld treat, perfect for sharing-or savoring solo. Whether you’re crafting them for a holiday gathering or an indulgent afternoon treat, mastering each element will elevate your baking to irresistible heights.
Prep and cook Time
- Readiness Time: 20 minutes
- Cook Time: 35 minutes
- Total Time: 55 minutes
Yield
12 delicious pecan pie bars, perfect for a small gathering or family dessert.
Difficulty Level
Medium – Ideal for bakers comfortable with layering crusts and mixing fillings.
Choosing the Perfect Ingredients for Ultimate Pecan Pie Bars
The foundation of how to make irresistible pecan pie bars starts with selecting fresh, quality ingredients. For the crust, use cold unsalted butter, which creates that coveted flaky, tender base. The texture of the crust benefits enormously from all-purpose flour, sifted to ensure a light and even crumb. When it comes to the filling, fresh pecans-preferably halved-add crunch and depth, so avoid pre-chopped nuts drenched in oil or preservatives. Light corn syrup offers that classic gooey chew, but you can substitute with pure maple syrup for a more nuanced sweetness and a hint of caramel complexity. Don’t forget the hint of pure vanilla extract and a pinch of fine sea salt, which balances the deep sweetness and brightens every bite.
Mastering the Art of the Flaky Crust for a Delightful Base
To achieve that signature flaky crust, be sure to keep your butter cold until the moment of mixing; warming the butter will result in a tougher texture. Use a pastry cutter or your fingertips to quickly work the butter into the flour and sugar until the mixture resembles coarse crumbs. press the dough firmly yet gently into an even layer in your pan to prevent cracking or shrinking during baking. A swift blind bake for 10-12 minutes before adding the filling sets a firm, buttery stage that prevents sogginess, ensuring every bar holds together beautifully.
Crafting the Gooey and Nutty Filling That Melts in Your Mouth
The magic of how to make irresistible pecan pie bars depends heavily on that luscious filling. Combine dark brown sugar and light corn syrup, then stir in large eggs and melted butter for richness and silkiness. Toasting your pecans lightly enhances their aroma and flavor-spread them on a baking sheet and roast for 5-7 minutes until fragrant, careful not to burn. Gently fold the pecans into the custard-like mixture and pour it evenly over the pre-baked crust.The filling should be thick enough to hold the nuts suspended but still pour easily for even coverage.
Baking Tips and Tricks for That Picture-Perfect Golden Finish
Bake the filled bars until the edges are golden and the center is just set, with a slight jiggle-overbaking will yield a dry texture.For a radiant, glossy finish, gently brush the top with warmed honey or melted butter as soon as it comes out of the oven. Let the bars cool completely in the pan to allow the filling to fully set-this step is crucial for clean slices and a gooey, yet stable bite. Use a sharp knife dipped in hot water between cuts for bar lines as pristine as these delicious treats deserve.
Ingredients
- 1 1/4 cups all-purpose flour, sifted
- 1/2 cup unsalted butter, cold and cubed
- 1/4 cup granulated sugar
- 1/4 teaspoon fine sea salt
- 1 1/2 cups pecan halves, toasted
- 1 cup light corn syrup
- 1 cup dark brown sugar, packed
- 3 large eggs
- 4 tablespoons unsalted butter, melted
- 1 teaspoon pure vanilla extract
- 1 tablespoon honey (optional, for glaze)
Instructions
- Preheat your oven to 350°F (175°C). Lightly grease a 9×9-inch baking pan and line with parchment paper, leaving an overhang for easy removal.
- Make the crust: In a large bowl, combine the sifted flour, sugar, and sea salt. Add the cold cubed butter. Using a pastry cutter or fingertips, work the butter into the flour until the mixture resembles coarse crumbs.
- Press the dough evenly into the prepared pan, ensuring it covers the bottom in one smooth layer. Bake for 12 minutes or until the edges are just beginning to turn golden.
- Toast the pecans: Spread pecans on a baking sheet and roast for 5-7 minutes until fragrant, stirring once. Let cool slightly.
- Prepare the filling: In a medium bowl, whisk the eggs, dark brown sugar, corn syrup, melted butter, and vanilla extract until smooth and glossy.
- Fold in the toasted pecans gently, then pour the filling evenly over the baked crust.
- Bake for 25-30 minutes or until the filling is set but still slightly jiggly in the center and the edges are golden brown.
- Optional glaze: Brush the warm bars with honey or melted butter for a shiny finish.
- Cool completely in the pan on a wire rack, preferably for at least 2 hours, before lifting out and slicing into bars.
Tips for success
- Butter Temperature: Keep butter cold for the crust to create flakiness; warm butter melts and toughens the base.
- Toasting Pecans: Toast nuts for an enhanced aroma and crunch-skip pre-chopped pecans for superior texture.
- Cooking Time: Avoid overbaking the filling to maintain its gooey texture; underbaking causes runniness.
- Make-Ahead: Bars keep beautifully in an airtight container at room temperature for up to 3 days or refrigerated up to one week.
- Substitutions: Swap corn syrup for maple syrup for a deeper flavor, or add a pinch of cinnamon for subtle warmth.
Serving Suggestions
These bars shine served slightly warm with a scoop of vanilla bean ice cream or a dollop of freshly whipped cream.Garnish with a few whole pecans atop each bar and a light dusting of powdered sugar for extra elegance. Pair your serving with a rich cup of coffee or a subtly spiced chai latte for a truly memorable dessert experience.

| nutrient | Per Bar (Approx.) |
|---|---|
| Calories | 320 |
| Protein | 4g |
| Carbohydrates | 38g |
| Fat | 18g |
For more classic Southern dessert inspiration, check out our Classic Pecan Pie Recipe. Discover the history and science behind corn syrup as a baking ingredient on Serious Eats.
Q&A
Q&A: How to Make Irresistible Pecan Pie Bars – A Sweet Treat Guide
Q1: What makes pecan pie bars different from traditional pecan pie?
A1: While traditional pecan pie boasts a flaky pie crust and a gooey filling served by the slice, pecan pie bars are more like portable, layered desserts with a crispy buttery base, a sweet, caramel-like pecan topping, and a perfect balance of textures. They’re easier to serve at parties and less messy to eat,making them a crowd-pleasing twist on a classic favorite.
Q2: What’s the secret to the perfect crust for pecan pie bars?
A2: The crust is the foundation of pecan pie bars, and its success lies in two things: butter and precision. Use cold, unsalted butter cut into the flour to create a tender, crumbly base. Press it evenly into your pan and bake it just until golden before adding the filling. This ensures a sturdy yet buttery base that won’t get soggy when topped with the luscious pecan mixture.
Q3: How do you achieve that signature gooey pecan filling?
A3: The magic happens with a luscious caramel-like blend of brown sugar, corn syrup (or maple syrup for a natural twist), eggs, butter, and vanilla. This mixture thickens as it bakes with the pecans, creating a sticky, sweet filling that sets just enough to slice cleanly but remains decadently gooey. The balance of sweetness and texture is everything!
Q4: Can I customize pecan pie bars for different tastes or dietary needs?
A4: Absolutely! For a twist,try adding a pinch of cinnamon or a dash of bourbon to the filling for warm,complex notes. You can swap corn syrup for pure maple syrup or honey if you prefer natural sweeteners. For a gluten-free crust, use almond flour or a gluten-free flour blend. Vegan versions are possible too by substituting eggs with flax eggs and butter with coconut oil or plant-based margarine.
Q5: What’s the best way to store pecan pie bars to keep them fresh?
A5: Pecan pie bars do best stored in an airtight container at room temperature for up to 3 days. If you’re in a warm climate or want to keep them longer, refrigeration works well-just allow them to come to room temperature before serving for the gooey texture to shine. They also freeze beautifully: wrap bars individually and freeze for up to 2 months. Thaw overnight in the fridge before enjoying.
Q6: Any tips for cutting perfect, neat pecan pie bars?
A6: to slice perfect bars without the filling sticking to the knife, chill the bars thoroughly first. Use a long, sharp knife and wipe it clean between cuts for neat edges. For extra finesse, warm the knife slightly under hot water and dry it before slicing-this helps glide through the sticky topping smoothly.
Q7: What drinks pair best with pecan pie bars?
A7: Pecan pie bars love company! Pair them with a cup of rich coffee or a creamy latte to contrast their sweetness. For an adult twist, an oaky bourbon or a glass of tawny port enhances the nutty, caramel flavors beautifully. Non-alcoholic options like spiced chai tea or vanilla almond milk also complement their cozy warmth.
With these tips and answers, you’re well on your way to crafting pecan pie bars that no one will be able to resist-from your first buttery bite to the last caramel-drizzled crumb!
To wrap It Up
Whipping up a batch of pecan pie bars is more than just following a recipe-it’s about capturing the magic of rich, buttery crusts and gooey, nut-studded sweetness in every bite. Whether you’re baking for family gatherings, holiday celebrations, or simply to satisfy a sudden craving, these bars offer a perfect harmony of texture and flavor that’s hard to resist. Armed with the tips and tricks in this guide, you’re ready to transform simple ingredients into a crowd-pleasing dessert that melts hearts and leaves everyone asking for more.So preheat that oven,gather your pecans,and get ready to create a sweet treat that’s truly unforgettable. Your next bakers’ masterpiece awaits!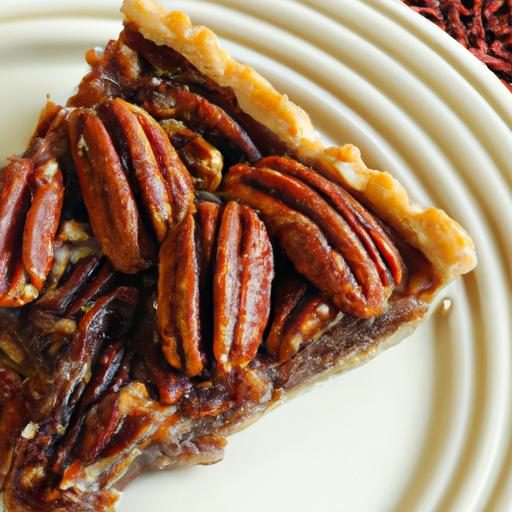
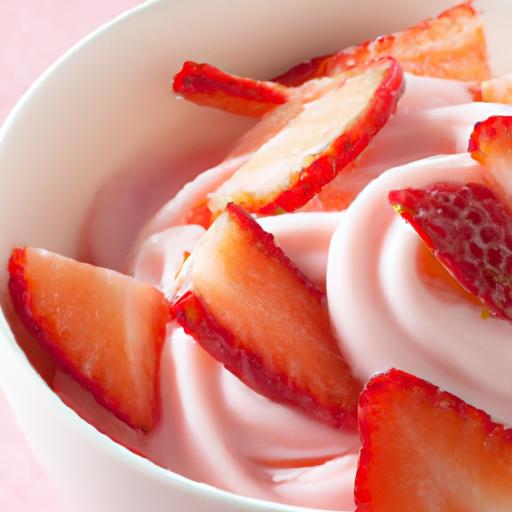
Berry & Greek Yogurt Smoothie: Naturally Sweet & Sugar-Free
Berry & Greek Yogurt Smoothie: Naturally Sweet & Sugar-Free is a vibrant, creamy treat that not only delights the taste buds but also fuels your day with wholesome nutrition. This smoothie celebrates nature’s perfect marriage of antioxidant-rich berries and the protein-packed creaminess of Greek yogurt, creating a refreshingly satisfying blend without any added sugar. Inspired by mornings in the Mediterranean where fresh fruits and creamy yogurts are a staple, this recipe transforms simple ingredients into a colorful powerhouse of health and flavor.
Prep and Cook Time
Prep Time: 5 minutes
Cook Time: 0 minutes (no cooking required!)
Yield
Servings: 2 generous portions
Difficulty Level
Easy – Perfect for beginners and busy mornings alike!
ingredients
- 1 cup Greek yogurt (full-fat or low-fat, plain)
- 1 cup mixed fresh or frozen berries (blueberries, strawberries, raspberries, blackberries)
- 1 medium ripe banana (for natural sweetness and creaminess)
- 1/2 cup unsweetened almond milk (or any plant-based milk of choice)
- 1 tablespoon chia seeds (optional, for fiber boost)
- 1 teaspoon pure vanilla extract (enhances natural sweetness)
- Ice cubes (optional, for a colder, thicker texture)
Instructions
- combine the base ingredients: Place the greek yogurt, mixed berries, ripe banana, and almond milk into a high-speed blender. Using ripe banana ensures smooth creaminess and gentle natural sweetness without any need for added sugars.
- Add the boosters: Sprinkle in chia seeds and pour in the vanilla extract. Both elevate the nutrient profile and deepen flavor complexity.
- Blend until smooth: Pulse the mixture on high for 30-45 seconds, or until completely smooth and creamy. If the smoothie feels too thick, add a splash more milk too your preferred consistency.
- Adjust texture and chill: If you like a colder, frostier smoothie, add ice cubes and blend again for 15 seconds. Avoid over-blending ice to prevent watering down the flavor.
- Taste and tweak: Assess the balance of sweetness and tartness. For more natural sweetness, a touch more ripe banana or a handful of frozen berries can definitely help without introducing processed sugars.
- Serve immediately: Pour into chilled glasses and garnish with fresh berry sprigs or a sprinkle of chia seeds for that finishing touch.
Tips for Success and Customization
- Choose full-fat greek yogurt for a richer, silkier mouthfeel and increased satiety, but low-fat options work well for lighter smoothies.
- Frozen berries not only chill the smoothie but also concentrate sweetness and flavor – perfect when fresh berries are out of season.
- Boost protein further by adding a scoop of your favorite plant-based or whey protein powder-blend well to avoid clumping.
- For extra fiber, stir in ground flaxseed or oat bran along with chia seeds to keep the smoothie thick and filling.
- Swapping almond milk for coconut water adds natural electrolytes and a subtle tropical undertone.
- Prepare smoothie packs by freezing fruit, banana slices, and seeds in portioned bags-just add yogurt and liquid when ready to blend.
Serving Suggestions
Serve your delightful Berry & Greek Yogurt Smoothie: Naturally Sweet & sugar-Free in tall, clear glasses to show off its luscious layers. Garnish with a fresh mint sprig, a few whole berries on top, and a sprinkle of crunchy granola for added texture. Pair it with a light almond or whole-grain toast if you want a balanced breakfast.this smoothie also shines as a post-workout recharge or a refreshing afternoon pick-me-up.
| Nutrient | Per Serving |
|---|---|
| Calories | 210 kcal |
| Protein | 15 g |
| Carbohydrates | 28 g |
| Fat | 4 g |
| Fiber | 6 g |
| Antioxidants | High |

Explore More Healthy Smoothie Recipes
For additional nourishing smoothie ideas that complement your health goals, explore our Healthy Green smoothie Recipes.
Learn more about the benefits of Greek yogurt and berries at the British Nutrition Foundation.
Q&A
Q&A: Berry & Greek yogurt Smoothie – Naturally Sweet & Sugar-Free
Q: What makes a Berry & Greek Yogurt Smoothie naturally sweet without added sugar?
A: The natural sugars found in fresh or frozen berries and creamy Greek yogurt create a perfect harmony of sweetness. Berries like strawberries, blueberries, and raspberries have their own naturally occurring fructose, while Greek yogurt adds a subtle tang that enhances the fruity flavors, eliminating the need for any processed sugar.
Q: Why choose Greek yogurt over regular yogurt in this smoothie?
A: Greek yogurt is thicker, creamier, and packed with protein, which not only gives the smoothie a velvety texture but also keeps you fuller for longer. Plus, its tartness beautifully balances the sweetness of berries, resulting in a refreshing, guilt-free treat.Q: Can you customize the smoothie to suit dietary preferences?
A: Absolutely! Swap regular Greek yogurt for plant-based versions like almond or coconut yogurt to make it dairy-free while still maintaining creaminess. You can also mix different berries or add a handful of spinach or kale for an extra nutrient boost without compromising sweetness.Q: how does this smoothie support a sugar-free lifestyle?
A: By relying on whole, unprocessed ingredients that contain natural sugars, this smoothie avoids the blood sugar spikes caused by added sweeteners. It’s a delicious way to satisfy sweet cravings while nourishing your body with antioxidants, protein, and probiotics.
Q: What’s the ideal time to enjoy this Berry & Greek Yogurt Smoothie?
A: Perfect for breakfast, a mid-morning snack, or a post-workout refresher! Its protein content aids muscle recovery, and the natural sweetness gives you an energizing boost without a sugar crash later.
Q: Any tips to enhance the flavor and texture?
A: For extra creaminess, add half a ripe banana or a splash of unsweetened almond milk. To pack in some healthy fats, sprinkle in chia seeds or flaxseeds. And if you love a little zest, a small squeeze of fresh lemon juice brightens all the flavors beautifully.
Q: How simple is it to make this smoothie at home?
A: Incredibly simple! Just toss your berries, greek yogurt, and optional add-ins into a blender, whirl until smooth, and enjoy. it’s a few minutes of prep for a whole day of wholesome deliciousness.Q: Can kids enjoy this smoothie as well?
A: Definitely! Its natural sweetness and creamy texture make it a kid-amiable way to sneak in nutrients. Plus, it’s a fun, colorful drink that frequently enough becomes a family favorite.
enjoy your Berry & Greek Yogurt Smoothie-a naturally sweet, sugar-free delight that’s as good for your taste buds as it is indeed for your health!
In Summary
In a world where added sugars frequently enough sneak into our favorite treats, the Berry & Greek Yogurt Smoothie stands out as a vibrant, naturally sweet option that nourishes both body and soul. By harnessing the juicy goodness of fresh berries and the creamy tang of Greek yogurt, this smoothie not only delights your taste buds but also supports your health goals without a single gram of added sugar. So next time you’re craving something refreshing, remember: nature’s sweetness is already packed and ready to blend. Cheers to a deliciously simple way to fuel your day,one berry-filled sip at a time!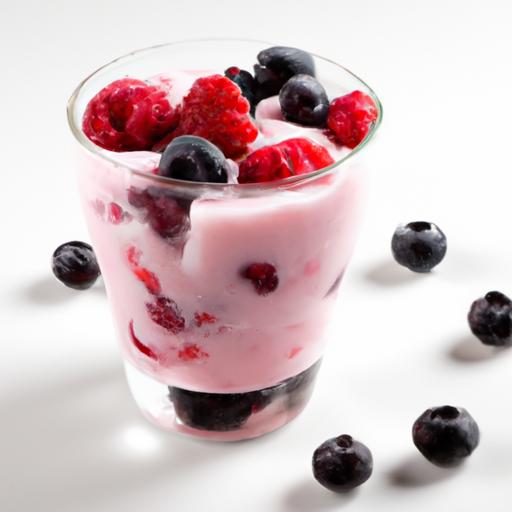
Exploring the Rich Flavors Behind the Perfect Blueberry Sauce
Blueberry Bliss is more than just a topping-it’s a luscious celebration of vibrant berries transformed into a silky, deeply flavorful sauce that elevates any cheesecake experience. Inspired by memories of sun-drenched berry picking adventures and homemade family treats, this sauce perfectly balances sweet and tart, while adding a jewel-toned splash of color and decadent texture to your dessert plate.
Key Ingredients That Make Your Blueberry Sauce Irresistible
- Fresh or frozen blueberries: Naturally sweet with a hint of tartness, these are the star of the sauce.
- Granulated sugar: Enhances sweetness and helps develop a glossy finish.
- Fresh lemon juice: Adds a radiant, zesty contrast that intensifies the fruit flavors.
- Pure vanilla extract: Deepens the aroma and rounds out the sauce’s complexity.
- Water: helps gently cook down the berries without overpowering their flavor.
- Cornstarch slurry: For that silky, perfect consistency that clings to cheesecake slices beautifully.
Prep and Cook Time
- Preparation: 5 minutes
- Cooking: 10 minutes
- Total Time: 15 minutes
Yield
Approximately 1 cup of sauce – enough to generously top 8 servings of cheesecake.
Difficulty Level
Easy – This sauce comes together quickly, perfect for cooks of all levels!
Step by Step Guide to Creating a Silky Smooth blueberry Topping
- Combine blueberries, sugar, and water in a medium saucepan over medium heat. Stir occasionally until the sugar dissolves and the blueberries start releasing their juices, about 5 minutes.
- Add lemon juice and vanilla extract, stirring to infuse the sauce with brightness and warmth.
- Mix the cornstarch slurry (1 tablespoon cornstarch + 2 tablespoons cold water) in a small bowl until smooth.
- Slowly pour the slurry into the simmering blueberry mixture while stirring constantly to prevent lumps.
- Allow the sauce to simmer gently for another 2-3 minutes until it thickens to a glossy,smooth consistency that coats the back of a spoon.
- Remove from heat and let the sauce cool slightly; it will continue to thicken as it rests.
Expert Tips for Pairing Blueberry Bliss with Different Cheesecake Varieties
- classic New York-style cheesecake: The rich creaminess contrasts beautifully with the bright blueberry sauce, creating a timeless flavor pairing.
- Lemon cheesecake: Enhance the citrus notes by adding a few fresh lemon zest shavings on top after spooning the sauce.
- Chocolate swirl cheesecake: The fruity brightness of the “Blueberry Bliss” sauce cuts through the chocolate’s richness, delivering a perfectly balanced bite.
- No-bake cheesecakes: Use the sauce chilled or slightly warmed to maintain a fresh and vibrant presentation.
- Cheesecake bars or bites: Drizzle sauce artistically just before serving, then garnish with fresh blueberries or edible flowers for an elegant touch.
Chef’s Notes and Tips for Success
- Fresh vs. frozen berries: Both work wonderfully, but frozen blueberries frequently enough yield a deeper, more vivid color.
- Sweetness adjustment: Taste the sauce before thickening; adjust sugar or lemon juice to your preferred balance.
- Make-ahead convenience: Store the sauce in an airtight container in the refrigerator for up to 5 days.Rewarm gently before serving.
- Texture tweaks: For a chunkier sauce, lightly mash some berries during cooking. For an ultra-smooth finish, strain the sauce through a fine sieve.
- Extra flair: Add a splash of red wine or a pinch of cinnamon for seasonal twists.
Serving Suggestions
Present your cheesecake slice with a generous spoonful of the blueberry sauce cascading over the side. Garnish with a few fresh blueberries, a sprig of mint, or a dusting of powdered sugar for an irresistible dessert plate.Pair the dish with a cup of freshly brewed coffee or an herbal tea to round out the experience.
| Nutritional information (per 2 tbsp) | Calories | Protein | Carbs | Fat |
|---|---|---|---|---|
| Blueberry Bliss Sauce | 45 | 0.2g | 12g | 0g |

For more inspiring dessert ideas, check out our Classic New York Cheesecake Recipe, and deepen your knowledge of berry health benefits at Healthline’s Blueberries Nutrition guide.
Q&A
Q&A: Blueberry Bliss – The Perfect Sauce to Elevate Your Cheesecake
Q: What makes blueberry sauce the ideal pairing for cheesecake?
A: Blueberries strike a sublime balance between tartness and natural sweetness,which cuts through the rich,creamy texture of cheesecake. This contrast elevates each bite,refreshing the palate while enhancing the dessert’s decadence.
Q: How can I make a blueberry sauce that truly complements cheesecake?
A: Start with fresh or frozen blueberries, a hint of sugar, a splash of lemon juice, and a pinch of cinnamon or vanilla for warmth. Simmer gently until the berries release their juices and transform into a glossy, luscious sauce. The key is to keep it slightly thick but still pourable, so it cascades beautifully over your cheesecake.
Q: Are there any secret ingredients that can take blueberry sauce from good to unforgettable?
A: Absolutely! A dash of balsamic vinegar adds unexpected depth, amplifying the berries’ natural tang. Or try a touch of fresh rosemary or lavender for a fragrant twist.These subtle layers of flavor make each spoonful of sauce feel like a gourmet surprise.
Q: Can blueberry sauce be prepared ahead of time?
A: Yes! Blueberry sauce actually benefits from resting as it allows flavors to meld and intensify. Prepare it a day or two in advance, refrigerate in a sealed container, and gently warm before serving.This makes it perfect for entertaining or when you want a stress-free dessert finish.
Q: Is blueberry sauce only good with classic cheesecake?
A: Not at all.While it’s a match made in heaven with conventional New York-style cheesecake, blueberry bliss also pairs wonderfully with no-bake cheesecakes, mini cheesecakes, and even vegan versions. Plus, it’s a delightful companion to other desserts like panna cotta, ice cream, or pancakes!
Q: How can the presentation of blueberry sauce enhance the overall cheesecake experience?
A: Presentation is everything.Drizzle the sauce artistically over each slice, garnish with fresh blueberries and mint leaves, or even swirl some into the cheesecake batter before baking for a marbled effect. visual appeal not only tempts the eyes but heightens anticipation and enjoyment.
Q: Any final tips for blueberry sauce perfection?
A: Keep it simple and taste as you go! Adjust the sweetness and acidity to complement your cheesecake style. Remember, the best blueberry sauce is vibrant, balanced, and made with love-that’s the true secret to blissful bites.
In Retrospect
As you drizzle that luscious, vibrant blueberry bliss over your cheesecake, you’re not just adding a topping-you’re crafting an experience. This sauce, bursting with the perfect balance of sweet and tangy notes, transforms every bite into a celebration of flavors. Whether you’re delighting guests or indulging in a quiet moment of self-care, this blueberry sauce elevates your cheesecake from simple dessert to unforgettable masterpiece.So next time you crave that extra touch of magic, reach for this recipe and watch your cheesecake steal the spotlight every time.
Vanilla chia seed mug cake is more than just a quick treat-it’s a nutritional powerhouse that effortlessly blends wholesome ingredients with comforting flavors. Born from the fusion of superfoods and speedy preparation, this delightful snack satisfies your sweet tooth while nourishing your body. Whether you’re craving a cozy solo dessert or a wholesome breakfast option,this recipe delivers decadence without compromise.
Prep and Cook Time
Prep Time: 5 minutes
Cook Time: 90 seconds
yield
Serves 1 (perfect for a single portion indulgence)
Difficulty Level
Easy – ideal for beginners and busy food lovers alike
Ingredients
- 4 tbsp all-purpose flour, sifted
- 1 tbsp chia seeds
- 1 tbsp maple syrup or honey
- 1/4 tsp baking powder
- 1/4 tsp vanilla extract
- 3 tbsp milk (dairy or plant-based)
- 1 tbsp unsweetened Greek yogurt or coconut yogurt
- 1 tbsp melted coconut oil or butter
- Pinch of salt
Instructions
- Combine dry ingredients: In a microwave-safe mug, whisk together the flour, chia seeds, baking powder, and a pinch of salt until evenly mixed.
- Add wet ingredients: Stir in the maple syrup, vanilla extract, milk, Greek yogurt, and melted coconut oil until a smooth batter forms. Be sure to scrape the sides of the mug so everything is incorporated.
- Let the batter rest: Allow the mixture to sit for 5 minutes. This lets the chia seeds swell and thicken the batter, giving the mug cake a perfect moist texture.
- Microwave: Cook on high for 90 seconds. Microwave ovens vary, so start with 80 seconds and add time if needed-avoid overcooking to keep the mug cake tender and moist.
- Check doneness: Insert a toothpick or fork to ensure it comes out clean. If the center is still wet, microwave in 10-second bursts until set.
- Cool briefly: Let the mug cake rest for 2 minutes to firm up and finish cooking from residual heat.
Tips for Success
- Substitutions: Use almond flour for a gluten-free option or swap Greek yogurt for dairy-free coconut yogurt.
- Sweetener tweaks: Adjust the sweetness to your preference with agave syrup or brown sugar alternatives.
- Texture tip: For extra fluffiness, separate one egg white, whip to soft peaks, and gently fold into the batter.
- Overcooking alert: Microwaving too long will dry out your mug cake; watch carefully and check frequently.
- Make ahead: Prepare dry mix blends in bulk and store airtight to speed up future breakfasts or snacks.
Serving Suggestions
Elevate your vanilla chia seed mug cake by adding a dollop of Greek yogurt or coconut cream on top. Scatter fresh berries like raspberries or blueberries for a burst of color and natural sweetness. Drizzle a thin ribbon of warm honey or chocolate sauce to create an elegant finish. For a crunchy contrast, sprinkle toasted sliced almonds or granola crumbs.Serve it on a pretty plate to make your quick, healthy mug cake look as delightful as it tastes-perfect for sharing (or not!).
| Nutrient | Amount |
|---|---|
| Calories | 230 kcal |
| protein | 6 g |
| Carbohydrates | 28 g |
| Fat | 8 g |
| Fiber | 5 g |

Discover more healthy dessert ideas in our Healthy Mug Cake Recipes collection. For an in-depth look at chia seeds’ incredible benefits visit Healthline’s detailed chia seed guide.
Q&A
Q&A: Vanilla Chia Seed Mug Cake – Quick,Healthy,and Delicious!
Q1: What makes the Vanilla Chia Seed Mug cake a healthy treat?
A1: This mug cake packs nutrition into every bite! Thanks to chia seeds,it’s rich in omega-3 fatty acids,fiber,and protein. Plus, it uses wholesome ingredients with minimal added sugars, making it a guilt-free dessert or snack that supports digestion and sustained energy.
Q2: How quick is this mug cake to prepare?
A2: Lightning-fast! From mixing to munching, it takes about 5 minutes tops. simply stir your ingredients in a mug, microwave for about 90 seconds, and voilà-a warm, fluffy cake ready to satisfy your sweet tooth in no time.
Q3: Can I customize this recipe to suit my taste or dietary needs?
A3: Absolutely! Swap dairy milk for almond or oat milk,replace sweeteners with honey or maple syrup,or add a handful of berries or chocolate chips for a personal twist. The vanilla base offers a versatile canvas for creativity.Q4: Will the chia seeds affect the texture of the cake?
A4: Yes, and in a wonderful way! Chia seeds absorb moisture and create a slightly gelatinous texture that keeps the cake moist and tender. They also add a gentle crunch that makes every bite captivating.
Q5: Is this recipe suitable for beginners?
A5: Perfectly so! No baking expertise required. The simplicity of the mug cake method means you don’t need any special equipment or skills-just a mug, a fork, and a microwave. It’s ideal for a quick indulgence anytime.Q6: How does this recipe stand out from other mug cakes?
A6: Besides being healthier, the infusion of chia seeds and natural vanilla gives it a subtle, comforting flavor and a nutritional boost that traditional mug cakes often lack. It’s a delightful way to upgrade your typical microwave dessert experience.
Q7: Can I prepare this vanilla chia seed mug cake in advance?
A7: While best enjoyed fresh and warm, you can prepare the batter ahead and refrigerate it for a day. Microwave when ready, but note the texture might be a bit different compared to freshly baked. for the ultimate experience,make it fresh!
Q8: Is this recipe suitable for any specific diet?
A8: Yes! Easily adaptable to vegan,gluten-free,and paleo diets depending on ingredient choices. Use plant-based milk and sweeteners, and ensure your flour substitute fits your dietary needs.
Q9: What occasions is this mug cake ideal for?
A9: It’s perfect for a quick breakfast boost, a mid-afternoon energy pick-me-up, or a fast dessert when cravings strike. Also great for dorm rooms, office breaks, or any time you want a cozy treat without the fuss.
Q10: Any tips to enhance the flavor or presentation?
A10: Try topping your mug cake with fresh fruit, a dollop of Greek yogurt, a sprinkle of cinnamon, or a drizzle of nut butter. Even a pinch of sea salt can intensify the sweetness and balance the flavors. Don’t forget to let it cool a bit before digging in for the best texture!
To Conclude
As you’ve discovered, the vanilla chia seed mug cake is more than just a quick treat-it’s a harmonious blend of health and indulgence, ready in minutes and brimming with wholesome goodness.whether you’re rushing through a busy morning or craving a guilt-free dessert, this recipe offers a smart, satisfying solution that fits seamlessly into any lifestyle.So next time the sweet tooth calls, remember: with just a few simple ingredients and a microwave, you can whip up a nourishing delight that’s as nourishing as it is delicious. Embrace the ease, enjoy the flavor, and let this little mug cake become your new go-to for fast, healthy happiness.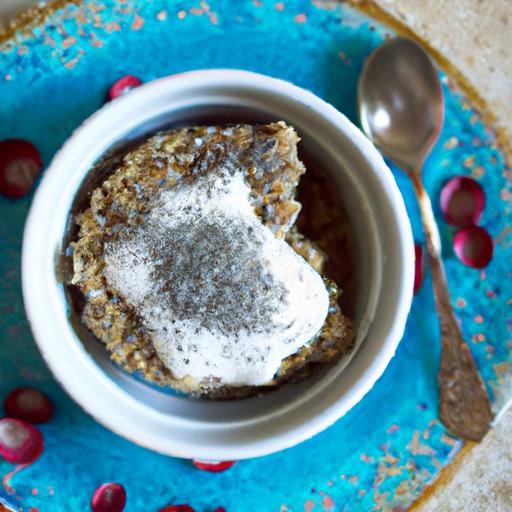
Choosing the Perfect Plant-Based Ingredients for Irresistible Flavor
Deliciously Simple Vegan Oatmeal Chocolate Chip Cookies Recipe begins with a thoughtful selection of plant-based ingredients that build layers of rich, comforting flavor. Opting for rolled oats over instant oats ensures a delightful chewiness and a rustic texture,while using coconut sugar instead of refined white sugar imparts a subtle caramel undertone that beautifully complements the dark chocolate chips. For the fat component, coconut oil lends a mild tropical note and helps achieve that coveted crisp edge, yet vegan butter can be a fantastic swap for a richer mouthfeel.Additionally, a splash of pure vanilla extract ties the flavors together, adding warmth without overpowering the cookie’s natural sweetness.
To maximize depth and complexity, consider including a pinch of cinnamon or freshly grated nutmeg. These spices evoke cozy autumnal vibes and elevate the cookie beyond the ordinary. Choosing high-quality dairy-free chocolate chips-such as those made from organic cocoa or cacao nibs-will intensify the chocolate burst in every bite. Remember, sustainable and minimally processed ingredients not only enhance taste but nourish your body and the planet.
Mastering the Art of Texture in Vegan oatmeal Chocolate Chip Cookies
The magic of perfect texture lies in balancing chewiness with the slightest crisp on the edges. Using old-fashioned rolled oats ensures each cookie has a pleasant bite,as these oats hold their shape better than quick or instant varieties. Incorporating a flaxseed or chia egg replacement, mixed with water until gelatinous, helps bind the dough while maintaining a tender crumb. Coconut oil’s semi-solid state at room temperature provides structure and a slight crunch, while keeping the centers soft.
Another key tip is to not overbake the cookies. Pull them from the oven just as their edges turn golden but centers remain slightly soft-this guarantees chewy centers after cooling. For an extra layer of texture, lightly toast the oats before mixing; this step imparts a subtle nuttiness that marries beautifully with the chocolate chips.
Tips for Baking the Ultimate Moist and Chewy Vegan Treats
Avoid drying out your cookies by measuring your flour correctly-use a spoon-and-level method rather than scooping directly from the bag. Adding a tablespoon of unsweetened applesauce or mashed banana can boost moisture naturally, keeping your cookies luscious and tender without extra oil. If your dough feels too stiff, a splash of unsweetened plant milk (almond, oat, or soy) helps loosen it without sacrificing flavor.
Remember, chilling the dough for at least 30 minutes before baking is a simple trick that enhances texture and flavor development. It prevents excessive spreading and results in thicker, chewier cookies. choose a parchment-lined baking sheet to avoid sticking and ensure even browning.
Creative Variations to Elevate Your Vegan cookie Experience
Once you’ve mastered the classic, don’t hesitate to experiment. Swapping classic semisweet chocolate chips for chunks of vegan white chocolate,dried cranberries,or chopped pecans can add exciting layers of sweet,tart,or crunchy texture.For a seasonal twist, sprinkle toasted coconut flakes or a few lavender buds on top before baking.
For an indulgent treat, drizzle your baked cookies with melted vegan caramel sauce or a dusting of powdered sugar and sea salt. Incorporating spices like cardamom or ginger adds a sophisticated flair, ideal for afternoon tea or gifting to loved ones.The possibilities are endless, so personalize your Deliciously Simple Vegan Oatmeal Chocolate Chip Cookies recipe to reflect your own culinary creativity.
Prep and Cook Time
- Preparation Time: 15 minutes
- Chilling Time: 30 minutes
- Baking Time: 12-14 minutes
- Total Time: 57 minutes
Yield
Makes approximately 24 cookies, perfect for sharing or an indulgent week of snacking.
Difficulty Level
Easy – perfect for beginner bakers and seasoned pros alike.
Ingredients
- 1 1/2 cups rolled oats (old-fashioned)
- 3/4 cup all-purpose flour,sifted
- 1/2 cup coconut sugar
- 1/4 cup brown sugar,packed
- 1/2 cup melted coconut oil (or vegan butter)
- 1 flax egg: 1 tbsp ground flaxseed + 3 tbsp water,combined and set
- 1 tsp baking soda
- 1/2 tsp sea salt
- 1 tsp pure vanilla extract
- 1 cup vegan dark chocolate chips
- Optional: 1/2 tsp cinnamon or pinch of nutmeg
Instructions
- Preheat your oven to 350°F (175°C). Line two baking sheets with parchment paper.
- Prepare the flax egg: In a small bowl, mix ground flaxseed with water and let it sit for 5 minutes until gelatinous.
- Toast the oats: In a dry skillet over medium heat, toast the rolled oats for 3-4 minutes, stirring frequently until aromatic and lightly golden. Let cool.
- Mix dry ingredients: In a large bowl, combine the flour, baking soda, sea salt, coconut sugar, brown sugar, and optional spices.
- Blend wet ingredients: In another bowl, whisk together the melted coconut oil, vanilla extract, and flax egg until smooth.
- Combine: Pour the wet mixture into the dry ingredients. Stir until just combined, then fold in the toasted oats and chocolate chips.
- Chill the dough: Cover and refrigerate the dough for at least 30 minutes to firm up.
- Form cookies: Using a tablespoon or cookie scoop, drop dough onto the prepared baking sheets, spacing them 2 inches apart.
- Bake: Bake for 12-14 minutes or until edges are golden but centers look slightly soft. Avoid overbaking for chewy cookies.
- Cool: Allow cookies to cool on the baking sheet for 5 minutes before transferring to a wire rack to cool wholly.
Tips for Success
- Substitute rolled oats: For a gluten-free version, use certified gluten-free oats.
- Sweetener swap: Maple syrup or agave can replace sugar but reduce other liquids slightly.
- dough consistency: If too crumbly, add a tablespoon of plant milk gradually to moisten.
- Make-ahead: Dough can be stored in the refrigerator up to 3 days or frozen for 2 months. Bake from chilled or frozen.
- Storage: Keep cookies in an airtight container at room temperature for up to 5 days or freeze for longer.
serving suggestions
Serve these cookies with a chilled glass of almond milk or your favorite hot beverage like chai or espresso for a cozy treat. Garnish with a light dusting of powdered sugar or a sprinkle of flaky sea salt for a gourmet touch. For parties, place the cookies on a rustic wooden platter surrounded by fresh berries and edible flowers, creating a visually stunning dessert centerpiece that’s sure to impress.
| Nutrition per Cookie | Amount |
|---|---|
| Calories | 140 kcal |
| Protein | 2 g |
| Carbohydrates | 22 g |
| Fat | 6 g |

For more plant-based baking inspiration, check out our vegan Desserts Collection. Also, discover expert baking science tips at king Arthur Baking to perfect your craft.
Q&A
Q&A: Deliciously Simple Vegan Oatmeal Chocolate Chip Cookies Recipe
Q1: What makes these oatmeal chocolate chip cookies vegan?
A1: These cookies skip traditional animal-based ingredients like butter, eggs, and dairy. Instead, they use plant-based alternatives such as coconut oil or vegan margarine, flaxseed or chia seeds as egg substitutes, and dairy-free chocolate chips. This keeps the flavor rich and the texture chewy without compromising on compassion.
Q2: How do you achieve the perfect chewy texture without eggs?
A2: The magic lies in using flaxseed or chia seeds mixed with water as an egg replacement. this mixture acts as a natural binder and retains moisture, giving the cookies that perfect chewy bite.Plus, rolled oats add a hearty texture that’s both satisfying and wholesome.
Q3: Can I use gluten-free oats in this recipe?
A3: Absolutely! Just be sure to pick certified gluten-free oats if you have sensitivities or celiac disease. The rest of the recipe works seamlessly with gluten-free oats, making these cookies a treat for everyone to enjoy.
Q4: What’s the best type of vegan chocolate chips to use?
A4: Look for dairy-free and ethically sourced chocolate chips. Dark chocolate chips ofen have a higher cocoa content and less added sugar, which pairs beautifully with the nuttiness of oats. Some brands even offer cacao nibs or vegan white chocolate chips, which can add exciting twists to the classic flavor.
Q5: Is this recipe quick and beginner-kind?
A5: Yes! This recipe was designed with simplicity in mind-minimal ingredients, straightforward steps, and no fancy equipment needed.Whether you’re a novice baker or a seasoned cookie enthusiast, you’ll appreciate how easily these come together for a quick, guilt-free treat.
Q6: Can I customize the cookies with nuts or dried fruit?
A6: Definitely! Feel free to mix in chopped walnuts,pecans,or dried cranberries for added texture and flavor. Just keep the total mix-ins to about a cup to maintain the balance and baking consistency.
Q7: How should I store these cookies to keep them fresh?
A7: Store them in an airtight container at room temperature for up to 4-5 days. For longer storage, pop them in the freezer-frozen cookies can stay fresh for up to 3 months and are deliciously quick to thaw or even enjoy frozen!
Q8: What’s the secret to not overbaking vegan cookies?
A8: Vegan cookies often continue to firm up as they cool, so it’s best to pull them from the oven when the edges are slightly golden but the centers look a bit soft. This ensures a tender, chewy result rather than a dry, crumbly cookie.Q9: Can this recipe be turned into cookie bars?
A9: Yes! Simply press the dough evenly into a lined baking pan and bake a bit longer until golden and set. Once cooled, cut into bars for a convenient grab-and-go snack perfect for lunchboxes or picnics.
Q10: Why choose vegan oatmeal chocolate chip cookies over regular ones?
A10: Beyond dietary preferences, vegan oatmeal chocolate chip cookies frequently enough boast cleaner ingredients with less saturated fat and no cholesterol. They’re kinder to animals and the planet while still delivering that timeless, comforting cookie experience we all crave. Plus, their wholesome ingredients can provide a nutrient boost with the fiber from oats and the antioxidants in dark chocolate!
The Way Forward
Baking these deliciously simple vegan oatmeal chocolate chip cookies is more than just making a sweet treat-it’s a festivity of wholesome ingredients coming together in perfect harmony. with each soft, chewy bite, you’re enjoying a recipe that’s as kind to the planet as it is indeed to your taste buds. Whether you’re a seasoned vegan, a curious foodie, or simply someone craving a comforting cookie, these cookies offer a guilt-free indulgence that’s easy to whip up anytime.So go ahead, grab your mixing bowl and savor the joy of homemade, plant-based goodness-one cookie at a time.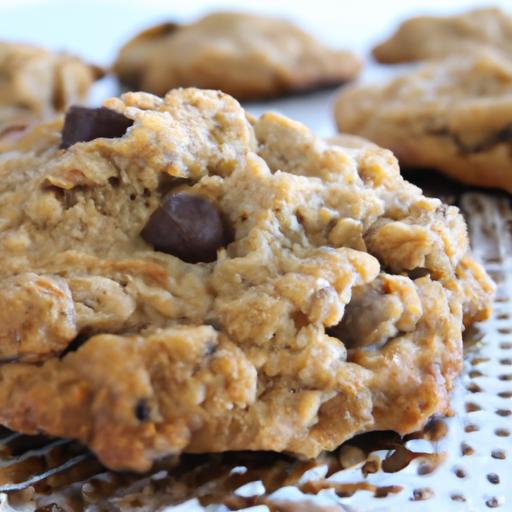
Delight in guilt-free sugar-free strawberry frozen yogurt by embracing the natural sweetness of ripe strawberries, a fruit celebrated not only for its vibrant, juicy flavor but also for its abundance of antioxidants and vitamin C. This refreshing treat unlocks the creamy texture and indulgent mouthfeel you crave-without any added sugars-making it the perfect wholesome dessert for sunny afternoons or post-workout recovery.
Prep and Cook Time
Preparation: 15 minutes | Freezing Time: 4 hours
Yield
Serves 4 generous portions
Difficulty level
Easy – perfect for beginners and seasoned home cooks alike
Ingredients
- 3 cups fresh strawberries, hulled and halved
- 1 cup plain sugar-free Greek yogurt (see tips below for best bases)
- 1 tsp pure vanilla extract
- 1 tbsp freshly squeezed lemon juice
- 1/4 cup unsweetened almond milk (or any unsweetened milk alternative)
- optional: 1 tbsp natural erythritol or monk fruit sweetener for added subtle sweetness
Instructions
- Freeze the Strawberries: Lay the cleaned and halved strawberries on a parchment-lined tray and freeze for at least 2 hours until solid. This step ensures a smooth and creamy texture without dilution.
- Blend the Strawberries: Transfer frozen strawberries to a high-speed blender or food processor. Add the lemon juice and almond milk to help with blending.
- Puree Until Smooth: blend on high until a thick, sorbet-like consistency forms, scraping down the sides as needed to ensure everything is evenly mixed.
- Incorporate Yogurt and Vanilla: Add the sugar-free Greek yogurt and vanilla extract to the strawberry puree. Blend again on medium speed until creamy and fully combined.
- Taste and Adjust: Sample your mixture. If you prefer slightly sweeter frozen yogurt, gently fold in your optional natural sweetener at this stage.
- Freeze the Mixture: Pour your strawberry frozen yogurt base into a shallow airtight container. Freeze uncovered for 2 hours, stirring every 30 minutes with a fork to prevent ice crystals and maintain creaminess.
- Final Freeze: After stirring for 2 hours, cover the container and freeze for an additional 2 hours or until firm but scoopable.
- Serve & Enjoy: let it sit at room temperature for 5 minutes before scooping for perfect texture.
Chef’s Notes: Tips for Success
- Strawberry Selection: Use the ripest strawberries you can find; their natural sugars boost flavor and reduce the need for sweetening.
- Yogurt Base: Choose plain, unsweetened, and high-protein Greek yogurt for a tangy creaminess. Brands like Stonyfield organic Sugar-Free Greek Yogurt deliver both flavor and nutrition.
- Dairy-Free Alternative: Opt for coconut-based or almond-based sugar-free yogurts if you want a dairy-free version,but expect a subtle taste shift.
- Texture Tips: Do not skip stirring during the freezing process to avoid icy chunks and maintain that luscious creamy texture synonymous with authentic frozen yogurt.
- Prep Ahead: The base can be made a day in advance and stored in the freezer; just thaw slightly and whisk before refreezing to refresh creaminess.
Serving Suggestions
Serve your sugar-free strawberry frozen yogurt in charming glass bowls or vintage cups for an inviting presentation. Add a sprig of fresh mint or a dusting of lemon zest to enhance aroma and add color contrast.To elevate the experience further,sprinkle crunchy toasted sliced almonds,a handful of chia seeds,or unsweetened shredded coconut for texture and health-boosting benefits. Drizzle with a light sugar-free dark chocolate sauce or serve alongside fresh berries for a decadent touch without guilt.

| Nutrient | Per Serving |
|---|---|
| Calories | 110 |
| Protein | 8g |
| Carbohydrates | 15g (naturally occurring) |
| Fat | 1.5g |
For further inspiration, explore our detailed guide on Healthy Fruit Desserts and discover endless guilt-free treats. Remember,by choosing sugar-free sugar-free strawberry frozen yogurt,you are celebrating fresh ingredients and nourishing your body deliciously and naturally [1].
Q&A
Q&A: Delight in Guilt-Free Sugar-Free Strawberry Frozen Yogurt
Q1: What makes sugar-free strawberry frozen yogurt a guilt-free treat?
A1: Sugar-free strawberry frozen yogurt lets you indulge your sweet tooth without the added sugars that frequently enough weigh down traditional desserts. By swapping out sugar for natural or low-calorie sweeteners and using fresh, ripe strawberries, this frozen yogurt offers all the fruity flavor and creamy satisfaction-minus the sugar crash and extra calories.Q2: How can frozen yogurt be creamy without sugar?
A2: The creamy texture in sugar-free frozen yogurt comes from its high-quality yogurt base, often rich in live cultures and proteins. These ingredients create smoothness and tanginess,while the natural sweetness of strawberries and alternative sweeteners round out the flavor profile,delivering a luscious mouthfeel without relying on sugar.Q3: Are there any health benefits to choosing sugar-free strawberry frozen yogurt?
A3: Absolutely! Without the added sugar, this treat supports more stable blood sugar levels and fewer empty calories. Plus, the probiotics in yogurt promote gut health, and the antioxidant-packed strawberries boost your immune system. It’s dessert that feeds both your taste buds and your wellbeing.
Q4: Can I make sugar-free strawberry frozen yogurt at home?
A4: Yes! You just need plain Greek yogurt, fresh strawberries, a sugar substitute like stevia or erythritol, and a blender.Blend until smooth, then freeze and stir occasionally for that perfect frozen texture. Homemade versions allow you to customize sweetness and ingredients,ensuring a truly guilt-free creation.
Q5: How does sugar-free frozen yogurt compare to traditional ice cream?
A5: Sugar-free strawberry frozen yogurt is generally lighter, lower in calories, and packed with probiotics, unlike ice cream which is richer and higher in fats and sugars. It’s a refreshing alternative that satisfies cravings while keeping your health goals intact.
Enjoy the sweet life, minus the guilt! Sugar-free strawberry frozen yogurt proves that indulgence and wellness can go hand in hand.
To Conclude
As you savor each bite of this guilt-free, sugar-free strawberry frozen yogurt, you’re not just indulging your sweet tooth-you’re celebrating a mindful approach to dessert that nourishes both body and soul. Embracing this refreshing treat means you can enjoy the vibrant flavors of summer strawberries without compromise, striking the perfect balance between health and happiness. So next time the craving hits, remember: pleasure and wellness can coexist beautifully in one creamy, dreamy scoop.