Creamy Almond Butter banana Smoothie: nutty Twist on Health
The creamy almond butter banana smoothie is more than just a flavorful start to your day-it’s a vibrant blend that brings together wholesome nutrition and mouthwatering flavor in every sip. Inspired by the ancient tradition of blending nuts and fruits for sustained energy, this smoothie elevates everyday bananas with the rich, buttery depth of almond butter. Let’s dive into how these ingredients transform a simple smoothie into a powerhouse of nourishment.
Prep and Cook Time
Prep: 5 minutes | Cook: 0 minutes | Total: 5 minutes
Yield
Servings: 2 generous smoothies
Difficulty Level
Easy - Perfect for beginners and busy mornings
Benefits of Almond Butter in Boosting Smoothie Nutrition
Almond butter is a nutritional superstar in the world of nut butters, delivering a rich profile of healthy fats, plant-based protein, and essential vitamins and minerals. Incorporating almond butter into your smoothie adds smooth texture and a satisfying nutty depth, making it a crucial ingredient for anyone wanting to boost energy and keep hunger at bay longer.
- Good source of monounsaturated fats, which support heart health and reduce inflammation.
- High in vitamin E, a powerful antioxidant that promotes skin health and immune function.
- Rich in magnesium, helping muscle function and energy production.
- Contains protein and fiber that stabilize blood sugar and increase satiety.
When blended with banana, almond butter not only enriches the nutrient content but also adds a velvety smoothness that makes every sip indulgent yet guilt-free.
The Perfect Banana Selection for Maximum Creaminess and Flavor
Choosing the right banana is pivotal in crafting a great smoothie.For the ultimate creaminess and sweetness, opt for a fully ripe banana with vibrant yellow skin flecked with brown spots. These bananas have a higher sugar concentration, lending natural sweetness without added sugars.
- Avoid underripe bananas as their starch content imparts a chalky texture and less sweetness.
- If you prefer a cooler smoothie, pre-freeze peeled ripe bananas in slices-this method intensifies creaminess and creates a refreshing thickness.
The banana acts as a natural thickener and flavor balancer with almond butter’s savory notes, rounding out a perfect harmony of taste and texture.
Step by Step Guide to Crafting Your Ultimate Nutty smoothie
- Prepare ingredients: Peel 2 ripe bananas and slice them. Measure 3 tablespoons of almond butter-preferably unsweetened and creamy.
- Add liquids first: Pour 1 cup of unsweetened almond milk into your blender.This creates the perfect base for smooth blending without overloading the motor.
- Layer ingredients: Add the sliced bananas, almond butter, and 1 tablespoon of honey or maple syrup for a subtle touch of sweetness (optional).
- Boost nutrition: Toss in 1 tablespoon of ground flaxseeds or chia seeds for extra fiber and omega-3 fatty acids.
- Blend until smooth: Start on low speed, gradually increasing to high. Blend about 45-60 seconds or until velvety smooth with no lumps.
- adjust consistency: Add more almond milk in ¼ cup increments if you prefer a thinner texture.
- Serve immediately: Pour into tall glasses and garnish as desired.
Expert Tips to Customize and Enhance Your Almond Butter Banana Blend
- Add greens: Toss in a handful of baby spinach or kale for an extra nutrient boost without altering flavor.
- Protein punch: Include a scoop of plant-based or whey protein powder for a post-workout smoothie.
- Spice it up: A pinch of ground cinnamon or nutmeg adds warmth and depth to your drink.
- Texture twist: Sprinkle crushed almonds or granola on top for crunch contrast.
- Make it a dessert: Blend in 1 tablespoon of cocoa powder or use frozen banana slices for a thicker, ice cream-like treat.
- Meal prep: Pre-portion dry ingredients (seeds, spices) in freezer bags and freeze banana slices to speed up morning prep.
ingredients
- 2 ripe bananas,peeled and sliced
- 3 tablespoons creamy almond butter (unsweetened)
- 1 cup unsweetened almond milk
- 1 tablespoon ground flaxseeds or chia seeds
- 1 tablespoon honey or maple syrup (optional)
- Pinch of ground cinnamon (optional)
- Ice cubes (optional for cold smoothies)
Instructions
- Start by adding 1 cup unsweetened almond milk to your blender container. This helps the blades move smoothly through the ingredients.
- layer the sliced bananas and 3 tablespoons creamy almond butter right on top of the liquid.
- Add 1 tablespoon ground flaxseeds or chia seeds for a fiber and omega boost.
- if desired, drizzle 1 tablespoon honey or maple syrup for sweetness and sprinkle a pinch of cinnamon.
- Secure the lid and blend on low speed initially, slowly increasing to high. Blend until fully smooth, about 45-60 seconds.
- Check the texture; add more almond milk if too thick, or ice cubes for chill and blend briefly.
- Pour your smoothie into glasses and garnish with a light sprinkle of cinnamon or slivered almonds.
- Serve immediately to enjoy the freshest flavor and optimal nutrient benefits.
Chef’s Notes
- Almond Butter Substitute: Use cashew or peanut butter if allergies or preference dictate, but note these alter flavor profile.
- Sweetener Swap: Replace honey with agave nectar or leave it out for a naturally sweet banana base.
- Thickness Tips: Freeze banana slices ahead for an ice cream-like texture without watering down your smoothie.
- Storage: Best enjoyed fresh. If needed, refrigerate for up to 24 hours and stir before drinking.
- Blender Efficiency: High-speed blenders yield the creamiest results but standard blenders perform well with liquid layering first.
Serving Suggestions
For visual appeal and extra flavor bursts,garnish your smoothie with:
- Thinly sliced banana rounds on top
- A sprinkle of crushed roasted almonds or toasted coconut flakes
- A drizzle of almond butter or honey over the rim
- A cinnamon stick as a stylish stirrer
- Colorful fresh berries aside for a vibrant contrast
Serve in clear glass tumblers to showcase the smooth,golden hue of this nutritious blend-a feast for both eyes and palate.
| Nutrient | Per Serving |
|---|---|
| Calories | 280 kcal |
| Protein | 7 g |
| Carbohydrates | 32 g |
| Fat | 14 g |

For more smoothie inspiration and healthful recipes, check out our Healthy Breakfast Smoothies Collection. Learn about the science behind nuts and heart health at the American Heart Association.
Q&A
Q&A: Creamy Almond Butter Banana Smoothie - A Nutty Twist on Health
Q1: What makes the Creamy Almond Butter banana Smoothie so special compared to regular smoothies?
A1: This smoothie isn’t just your run-of-the-mill blend; it’s a luscious marriage of creamy almond butter and ripe bananas, delivering a nutty, naturally sweet flavor with a velvety texture. Unlike typical fruit smoothies, the almond butter adds rich protein and healthy fats, transforming it into a satisfying, energy-boosting drink that keeps you full longer.
Q2: Why choose almond butter as the nutty star ingredient?
A2: Almond butter is a nutritional powerhouse packed with heart-healthy monounsaturated fats, vitamin E, magnesium, and fiber. It supports brain health, promotes glowing skin, and helps regulate blood sugar levels. Plus, its creamy consistency elevates the smoothie’s texture, making every sip indulgently smooth.Q3: Can this smoothie be tailored for different dietary needs?
A3: Absolutely! Whether you’re vegan, gluten-free, or following a keto lifestyle, this smoothie is versatile. Swap dairy milk for almond, oat, or coconut milk to keep it plant-based; add a touch of cinnamon or a scoop of protein powder to suit your fitness goals; or incorporate greens like spinach to sneak in extra nutrients without losing that creamy delight.
Q4: How does the banana contribute beyond just sweetness?
A4: Bananas are more than just natural sugar boosters. They provide a solid dose of potassium, which regulates blood pressure and muscle function, and contain prebiotic fiber that supports gut health. Their creamy texture also helps bind the smoothie, creating that irresistibly smooth mouthfeel we crave.
Q5: Is the Creamy Almond Butter Banana Smoothie a good option for post-workout recovery?
A5: without a doubt! the combo of carbs from banana and protein + healthy fats from almond butter helps replenish glycogen stores and repair muscles. This smoothie offers a balanced nutrient profile that restores energy and aids muscle recovery, making it an ideal post-exercise treat.
Q6: How speedy and easy is this smoothie to prepare?
A6: Super easy! Just toss almond butter, a ripe banana, milk of choice, and optional extras like a dash of honey or chia seeds into a blender. Blend for 30 seconds, and you have a wholesome, creamy smoothie ready to fuel your day-perfect for busy mornings or a quick afternoon pick-me-up.Q7: can kids enjoy this creamy nutty concoction?
A7: Definitely! Kids usually love the natural sweetness of banana paired with the smooth, nutty flavor of almond butter. Just be mindful of any nut allergies, and you’ve got a delicious snack that sneaks in nutrients without any fuss.
Q8: Any tips to make the smoothie even more indulgent without losing health benefits?
A8: For a creamy luxe twist, add a splash of vanilla extract or a sprinkle of cacao nibs for a subtle chocolate note. You can also toss in a frozen date or two for extra natural sweetness. incorporating a handful of oats adds fiber and a slight chewiness while keeping it wholesome.
This Creamy almond Butter Banana Smoothie isn’t just a drink-it’s a wholesome experience blending flavor,nutrition,and convenience. Give your health a nutty twist with every sip!
Closing Remarks
In the world of wholesome blends, the Creamy Almond Butter Banana Smoothie stands out as a delightful fusion of taste and nutrition. With each sip, you embrace the rich nuttiness of almond butter perfectly balanced by the natural sweetness of ripe bananas, creating a nourishing treat that’s as satisfying as it is healthful.Whether you’re kickstarting your morning or seeking a revitalizing afternoon boost, this smoothie offers a simple yet powerful way to fuel your body and tantalize your taste buds. So go ahead-blend up this nutty twist on health and savor the creamy goodness that turns everyday wellness into a delicious ritual.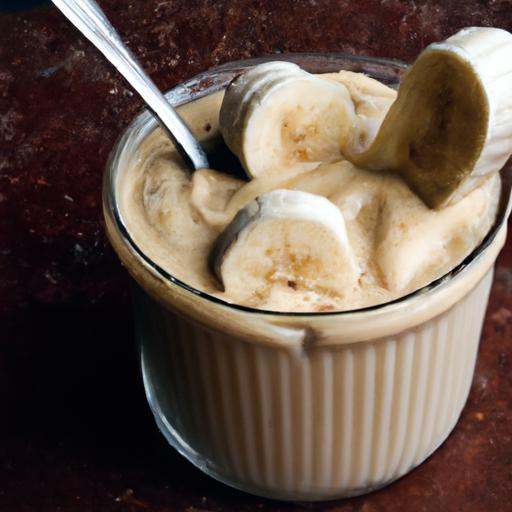
Banana Peanut Butter Overnight oats bring together the creamy richness of nut butter with the natural sweetness of ripe bananas, crafting a breakfast that’s as wholesome as it is indulgent. This easy, nourishing dish has become my go-to morning ritual-its velvety texture and invigorating flavor make waking up a delight. The magic lies in the slow overnight soak, which transforms simple oats into a luscious, ready-to-eat breakfast that saves precious time without sacrificing nutrition.
Prep and Cook Time
Preparation: 5 minutes
Refrigeration (Soaking): Minimum 4 hours or overnight
Total Time: 4 hours 5 minutes
Yield
Serves 2 hearty breakfasts
Difficulty Level
Easy – perfect for beginners and busy mornings
Ingredients
- 1 cup rolled oats
- 1 ripe banana, mashed
- 2 tablespoons creamy peanut butter
- 1 cup unsweetened almond milk (or your preferred milk)
- 1 tablespoon chia seeds (for extra fiber and thickness)
- 1 teaspoon pure vanilla extract
- 1 teaspoon honey or maple syrup (optional, for sweetness)
- Pinch of sea salt
Instructions
- Combine oats and chia seeds: In a medium bowl or a mason jar, stir together the rolled oats and chia seeds evenly to ensure consistent texture after soaking.
- Mash the banana: Use a fork to mash the ripe banana until smooth but still slightly chunky for texture.
- Add wet ingredients: Mix the mashed banana, peanut butter, almond milk, vanilla extract, honey, and a pinch of sea salt into the oats and chia seed mixture. Stir thoroughly until the peanut butter is fully incorporated and the mixture looks creamy and well combined.
- Divide & chill: Transfer the mixture into two serving jars or bowls with lids. Seal and refrigerate for at least 4 hours, preferably overnight, allowing the oats and chia seeds to swell and thicken the mixture.
- stir and serve: in the morning, give your oats a good stir to redistribute the ingredients and achieve that irresistibly creamy consistency. If needed, add a splash of almond milk to loosen the texture.
- Add toppings and enjoy: Personalize your overnight oats with an array of creative toppings and dive into a breakfast that energizes you.
Chef’s Notes: Tips for Success
- Consistency matters: For thicker oats, increase chia seeds to 2 tablespoons or use less milk.
- Switch it up: Swap peanut butter for almond, cashew, or sunflower seed butter for varied flavor profiles.
- Sweetener choice: Adjust honey or maple syrup quantity according to your sweetness preference or omit entirely for a low-sugar option.
- Make it vegan & allergy-amiable: Use plant-based milk and pure maple syrup to keep this recipe both vegan and nut-aware if substituting nut butter.
- Batch prep: Double or triple the recipe in larger containers for an effortless weekday grab-and-go breakfast.
Serving Suggestions
Transform the humble bowl of Banana peanut Butter Overnight Oats into a vibrant morning feast with these colorful toppings:
- Fresh sliced bananas and chopped peanuts for contrast and crunch
- A sprinkle of cinnamon or cacao nibs to deepen flavor complexity
- Drizzle a little extra peanut butter or almond butter warmed slightly for luscious ribbons
- Add bursts of antioxidants with fresh berries or pomegranate seeds
- For a tropical twist, toss in shredded coconut or diced mango cubes

Nutrition at a Glance
| Nutrient | Per serving |
|---|---|
| Calories | 350 kcal |
| Protein | 10 g |
| Carbohydrates | 45 g |
| fat | 12 g |
Fuel your morning with this nourishing blend of complex carbs, protein, and healthy fats-all wrapped in the undeniably rich duo of banana and peanut butter. For more wholesome breakfast ideas, explore our Healthy Breakfast Recipes collection.
To deepen your knowledge on the health benefits of oats, visit Healthline’s thorough oat guide.
Q&A
Q&A: Everything You Need to No About Banana peanut Butter Overnight Oats – Your Easy, Healthy Start
Q1: What exactly are Banana peanut Butter Overnight Oats?
A1: Imagine creamy oats soaked overnight in milk, infused with the natural sweetness of ripe bananas, and the rich, nutty goodness of peanut butter. Banana Peanut butter Overnight Oats are a make-ahead breakfast wonder that’s both tasty and nutritious, ready to fuel your morning with minimal effort.
Q2: Why choose overnight oats over customary hot oatmeal?
A2: Overnight oats save you precious time in the morning by soaking and softening in the fridge overnight-no cooking required! Plus, they’re cool and refreshing, perfect for busy days or warmer climates.The slow absorption also helps maintain steady energy levels, making them a smart, sustaining start to your day.
Q3: How healthy are banana Peanut Butter Overnight Oats?
A3: Very! Packed with fiber from oats and bananas, protein from peanut butter, and essential vitamins and minerals, this combo supports digestion, heart health, and sustained energy. Plus, they can be easily customized to be lower in sugar or higher in protein, fitting various dietary needs.
Q4: Can I use any type of milk?
A4: Absolutely! Whether it’s dairy, almond, oat, soy, or coconut milk, the choice is yours. Each brings its own subtle flavor and creaminess. For a dairy-free or vegan option, plant-based milks work perfectly without compromising taste or texture.
Q5: How ripe should the bananas be for the best flavor?
A5: Ripe bananas with brown speckles are ideal-they’re naturally sweeter and creamier, blending seamlessly into your oats. If you prefer less sweetness, slightly underripe bananas work too, lending a milder banana essence.
Q6: Can I prepare these oats in larger batches?
A6: Yes! Make a few jars at once to have grab-and-go breakfasts ready for several days. Just keep them refrigerated and enjoy within 3 to 4 days for optimal freshness and taste.
Q7: What toppings or mix-ins work well with this recipe?
A7: The sky’s the limit! Try adding chia seeds, flaxseeds, chopped nuts, fresh berries, a drizzle of honey or maple syrup, or even a sprinkle of cocoa nibs. these extras boost texture, flavor, and nutrition.
Q8: Is this breakfast suitable for kids and picky eaters?
A8: Definitely! The natural sweetness and creamy texture appeal to many palates, and as it’s customizable, you can adjust flavors to suit your family’s preferences. it’s also a gentle, wholesome option to introduce healthier habits.
Q9: How do I store Banana Peanut Butter Overnight Oats?
A9: Store your oats in airtight jars or containers in the refrigerator. They keep well for up to four days, making them a convenient, ready-to-eat breakfast you can enjoy any morning.
Q10: Can overnight oats help with weight management?
A10: Becuase they’re high in fiber and protein, Banana Peanut Butter Overnight Oats promote fullness and help stabilize blood sugar, which can prevent overeating later in the day. Paired with a balanced diet, they’re a smart choice for supporting healthy weight goals.
Ready to wake up to a creamy, dreamy breakfast that energizes your mornings? Banana Peanut butter Overnight Oats are your easy, healthy start-no cooking, no fuss, just wholesome goodness in a jar!
To Conclude
As the sun rises and your morning routine begins, let Banana Peanut Butter Overnight Oats be your trusty companion-a simple, wholesome delight that fuels your day with ease and flavor. Combining the creamy richness of peanut butter, the natural sweetness of ripe bananas, and the hearty goodness of oats, this recipe transforms busy mornings into moments of nourishment and joy. So, tuck it into your fridge tonight, and wake up to a bowl that’s as effortless as it is indeed energizing. Here’s to starting every day with a spoonful of health, happiness, and a little bit of magic.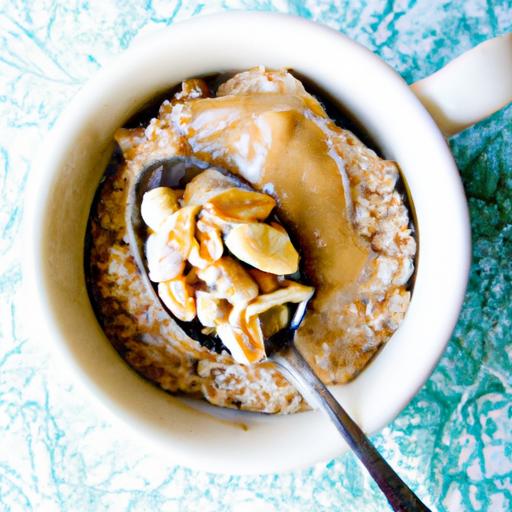
Power-Packed No-Bake Peanut Butter Protein balls Recipe offers a delightful way to fuel your day with nutritious energy in just a few simple bites. These bite-sized powerhouses blend creamy peanut butter with protein-rich ingredients, making them the perfect snack for busy mornings, post-workout recovery, or a midday pick-me-up. Inspired by the classic energy ball concept, this recipe combines wholesome elements into an effortless treat that tastes indulgent yet supports your health goals.
Prep and Cook Time
- Preparation: 15 minutes
- Chilling: 30 minutes
- Total time: 45 minutes
Yield
- Makes 20 protein balls
Difficulty Level
- Easy – No baking or complex techniques required
Ingredients
- 1 cup natural creamy peanut butter (unsweetened and unsalted for best results)
- 1 cup old-fashioned rolled oats (gluten-free, if preferred)
- 1/2 cup vanilla whey or plant-based protein powder
- 1/4 cup honey or pure maple syrup
- 1/4 cup ground flaxseed (acts as a natural binder and fiber boost)
- 1/3 cup mini dark chocolate chips (optional, for a touch of richness)
- 1 tsp pure vanilla extract
- Pinch of sea salt
Instructions
- Combine the wet ingredients: In a large mixing bowl, stir together peanut butter, honey (or maple syrup), and vanilla extract until smooth and creamy.
- Add dry ingredients: Gradually mix in the rolled oats, protein powder, ground flaxseed, and sea salt until evenly combined. The mixture should be thick but pliable. If too dry, add a teaspoon of water or almond milk; if too wet, add extra oats.
- Fold in chocolate chips: Gently incorporate the mini dark chocolate chips for an irresistible burst of flavor and texture.
- Shape protein balls: Using clean hands or a small cookie scoop, roll the mixture into 1-inch balls. Press firmly to ensure they hold together.
- Chill: Place the balls on a baking sheet lined with parchment paper and refrigerate for at least 30 minutes to firm up.
- Store: transfer to an airtight container and keep refrigerated for up to 1 week or freeze for up to 3 months.
Chef’s Notes and Tips for Success
- Protein powder choice: Use your favorite flavor, such as vanilla, chocolate, or unflavored, to customize the profile of these protein balls.
- nut butter alternatives: Almond butter or cashew butter work well for a different but equally delicious taste.
- Boost protein further: Add a tablespoon of chia seeds or hemp hearts for extra nutrients.
- Vegan option: Replace honey with maple syrup and use plant-based protein powder.
- Texture tip: For crunch, add chopped nuts or seeds. For extra creaminess, mix in a tablespoon of Greek yogurt before rolling.
- Make-ahead magic: These balls actually taste better after resting overnight as flavors meld and the texture firms up beautifully.
Serving Suggestions
- Enjoy as a quick pre-workout snack paired with a glass of cold almond milk or your favorite smoothie.
- Arrange on a colorful plate garnished with fresh berries, a sprinkle of chia seeds, and a drizzle of melted dark chocolate for a stunning energy-boosting snack tray.
- Wrap individually in parchment paper and pack in your lunchbox or gym bag to keep hunger at bay on busy days.
- Crush and sprinkle over yogurt bowls or oatmeal for added texture and protein.
| Nutrient | Per 1 ball |
|---|---|
| Calories | 120 kcal |
| Protein | 6 g |
| Carbohydrates | 10 g |
| Fat | 7 g |
Elevate your snacking routine with this easy-to-make recipe by checking out our healthy snacking ideas. For more science-backed nutrition info on the benefits of peanut butter and protein, visit Healthline’s complete guide.

Q&A
Q&A: Power-Packed No-Bake Peanut Butter Protein Balls Recipe
Q1: What makes these peanut butter protein balls “power-packed”?
A1: These little bite-sized wonders are loaded with nutrient-dense ingredients like peanut butter, protein powder, oats, and chia seeds. Together, they provide a potent blend of healthy fats, protein, and fiber that fuels your body and keeps your energy levels steady throughout the day.Q2: Why choose a no-bake recipe? isn’t baking better?
A2: No-bake means no oven, no fuss, and no time wasted! This recipe is perfect for quick prep, preserving the natural texture and flavors of the ingredients. Plus, it keeps heat-sensitive nutrients intact and makes for an ideal on-the-go snack without heating up your kitchen.
Q3: Can I customize these protein balls to fit my dietary needs?
A3: Absolutely! They’re incredibly versatile.Swap the peanut butter for almond or sunflower seed butter if you have allergies, use your favorite protein powder (whey, plant-based, collagen), or add extras like dark chocolate chips, dried fruits, or seeds to make them uniquely yours.
Q4: How long do these protein balls last, and how should I store them?
A4: Stored in an airtight container, these power balls stay fresh for up to a week in the fridge. You can also freeze them for up to three months-perfect for meal prepping or grabbing a quick protein boost anytime.
Q5: Are these protein balls suitable for kids and picky eaters?
A5: Yes! The naturally sweet peanut butter combined with a hint of honey or maple syrup makes them taste like a treat rather than a health snack. Their soft, chewy texture is generally a hit with kids, making them a nutritious option to candy or processed snacks.Q6: What’s the best time to enjoy these protein balls?
A6: Anytime you need a quick energy boost-post-workout, mid-morning snack, or late afternoon slump. Their balanced mix of protein and carbs aids muscle recovery and keeps you satiated until your next meal.
Q7: Do these protein balls provide enough protein for a workout recovery snack?
A7: Definitely! Each bite packs a good amount of protein, especially if you choose a concentrated protein powder. Paired with healthy fats and carbs, they’re excellent for muscle repair and replenishing glycogen stores after exercise.
Q8: Can I make a bigger batch, or are they best fresh?
A8: Making a larger batch is encouraged! These snack balls actually firm up more and flavor-marinate better after resting in the fridge for a day or two. Just be sure to keep them stored properly to maintain freshness.
Q9: What’s the easiest way to roll the protein balls without sticking to my hands?
A9: Lightly dampen your hands with water or coat them with a tiny bit of coconut oil before rolling. This keeps the mixture from sticking and helps form smooth, even balls.
Q10: Any tips for making these protein balls vegan or sugar-free?
A10: for a vegan twist, swap honey with maple syrup or agave nectar. To keep it sugar-free, omit sweeteners altogether or use a natural sugar substitute like stevia or monk fruit sweetener, adjusting quantities to taste.
Future Outlook
Whether you’re hitting the gym, rushing between meetings, or simply craving a wholesome snack, these power-packed no-bake peanut butter protein balls have got you covered. Bursting with creamy peanut butter, protein-rich ingredients, and a touch of natural sweetness, they’re the perfect fusion of convenience and nutrition. Easy to whip up and even easier to enjoy, these little energy bombs prove that healthy snacking doesn’t have to be complex. So next time hunger strikes, reach for a bite that fuels your day and delights your taste buds-all without turning on the oven. Happy snacking!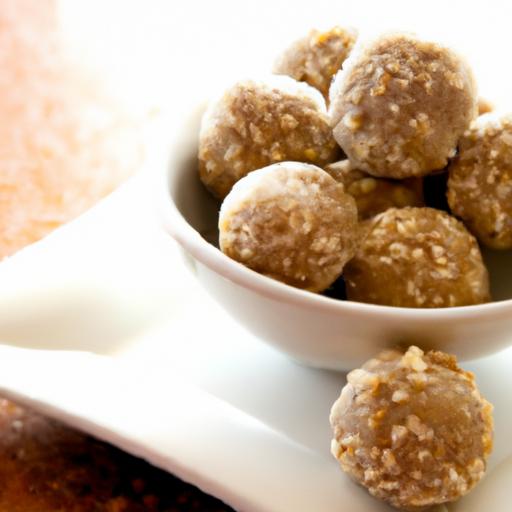
Delicious No-bake Almond Butter Cookies offer a delightful, chewy texture combined with the rich, nutty goodness of almond butter-making these treats a perfect quick fix when you crave something sweet without fuss. Inspired by the growing love for simple, wholesome snacks, this recipe blends pantry staples into irresistibly flavorful bites that don’t require an oven or complex steps.Whether you’re a seasoned cookie enthusiast or just exploring no-bake desserts, these almond butter cookies promise satisfaction with every bite.
Prep and Cook Time
- Preparation: 10 minutes
- Chilling: 15-20 minutes
- Total Time: 30 minutes
Yield
Approximately 16 cookies (serving size: 1 cookie)
Difficulty Level
Easy – Perfect for beginners and busy home cooks
Ingredients That Make No-Bake Almond Butter Cookies Irresistibly Flavorful
- 1 cup almond butter (smooth and unsweetened for the creamiest base)
- 1/2 cup rolled oats (gluten-free if preferred, adds chewy texture)
- 1/4 cup honey or maple syrup (natural sweetness and sticky binder)
- 1/4 cup shredded unsweetened coconut (for a subtle tropical note)
- 1 teaspoon vanilla extract (boosts aromatic depth)
- Pinch of sea salt (balances sweetness, enhances flavors)
- Optional: 2 tablespoons mini dark chocolate chips or chopped almonds for extra crunch
Step-by-Step Guide to Crafting Perfectly chewy Almond Butter Cookies
- Combine the almond butter and honey in a medium bowl. Stir well until the mixture becomes smooth and glossy, ensuring the ingredients blend thoroughly for that signature chewy texture.
- Add the vanilla extract and a pinch of sea salt, stirring gently to enhance the overall flavor profile without overpowering the nutty undertones.
- Fold in the rolled oats and shredded coconut using a spatula. The oats provide heartiness, while the coconut adds natural sweetness and a bit of chew-mix until all dry ingredients are evenly coated.
- If using, sprinkle in chocolate chips or chopped almonds, folding them in delicately to keep their shape and add a luxurious crunch or melty surprise.
- Scoop tablespoon-sized dollops of the mixture onto a lined baking sheet or parchment paper.Gently press each mound down with your fingers or the back of a spoon to form cookie shapes, about 1/2 inch thick.
- Refrigerate the cookies for at least 15-20 minutes until firm but still chewy.
- Serve chilled for a refreshing treat or allow to sit at room temperature for 5 minutes if you prefer a softer, melty bite. Enjoy immediately or store in an airtight container in the fridge.
Tips for customizing Your No-bake Cookies with Mix-Ins and Toppings
- Add dried fruit such as raisins,cranberries,or chopped dates for a natural sweet burst that complements the almond butter.
- Swap coconut for finely chopped nuts like pecans or walnuts to deepen the texture and add nutty flavor complexity.
- Sprinkle sea salt flakes on top just before chilling to elevate your cookies with a perfect sweet-salty contrast.
- For a chocolate lover’s twist, drizzle melted dark chocolate over chilled cookies and let harden before serving.
- Incorporate ground flaxseed or chia seeds for added nutrition while maintaining chewiness.
Creative Serving Ideas to Elevate Your Quick and Easy Treats
Present these no-bake almond butter cookies on a rustic wooden platter paired with a small bowl of fresh fruit like berries or sliced apples-colors and textures that pop beautifully. Garnish with a dusting of powdered sugar or a light sprinkle of cinnamon for extra visual appeal. For parties, arrange cookies alongside a variety of nut butters and honey drizzles for guests to customize their bites. Pair with a warm cup of chai tea or a frothy almond milk latte for an indulgent mid-afternoon snack experience.
Chef’s Notes
- Use natural, unsalted almond butter for a pure flavor impact; avoid overly processed brands for the best texture.
- If your mixture feels too wet, add more oats a tablespoon at a time until manageable but still chewy.
- To keep cookies fresh, store in an airtight container in the fridge for up to one week or freeze for longer storage.
- for a vegan version, substitute honey with maple syrup or agave nectar without compromising sweetness or stickiness.
- If craving a softer cookie, let the mixture sit at room temperature before shaping; colder dough will yield a firmer texture.
| Nutrient | Per Cookie (approx.) |
|---|---|
| Calories | 130 kcal |
| Protein | 4 g |
| Carbohydrates | 12 g |
| fat | 8 g |

For more no-bake dessert inspiration, check out our Healthy No Bake Snacks collection. To learn about the nutritional benefits of almonds, visit the healthline Almond Benefits Guide.
Q&A
Q&A: Delicious No-Bake Almond Butter Cookies – Quick & Easy Treats
Q1: What makes these no-bake almond butter cookies so special?
A1: These cookies are a game-changer because they combine rich, creamy almond butter with a hassle-free no-bake method. You get that satisfying nutty flavor and chewy texture without preheating an oven or waiting for baking time. Perfect for when you want a fast, wholesome treat!
Q2: How do no-bake cookies differ from conventional baked cookies?
A2: unlike traditional cookies that rely on heat to transform dough into a finished product, no-bake cookies set through chilling or natural thickening agents.This preserves the fresh, raw flavors of the ingredients-like almond butter-and makes prep a breeze.
Q3: What ingredients do I need for these almond butter cookies?
A3: The magic happens with just a few pantry staples: creamy almond butter, rolled oats for texture, a natural sweetener like honey or maple syrup, vanilla extract, and a pinch of salt. Optional add-ins like mini chocolate chips or shredded coconut can elevate the flavor.
Q4: Can I customize these cookies to suit dietary preferences?
A4: Absolutely! They’re naturally gluten-free if you use certified gluten-free oats,and you can easily swap honey for maple syrup or agave to keep them vegan. Plus, mixing in seeds or dried fruit can add a unique twist.
Q5: How long does it take to prepare these cookies?
A5: From start to finish, you’re looking at about 10 to 15 minutes of hands-on prep, plus another 20-30 minutes chilling time to firm them up.That’s lightning-fast compared to traditional baking!
Q6: Will the cookies hold together well without baking?
A6: Yes! The almond butter acts as a natural binder, while the oats provide structure. The chill time helps the fats solidify, ensuring the cookies keep their shape and have a lovely chewy texture.
Q7: What’s the best way to store these no-bake almond butter cookies?
A7: Store them in an airtight container in the refrigerator for up to a week. They also freeze beautifully,so you can stash some away for a quick snack that’s ready whenever you are.
Q8: Are these cookies kid-pleasant and suitable for parties?
A8: Definitely! Kids love the sweet, nutty flavor and fun chewy texture. Plus, these cookies can be made ahead of time, making them perfect for parties, snack boxes, or after-school treats.
Q9: Can I double or triple the recipe easily?
A9: Yes, just scale up the ingredients proportionally. As there’s no baking,larger batches don’t complicate cooking times-just make sure to chill them in batches that fit your fridge.
Q10: What’s the best way to enjoy these almond butter cookies?
A10: Pair them with a cold glass of milk, a cup of tea, or even enjoy as an energizing midday snack. Their creamy, nutty richness makes them a simple yet indulgent treat. Enjoy!
To Wrap It Up
With just a handful of simple ingredients and zero oven time, these delicious no-bake almond butter cookies prove that effortless treats can be truly satisfying. Whether you’re pressed for time, craving a healthy snack, or simply want to indulge without the heat of baking, this quick and easy recipe has you covered. So next time the sweet tooth strikes, reach for these chewy, nutty delights-and savor a moment of homemade goodness that’s as simple as it is scrumptious. Happy nibbling!
Flourless peanut butter cookies bring together the irresistible combination of nutty flavor and simple ingredients, creating a soft, chewy treat that satisfies every craving without the need for flour. Perfect for gluten-free diets or anyone looking for a quick, fuss-free cookie recipe, these delights owe much of their success to the quality of peanut butter you choose, the careful handling of a no-flour dough, and precise baking techniques that deliver ideal texture and crispness.
Choosing the Perfect Peanut Butter for Rich Flavor and Texture
At the heart of flourless peanut butter cookies lies the peanut butter itself-a pivotal ingredient that dictates both flavor and texture. For the richest results, opt for a natural, creamy peanut butter with minimal additives. Natural peanut butter, free of hydrogenated oils and excess sugars, highlights pure roasted peanut flavor and blends smoothly with the dough to yield a tender, moist cookie. If you prefer a bit of extra texture, a chunky variety adds delightful nutty pockets that contrast beautifully with the soft centers.
When selecting peanut butter, review the label and aim for one with just peanuts and possibly a pinch of salt. Avoid overly oily or processed options, as excess oil can cause spreading issues and thinner cookies. For an extra boost of depth, some bakers even incorporate a spoonful of homemade peanut butter,which brings a fresh roasted aroma and customized texture to your cookies.
Mastering the No-Flour Dough for Soft and Chewy Cookies
Without the structure flour provides, the binding agents and mixing technique become even more crucial. These cookies rely mainly on peanut butter, sugar, and an egg to come together.Start by creaming the peanut butter and sugar thoroughly until the mixture is light and fluffy-this aeration step is key in creating an inviting crumb. Incorporating the egg slowly ensures the dough is moist and cohesive without becoming runny.
A common tip is to chill the dough briefly before shaping. This step firms up the mixture, preventing excessive spreading during baking and helping the cookies maintain their iconic fork-pressed crisscross pattern. Using a cookie scoop or rolling dough into uniform balls results in consistent thickness that bakes evenly,delivering a luscious,chewy center with just a hint of crispness along the edges.
Insider Tips for Baking Time and Temperature to Achieve Ideal Crispness
The magic of perfect flourless peanut butter cookies happens in the oven, where precise timing and temperature control can elevate the texture from flat and greasy to satisfyingly chewy with a golden crust. Bake at a moderate 350°F (175°C) to allow the cookies to set properly without burning the sugars.
Because these cookies lack flour’s structure, they bake faster and require close attention. Bake for 8 to 10 minutes, removing them as soon as the edges show a delicate golden hue but the centers remain slightly soft-they will firm up as they cool. Overbaking leads to a crunchy cookie,so err on the side of underbaking for that signature tenderness.
For extra crispness, you can gently flatten the dough balls with a fork dipped in sugar to prevent sticking and encourage an even, attractive pattern. Rotating your cookie sheet halfway through baking also promotes uniform color and texture.
creative Variations to Elevate Your Flourless Peanut Butter Cookies
Once you’ve mastered the classic, these peanut butter cookies invite playful twists that maintain their flourless magic. A handful of mini chocolate chips or chopped dark chocolate folded into the dough adds bursts of melty richness, balancing the nuttiness with a touch of sweetness.
For a tropical flair,mix in some chopped dried cranberries or shredded coconut,introducing chewy contrasts and luminous flavor notes. Sprinkling flaky sea salt atop before baking enhances both sweetness and peanut depth, transforming each bite into a gourmet experience.
For those avoiding refined sugars, substituting coconut sugar or honey (reduce slightly to maintain dough consistency) can create interesting flavor profiles while keeping the cookies wholesome. Vegan bakers can replace the egg with flaxseed meal mixed with water (1 tbsp flax + 3 tbsp water) to preserve binding and texture.
Additionally, swirling in a spoonful of creamy hazelnut spread or almond butter with peanut butter creates a rich, layered nuttiness that’s irresistibly elegant.
Prep and cook Time
- Prep Time: 10 minutes
- Chill Time: 15 minutes (optional)
- cook Time: 8-10 minutes
- Total Time: Approximately 25 minutes
Yield
Makes approximately 18-20 cookies, perfect for sharing or storing for a quick snack.
Difficulty Level
Easy: Ideal for beginners and experienced bakers alike looking for a fuss-free, delicious result.
Ingredients
- 1 cup natural creamy peanut butter (smooth or chunky)
- ¾ cup granulated sugar
- 1 large egg
- 1 teaspoon baking soda
- ½ teaspoon vanilla extract
- 1/8 teaspoon salt (omit if your peanut butter is salted)
Instructions
- Preheat your oven to 350°F (175°C). Line a baking sheet with parchment paper for easy cleanup.
- In a large bowl, cream together the peanut butter and sugar with an electric mixer or sturdy spoon until the mixture is smooth and fluffy, about 2 minutes.
- Beat in the egg and vanilla extract until fully incorporated,creating a glossy,uniform dough.
- Mix in the baking soda and salt, ensuring an even distribution throughout the dough.
- Optional: Chill the dough in the refrigerator for 15 minutes to make it easier to handle and reduce spreading.
- Using a cookie scoop or tablespoon, form dough balls and place them on the prepared baking sheet, spaced about 2 inches apart.
- Flatten each dough ball gently with a fork dipped in sugar, creating a crosshatch pattern and slight indentation.
- Bake for 8-10 minutes,until the cookies’ edges turn lightly golden but centers remain soft.
- Remove from the oven and allow cookies to cool on the baking sheet for 5 minutes before transferring to a wire rack to cool entirely.
Tips for Success
- Always use room temperature eggs to help the dough bind evenly.
- If your peanut butter is very oily, stir it well before measuring to incorporate the oils evenly.
- Do not overbake-cookies will firm as they cool, so pull them early for a soft interior.
- Store cookies in an airtight container at room temperature for up to 5 days or freeze for long-term storage.
Serving Suggestions
Enjoy these flourless peanut butter cookies with a cold glass of milk or a cup of hot coffee for a cozy afternoon treat. For a festive touch, dust with a light sprinkle of powdered sugar or drizzle melted dark chocolate over the cooled cookies. Pair with fresh berries or a dollop of whipped cream for an elegant dessert plate that highlights the cookie’s rich, nutty flavor.

| Nutrition per Cookie | Amount |
|---|---|
| Calories | 110 kcal |
| Protein | 4 g |
| Carbohydrates | 10 g |
| Fat | 7 g |
Looking for more gluten-free baking inspiration? Check out our gluten-free banana bread recipe for another nutrient-packed and effortless treat.
Q&A
Q&A: Flourless Peanut Butter Cookies – Nutty, Simple & Delicious
Q1: What makes flourless peanut butter cookies different from regular cookies?
A1: Flourless peanut butter cookies ditch the customary wheat flour, leaning on peanut butter itself for structure and flavor. This creates a dense, chewy texture with an intense nutty richness that’s both satisfying and naturally gluten-free.
Q2: Are flourless peanut butter cookies healthier than regular cookies?
A2: While “healthier” can be subjective, flourless peanut butter cookies frequently enough have fewer ingredients and no added flour, which some people prefer. They pack protein and healthy fats from peanut butter, but remember, they still contain sugar and should be enjoyed in moderation.
Q3: Can I make these cookies without eggs?
A3: Absolutely! Many flourless peanut butter cookie recipes use a single egg to bind ingredients, but you can substitute with a flax egg (1 tablespoon ground flaxseed + 3 tablespoons water) or even a mashed banana for a vegan twist.Q4: What’s the secret to getting the perfect chewy texture in these cookies?
A4: The magic lies in the balance. Using creamy peanut butter, the right amount of sugar, and not overbaking ensures the cookies stay soft and chewy. Pull them out when the edges are set but the centers are still slightly tender-they firm up as they cool.
Q5: Can I customize these cookies with add-ins?
A5: Definitely! Chocolate chips, chopped nuts, or a sprinkle of sea salt on top take these cookies to a whole new level. Just fold them gently into the batter to maintain that perfect cookie consistency.
Q6: How long do flourless peanut butter cookies keep?
A6: Stored in an airtight container at room temperature,these cookies stay fresh for about 3-5 days. For longer storage,freeze them in a sealed bag for up to 3 months-just thaw at room temperature before enjoying.
Q7: Are these cookies suitable for people with gluten intolerance?
A7: Yes! Since they contain no wheat flour or gluten-containing ingredients, flourless peanut butter cookies are naturally gluten-free, making them a safe treat for those with gluten sensitivities or celiac disease.
Q8: What type of peanut butter works best?
A8: For the best results, use smooth, creamy peanut butter without added sugars or oils. Natural peanut butter can work, but stirring it well to reincorporate the oils is crucial to avoid dry or crumbly cookies.
Q9: Can I use other nut butters instead of peanut butter?
A9: Sure thing! Almond butter, cashew butter, or even sunflower seed butter can be delicious alternatives, though the texture and flavor will change slightly. Just opt for creamy varieties for the best bake.
Q10: Why are flourless peanut butter cookies considered so simple to make?
A10: These cookies are wonderfully straightforward: just a handful of ingredients,no need for creaming butter and sugar separately,and minimal mixing. Plus, no flour means no sifting, which makes the process quick, fuss-free, and kid-amiable!
Whether you’re gluten-free, short on ingredients, or simply craving a wholesome, nutty cookie, flourless peanut butter cookies deliver sweet satisfaction with minimal effort.Ready to get baking?
To Conclude
Whether you’re craving a quick treat or aiming for a gluten-free delight, these flourless peanut butter cookies deliver a perfect blend of nutty richness and melt-in-your-mouth simplicity. With just a handful of ingredients and minimal effort, you can whip up a batch of these wholesome cookies that satisfy your sweet tooth without the fuss. So next time you want a snack that’s both comforting and clever, remember: sometimes, the simplest recipes yield the most delicious results. Happy baking and even happier nibbling!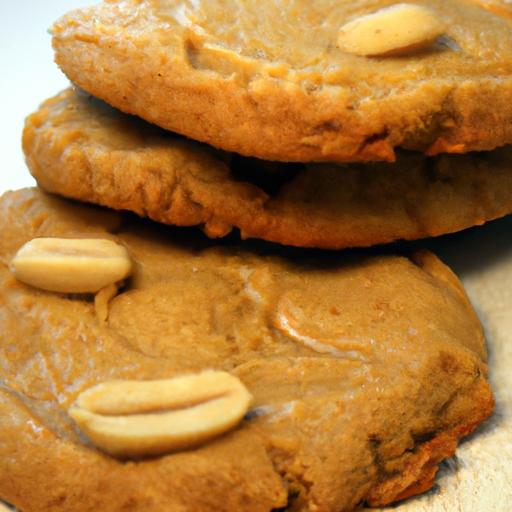
Savor Garlic Butter Shrimp with spinach: A Flavorful Feast
Savor Garlic Butter Shrimp with Spinach is a delightful dish that marries the succulent essence of shrimp with the vibrant freshness of spinach, all enveloped in a fragrant garlic butter sauce. Inspired by coastal culinary traditions, this recipe brings restaurant-quality flavors to your home kitchen with ease and elegance.
prep and Cook Time
Preparation: 10 minutes
Cooking: 12 minutes
Total Time: 22 minutes
Yield
Serves 4
Difficulty Level
Easy
Ingredients
- 1 lb large shrimp, peeled and deveined
- 4 tbsp unsalted butter, divided
- 5 cloves garlic, finely minced
- 5 cups fresh baby spinach, washed and dried
- 1 tbsp olive oil
- ½ tsp crushed red pepper flakes (optional)
- Salt and freshly ground black pepper, to taste
- 1 tbsp freshly squeezed lemon juice
- ¼ cup dry white wine or chicken broth
- Fresh parsley, chopped, for garnish
Instructions
- Prepare the shrimp: Pat the shrimp dry with paper towels to ensure they sauté properly. Season lightly with salt and pepper.
- Heat the pan: In a large skillet, melt 2 tablespoons of butter with 1 tablespoon olive oil over medium-high heat. The oil prevents butter from burning and adds depth to the flavor.
- Sauté the shrimp: Add shrimp in a single layer and cook 2 minutes per side, until they turn opaque and develop a light golden sear. Remove shrimp from the skillet and set aside to avoid overcooking.
- create garlic butter sauce: Reduce heat to medium. add the remaining 2 tablespoons butter and minced garlic to the pan. Sauté for about 1 minute,stirring frequently,until fragrant but not browned (burnt garlic turns bitter).
- deglaze the pan: Pour in white wine or chicken broth to lift all those flavorful browned bits off the pan bottom. Let it simmer for 2 minutes to reduce slightly.
- Wilt the spinach: Add spinach gradually, stirring continuously. It will release water but quickly collapse into a tender bed of greens.Season with salt, pepper, and crushed red pepper flakes for a subtle kick.
- Combine and finish: Return the shrimp to the pan and toss gently with the spinach and sauce. Drizzle with fresh lemon juice to brighten all the flavors.
- Serve immediately: Remove from heat once shrimp is reheated through. Garnish with freshly chopped parsley for a pop of color and freshness.
Chef’s Notes
- Freshness is key: Always use fresh shrimp and spinach for the best texture and flavor. Frozen shrimp can work but thaw completely and pat dry.
- Avoid overcrowding: Cook shrimp in batches if necessary to ensure even searing.
- Butter clarity tip: Use unsalted butter to control seasoning and prevent bitterness from overcooking garlic.
- Make ahead: You can sauté shrimp and spinach separately, then combine before serving to keep flavors bright.
- Variations: Try adding cherry tomatoes for a burst of sweetness or sprinkle toasted pine nuts for an earthy crunch.
Serving suggestions
Present your garlic butter shrimp over a bed of creamy mashed potatoes or al dente pasta for a satisfying meal. For a lighter option,serve with crusty artisan bread to mop up every luscious drop of sauce. Garnish with a lemon wedge and a sprinkle of vibrant parsley to enhance the visual appeal. Pair with a chilled glass of Sauvignon Blanc to elevate the dining experience.
| Nutrient | Per Serving |
|---|---|
| calories | 280 kcal |
| protein | 28g |
| Carbohydrates | 4g |
| Fat | 14g |

Explore related dishes like our Creamy Garlic Shrimp Pasta for more seafood inspiration. For the nutritional benefits of spinach, the National Institutes of Health provides excellent insights on its powerhouse nutrients.
Q&A
Q&A: Savor Garlic Butter Shrimp with spinach - A Flavorful Feast
Q1: What makes garlic butter shrimp with spinach such a standout dish?
A1: This dish marries the rich, velvety goodness of garlic butter with the fresh, slightly earthy flavor of spinach and the succulent sweetness of shrimp. The contrast of textures and the harmony of bold and subtle tastes create a truly unforgettable culinary experience.
Q2: Is this recipe arduous to prepare for a home cook?
A2: Surprisingly, no! Despite its gourmet flair, garlic butter shrimp with spinach is quick and straightforward.With just a handful of ingredients and a few simple steps, even novice cooks can whip up a dish that looks and tastes restaurant-worthy.
Q3: What are the key ingredients that elevate this dish?
A3: The hero ingredients are fresh shrimp, fragrant garlic, rich butter, and vibrant spinach. A splash of lemon juice and a sprinkle of red pepper flakes or fresh herbs like parsley can elevate the flavors even more, adding brightness and a gentle kick.
Q4: Can this dish be adapted for different dietary preferences?
A4: Absolutely! To make it gluten-free, simply skip any bread accompaniment or serve it with gluten-free pasta or rice. For a dairy-free version, substitute the butter with olive oil or a plant-based spread without compromising the garlic’s mouthwatering aroma.
Q5: How can one serve garlic butter shrimp with spinach to impress guests?
A5: Serve it over a bed of fluffy rice, creamy mashed potatoes, or al dente pasta to soak up every buttery, garlicky drop. Garnish with freshly grated Parmesan and a wedge of lemon for a vibrant presentation that’s as pleasing to the eyes as it is to the palate.
Q6: Why is spinach the perfect green to pair with shrimp and garlic butter?
A6: Spinach’s tender leaves absorb the garlic butter beautifully without overpowering the dish. Its mild earthy flavor balances the richness of the butter and the sweetness of shrimp, adding a nutritious punch and a pop of color that makes the plate pop.
Q7: What’s the best way to ensure shrimp stays tender and juicy?
A7: The secret is to cook shrimp quickly over medium-high heat-just until they turn pink and opaque. Overcooking shrimp can make them rubbery, so watching the clock (and the color change) is key to that perfect bite.
Q8: Can leftovers be stored and reheated?
A8: Yes, leftovers keep well for up to two days in the fridge. Reheat gently on the stove over low heat to preserve shrimp tenderness and prevent the spinach from becoming mushy. Adding a little fresh butter or a splash of water can definitely help maintain the sauce’s luscious texture.
Q9: Any tips for making the garlic butter sauce extra flavorful?
A9: Sauté the garlic gently until fragrant but not browned,to avoid bitterness.Using high-quality butter and finishing with a touch of fresh herbs or a squeeze of lemon zest can transform a simple sauce into a sumptuous delight.Q10: What occasions is garlic butter shrimp with spinach best suited for?
A10: This dish shines during cozy weeknight dinners, elegant weekender feasts, or even festive celebrations. Its luxurious flavors feel indulgent without being complex, making it perfect for impressing loved ones with minimal fuss.
The Way Forward
As you savor each bite of garlic butter shrimp nestled atop a bed of vibrant spinach, you’re not just enjoying a meal-you’re embracing a harmonious blend of flavors and nutrients that delight the palate and nourish the body. This dish effortlessly combines simplicity with sophistication, turning everyday ingredients into a sumptuous feast that’s perfect for any occasion. Whether you’re cooking for a quick weeknight dinner or impressing guests with a flavorful spread, garlic butter shrimp with spinach stands as a testament to how culinary magic can arise from humble origins. So next time you crave a dish that’s both comforting and elegant, let this flavorful feast inspire your kitchen creations-as great food is as much about the experience as it is indeed about the taste.
Ingredients That Bring Flavor and Simplicity to Your No-Bake Treat
easy No-Bake Peanut Butter Oatmeal Cookies Recipe Delight begins with a handful of simple, wholesome ingredients that combine to create a rich, chewy texture full of flavor. The magic lies in the harmony between creamy peanut butter,hearty old-fashioned rolled oats,and a hint of natural sweetness from honey or maple syrup. A splash of vanilla extract infuses warmth and depth, while a pinch of salt enhances every bite without overpowering the gentle nuttiness. These pantry staples make for an effortless blend, allowing you to whip up a nourishing snack in minutes, no oven needed.
Prep and Cook Time
- Preparation: 10 minutes
- chilling: 30 minutes
- Total Time: 40 minutes
Yield
- Approximately 20 cookies
Difficulty Level
- Easy - perfect for beginners and busy bakers alike
Ingredients
- 1 cup creamy peanut butter (natural preferred, no added sugar)
- 1/2 cup honey or pure maple syrup
- 1 teaspoon vanilla extract
- 1/4 teaspoon fine sea salt
- 2 cups old-fashioned rolled oats
- Optional add-ins: 1/3 cup mini chocolate chips, 1/4 cup chopped nuts (pecans, walnuts), or 2 tablespoons ground flaxseed
Step-by-Step Guide to Perfectly Blended Peanut Butter Oatmeal Cookies
- Warm the peanut butter and honey: In a medium microwave-safe bowl, gently warm the peanut butter and honey in 20-second increments, stirring between each, until the mixture is smooth and easily combined.
- Add vanilla and salt: Stir in the vanilla extract and sea salt evenly, ensuring every bite is balanced with depth.
- Incorporate the oats: Gradually stir the rolled oats into the wet mixture,folding gently until all oats are fully coated and the dough starts to come together.
- Add optional mix-ins: If using chocolate chips, nuts, or flaxseed, fold them in now for added texture and flavor bursts.
- Shape the cookies: Using a tablespoon or small cookie scoop, portion out the dough onto a parchment-lined baking sheet. Press each mound down lightly with the back of a spoon to form a cookie shape.
- Chill to set: Refrigerate the cookies for at least 30 minutes until firm but chewy.
- Serve and enjoy: Transfer cookies to an airtight container or arrange beautifully on a serving platter.
Tips for Customizing Texture and sweetness to Suit Your Taste
- Texture: for chewier cookies,use old-fashioned oats rather than fast-cooking varieties. Adding a tablespoon of melted coconut oil can lend a softer bite, while extra oats create a heartier crunch.
- Sweetness: Adjust honey or maple syrup quantity to your preference. For a less sweet treat, reduce to 1/3 cup or swap honey for mashed ripe banana to introduce natural sugars and moisture.
- Nut Butter Alternatives: Swap peanut butter for almond or cashew butter for nuanced flavor profiles without sacrificing creaminess.
- Vegan Version: Use pure maple syrup and ensure your oats are certified gluten-free and vegan-friendly.
- Binding Tips: If your mixture feels too loose, add a tablespoon of ground flaxseed or chia seeds to help set the cookies firmly.
Creative Serving Ideas to Elevate Your Cookie Experience
- Cookie Sandwiches: Layer your cookies with a scoop of vanilla or chocolate ice cream for an indulgent no-bake dessert.
- Drizzle Elegance: Warm some dark chocolate and drizzle over the cooled cookies for added decadence and visual appeal.
- Nut Butter Dip: Serve alongside a small bowl of warming peanut butter or honey yogurt dip to complement flavors and add moisture.
- Fruit Pairings: Fresh slices of banana or crisp apple wedges create a refreshing contrast that balances the rich nuttiness.
- Portable Snack Packs: Arrange cookies in mason jars or reusable snack bags for on-the-go energy boosts, perfect for lunchboxes or travel.

Chef’s Notes & Tips for Success
- Make Ahead: Cookies keep well in an airtight container in the fridge for up to one week or freeze for up to 3 months.
- Binding Issue: If cookies crumble,add a few extra teaspoons of warm peanut butter or a splash of plant milk to bind.
- Oat Flour Substitute: For a smoother texture, pulse oats briefly in a food processor to create oat flour before mixing.
- Skip the Chill: If you’re in a rush, 15 minutes in the freezer will firm the cookies sufficiently.
- Allergy-Friendly: Substitute sunflower seed butter for peanut butter to accommodate nut allergies.
| Nutrient | Per Cookie (approx.) |
|---|---|
| Calories | 110 kcal |
| Protein | 4 g |
| carbohydrates | 12 g |
| Fat | 6 g |
For more wholesome no-bake dessert inspirations, explore our No-Bake Dessert Recipes Collection. To deepen your understanding of peanut butter’s nutritional benefits, visit the Healthline Peanut Butter Nutrition Guide.
Q&A
Q&A: Easy No-Bake Peanut Butter Oatmeal Cookies Recipe delight
Q1: What makes this peanut butter oatmeal cookie recipe so special?
A1: This recipe is a delightful twist on classic cookies-no oven required! It combines creamy peanut butter with hearty oats, creating a chewy, sweet treat that’s quick to whip up.Perfect for when you want homemade goodness without the wait or the heat.
Q2: How long does it take to make these no-bake cookies?
A2: From start to finish, these cookies come together in about 15 to 20 minutes. No baking means no preheating or cooling down the oven. Just mix, scoop, chill, and enjoy!
Q3: what ingredients do I need for this recipe?
A3: The magic happens with simple pantry staples: peanut butter (creamy or chunky), rolled oats, honey or maple syrup, a touch of vanilla extract, and sometimes a sprinkle of salt or cinnamon for extra flavor. Optional add-ins like chocolate chips or chopped nuts can elevate the delight.
Q4: Can I customize the texture of these cookies?
A4: Absolutely! For chewier cookies, use old-fashioned rolled oats. Want a bit more crunch? Add chopped nuts or use chunky peanut butter. Adjusting the amount of sweetener and peanut butter can also make the cookies softer or firmer to your preference.
Q5: Are these cookies kid-friendly and nutritious?
A5: Definitely! They’re a wholesome snack packed with protein and fiber thanks to the oats and peanut butter. Plus, since there’s no baking involved, kids can safely help with mixing and shaping the cookies-a fun and tasty kitchen adventure.
Q6: How should I store no-bake peanut butter oatmeal cookies?
A6: keep them fresh by storing in an airtight container in the refrigerator. They typically last up to a week, but they’re usually devoured much sooner! You can also freeze them for longer storage.
Q7: Can I make these cookies vegan or allergy-friendly?
A7: Yes! Swap honey for maple syrup or agave nectar to keep it vegan. For nut allergies, try using sunflower seed butter instead of peanut butter, and double-check your oats are gluten-free if needed. These cookies are flexible and fun to adapt.
Q8: what’s the best way to serve these cookies?
A8: Serve chilled for a refreshing,chewy bite. They pair wonderfully with a glass of cold milk, a cup of coffee, or tea. great for lunchboxes, quick snacks, or whenever a little peanut buttery happiness is needed.
Enjoy your effortless, no-bake peanut butter oatmeal cookie delight-simple to make and impossible to resist!
to sum up
And there you have it-a simple, no-fuss recipe that turns humble ingredients into a delightful treat. These no-bake peanut butter oatmeal cookies are proof that you don’t need a hot oven or hours in the kitchen to satisfy your sweet tooth. Whether you’re looking for a quick snack, a kid-friendly dessert, or a wholesome indulgence, this recipe has you covered. So go ahead, whip up a batch, and enjoy the perfect blend of creamy peanut butter and hearty oats-no baking required, just pure cookie joy!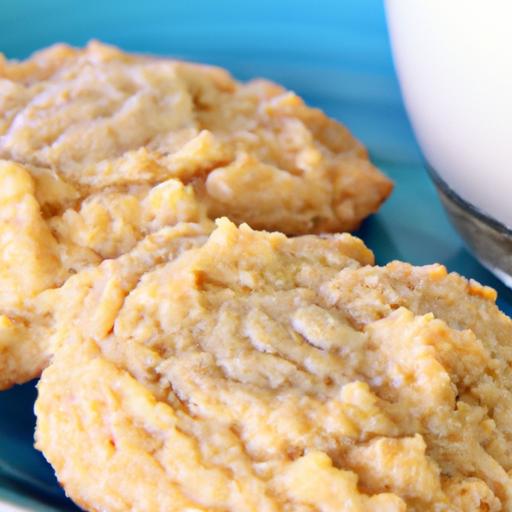
Savor Garlic Butter Chicken & Veggies: A Flavorful Feast
Few dishes encapsulate warmth and comfort quite like Savor Garlic Butter Chicken & Veggies. This recipe brings together the richness of a perfectly whipped garlic butter blend with the vibrant freshness of handpicked vegetables, creating an irresistible aroma and flavor profile that’s both homey and complex. From my earliest kitchen memories, the sizzle of garlic melting into butter was a signal of good things to come-this dish honors that tradition with a modern touch, making it a favorite for weeknight dinners or special occasions.
Prep and Cook Time
Preparation: 15 minutes | Cooking: 30 minutes | Total Time: 45 minutes
Yield
Serves 4 generous portions
Difficulty Level
Easy – Perfect for cooks of all levels!
ingredients
- 4 boneless, skinless chicken breasts (about 6 oz each)
- 6 tbsp unsalted butter, softened
- 5 cloves garlic, finely minced
- 1 tbsp fresh parsley, finely chopped
- 1 tsp fresh thyme leaves
- 1 tbsp lemon zest (from 1 lemon)
- 1 tbsp fresh lemon juice
- Salt and freshly ground black pepper, to taste
- 1 tbsp olive oil
- 1 medium red bell pepper, cut into 1-inch strips
- 1 medium zucchini, sliced into half-moons
- 1 cup baby carrots, halved lengthwise
- 1 cup green beans, trimmed
Instructions
- Prepare the garlic butter blend: In a small bowl, combine softened butter, minced garlic, chopped parsley, thyme leaves, lemon zest, and lemon juice. Season with salt and pepper. Mix thoroughly until smooth. Set aside.
- Season the chicken: Pat chicken breasts dry. Lightly season both sides with salt and pepper. For extra flavor,let rest for 10 minutes at room temperature.
- sear the chicken: Heat olive oil in a large skillet over medium-high heat. Add chicken breasts and cook without moving until golden brown on one side, about 5 minutes. Flip and cook 4 minutes more.
- Add garlic butter and veggies: Lower heat to medium. Spoon generous dollops of the garlic butter blend on top of each chicken breast.Surround chicken with bell pepper strips, zucchini, baby carrots, and green beans.
- Cover and cook: Cover skillet loosely with a lid or foil. Allow the chicken to finish cooking and the vegetables to steam until tender, about 8-10 minutes. Spoon melted garlic butter over veggies periodically for maximum flavor.
- Rest and serve: Remove skillet from heat. Let chicken rest for 5 minutes to retain juices. Serve chicken topped with pan juices and a sprinkle of fresh parsley for a pop of colour.
Tips for Success
- Use fresh garlic and herbs – they are key to the vibrant flavor of the garlic butter blend.
- Don’t rush the sear; a good golden crust adds texture and depth.
- If preferred, substitute chicken breasts with thighs for juicier results.
- Make the garlic butter in advance and keep chilled for an even easier assembly.
- To avoid overcooking, use a meat thermometer-optimal internal temperature for chicken is 165°F (75°C).
- Swap vegetables with seasonal favorites or what’s fresh in your market for endless variations.
Serving Suggestions and Pairings
plate your Savor Garlic Butter Chicken & veggies with a side of creamy mashed potatoes or fluffy jasmine rice, which soak up the luscious garlic butter sauce beautifully. A crisp mixed green salad with a light vinaigrette balances the richness while adding freshness.
Garnish the dish with a sprinkle of freshly grated Parmesan or a few twists of cracked black pepper to enhance the flavors visually and on the palate. Pair with a chilled glass of Sauvignon Blanc or a light Pinot Noir to elevate the meal to restaurant-quality elegance.

| Nutrient | Per Serving |
|---|---|
| Calories | 420 kcal |
| Protein | 45 g |
| Carbohydrates | 12 g |
| Fat | 22 g |
For more tasty poultry recipes, check out our collection of easy chicken dinner ideas. Learn more about the health benefits of garlic and herbs at the healthline Garlic Nutrition Guide.
Q&A
Q&A: Savor garlic Butter Chicken & Veggies – A Flavorful Feast
Q1: What makes Garlic Butter Chicken & Veggies stand out as a meal?
A1: This dish is a harmonious blend of succulent chicken and vibrant vegetables, all bathed in a luscious garlic butter sauce. The butter enriches every bite with creamy indulgence, while the garlic injects an irresistible aroma and depth, turning a simple skillet meal into a gourmet experience.
Q2: Can you describe the flavor profile of this recipe?
A2: Imagine tender chicken infused with savory, nutty butter and punchy garlic, complemented by the natural sweetness and earthiness of roasted veggies. The contrast between the rich sauce and the freshness of the vegetables creates a balanced, memorable flavor journey with every mouthful.
Q3: What vegetables work best in this dish?
A3: Classic choices include bell peppers, zucchini, cherry tomatoes, and asparagus – each adding a pop of color and their unique texture. Root vegetables like carrots or baby potatoes also shine when roasted in garlic butter,offering hearty sweetness that complements the chicken beautifully.Q4: How arduous is it to make Garlic Butter Chicken & Veggies at home?
A4: Surprisingly effortless! This recipe requires minimal prep and basic cooking techniques, making it perfect for busy weeknights or casual dinner parties. With a skillet, fresh ingredients, and patience for the butter’s magic, you’ll whip up a show-stopping meal in under 40 minutes.
Q5: Are there any tips for perfecting this dish?
A5: Absolutely! Use fresh garlic for the brightest flavor,and be mindful not to burn it-browning butter gently ensures a nutty richness rather than bitterness. Also, allow the chicken to sear properly before stirring, building a gorgeous crust that locks in juices and flavor.
Q6: Can this recipe be customized for different dietary needs?
A6: Definitely! For a dairy-free twist, substitute butter with olive oil or vegan butter alternatives. Swap chicken with tofu or tempeh for a plant-based version, and feel free to mix and match veggies according to your preference or seasonality.
Q7: What beverages complement Garlic Butter Chicken & Veggies?
A7: A crisp white wine like Sauvignon Blanc or a sparkling rosé balances the dish’s buttery richness. For non-alcoholic options,a zesty lemon-infused sparkling water or a chilled herbal iced tea enhances the fresh,garlicky flavors without overpowering them.Q8: Why should food lovers add Garlic Butter Chicken & Veggies to their recipe repertoire?
A8: Becuase it’s simplicity elevated-comfort food with flair.It nourishes the body and delights the senses, proving that sometimes the most satisfying feasts come from humble ingredients united by bold, thoughtful flavors. Try it once, and it just might become your new go-to favorite!
Closing Remarks
as the savory aroma of garlic butter chicken and tender, vibrant veggies lingers in the air, it’s clear this dish is more than just a meal-it’s a celebration of simple ingredients transformed by bold flavors. Whether you’re cooking for a busy weeknight or a leisurely weekend feast, this flavorful combination promises satisfaction with every bite. So go ahead, embrace the ease and elegance of this recipe, and let your taste buds revel in a truly unforgettable feast.After all, sometimes the most delightful meals are the ones that bring a little magic to your everyday table.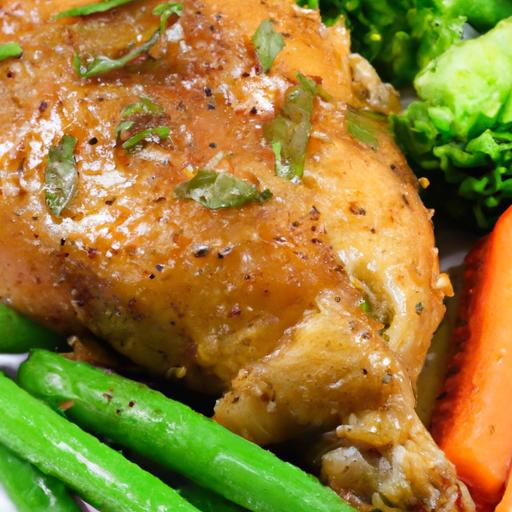
Savory Garlic Butter Shrimp Pasta is the ultimate fusion of simple ingredients that deliver a rich, comforting experience with every forkful. This dish brings together succulent shrimp bathed in a luxurious garlic butter sauce,paired perfectly with al dente pasta that soaks up every bit of flavor. Inspired by coastal Italian kitchens, this recipe celebrates fresh seafood and bold seasonings, making it an irresistible meal for casual dinners or special occasions alike.
Prep and Cook Time
Preparation: 10 minutes
Cooking: 15 minutes
Total Time: 25 minutes
Yield
Makes 4 generous servings
Difficulty Level
Easy – Perfect for cooks of all skill levels
Ingredients
- 12 oz linguine or fettuccine pasta
- 1 lb large shrimp, peeled and deveined
- 4 tbsp unsalted butter, divided
- 6 cloves garlic, minced
- ¼ cup dry white wine (optional)
- ½ tsp red pepper flakes (adjust to taste)
- Salt and fresh ground black pepper, to taste
- 2 tbsp fresh parsley, finely chopped
- Juice of 1 lemon
- ¼ cup freshly grated Parmesan cheese
- 2 tbsp olive oil
Instructions
- Cook the pasta: Bring a large pot of salted water to a boil. Add the linguine and cook until al dente, about 8-10 minutes. Drain, reserving ½ cup of pasta water, and set aside.
- Prepare the shrimp: Pat shrimp dry with paper towels and season lightly with salt and pepper.
- Sauté the shrimp: In a large skillet over medium-high heat, heat 1 tablespoon of butter and 2 tablespoons of olive oil. Add the shrimp in a single layer and cook until pink and opaque,about 2 minutes per side. Remove shrimp and set aside.
- Make the garlic butter sauce: Reduce heat to medium, add remaining 3 tablespoons of butter. Once melted, stir in minced garlic and red pepper flakes. Sauté gently until fragrant, about 1 minute-be careful not to burn the garlic.
- Deglaze the pan: Pour in the white wine and simmer until reduced by half, about 2-3 minutes.(Skip this step if abstaining from alcohol; substitute with ¼ cup low-sodium chicken broth.)
- combine shrimp and pasta: Return cooked shrimp to the pan, then add drained pasta. Toss everything together, adding pasta water little by little to create a silky sauce that coats the strands perfectly.
- Finish with lemon and Parmesan: Stir in lemon juice, chopped parsley, and grated Parmesan cheese. Adjust salt and pepper to taste.
- Serve promptly: plate the pasta with shrimp, making sure each serving includes a generous amount of sauce for that truly rich flavor.
Tips for Success
- Use the freshest garlic possible for the most aromatic sauce-avoid pre-minced jars when possible.
- Don’t overcook the shrimp; they become tough and rubbery quickly. Look for that firm, opaque pink color.
- If you prefer a creamier sauce, add a splash of heavy cream right after the wine reduction step.
- Reserve some pasta water-it’s your best friend for adjusting sauce consistency without watering down flavors.
- This dish can be made ahead by prepping shrimp and sauce separately; reheat gently to maintain texture.
Serving Suggestions
plate this garlic butter shrimp pasta with a fresh green salad tossed in a light vinaigrette to cut through the richness. A crusty baguette or garlic bread on the side is ideal to mop up any extra sauce. Garnish with an extra sprinkle of parsley and Parmesan for a visually stunning presentation and an extra layer of fresh flavor. For an elegant touch, add a lemon wedge on the side to brighten each bite.

| nutrient | Per Serving |
|---|---|
| Calories | 520 kcal |
| Protein | 35 g |
| Carbohydrates | 45 g |
| Fat | 18 g |
For more delightful seafood pasta recipes, check out our Creamy Lemon Garlic Scallop Pasta. To explore the science behind perfect shrimp cooking times, visit Serious Eats.
Q&A
Q&A: savory Garlic Butter Shrimp Pasta – A Flavorful Delight
Q1: What makes savory garlic butter shrimp pasta so irresistible?
A1: It’s the harmonious blend of rich, velvety butter, aromatic garlic, succulent shrimp, and perfectly cooked pasta that creates a symphony of flavors. Each bite bursts with savory goodness, balanced by the subtle sweetness of shrimp and the fragrant punch of garlic-a true taste sensation.
Q2: Can you describe the flavor profile of this dish?
A2: Imagine buttery warmth layered with the pungent zest of garlic, kissed by a hint of lemon zest or juice for brightness. The shrimp adds a tender, slightly sweet seafood essence, while the pasta acts as the comforting canvas. together, they form a luscious, well-rounded dish that’s both comforting and gourmet.Q3: how easy is it to prepare savory garlic butter shrimp pasta at home?
A3: Surprisingly easy! With basic ingredients like shrimp, garlic, butter, olive oil, pasta, and a few seasonings, you can whip up this dish in under 30 minutes. It’s perfect for weeknight dinners or when you want to impress with minimal effort.
Q4: What type of pasta works best in this recipe?
A4: Traditional spaghetti or linguine are classic choices, as their long, slender strands beautifully twirl with the garlic butter sauce and shrimp. Though, fettuccine or even penne can work wonderfully, soaking up the buttery, garlicky goodness.
Q5: Are there any tips for cooking the shrimp perfectly?
A5: Absolutely! Use fresh or thawed shrimp,deveined and peeled for best results. Cook them quickly over medium-high heat until they turn pink and opaque-about 2 minutes per side. Overcooking makes shrimp rubbery, so keep a close watch!
Q6: Can this dish be customized to suit dietary preferences?
A6: Definitely. For a lighter version, swap butter for olive oil or a plant-based choice. Gluten-free pasta options work well, and you can add veggies like spinach or cherry tomatoes for extra nutrition and color. Spicing it up with red pepper flakes adds a delightful kick.
Q7: What sides or drinks pair well with garlic butter shrimp pasta?
A7: A crisp green salad with a tangy vinaigrette complements the richness. Garlic bread or crusty baguette is perfect for sopping up sauce. As for drinks, a chilled Sauvignon Blanc or a light, citrusy beer enhances the seafood flavors beautifully.
Q8: How can leftover garlic butter shrimp pasta be stored and reheated?
A8: Store leftovers in an airtight container in the refrigerator for up to 2 days. Reheat gently on the stovetop with a splash of olive oil or broth to restore moisture,or use a microwave at medium power,stirring occasionally to heat evenly.
Q9: Is garlic butter shrimp pasta suitable for special occasions?
A9: Absolutely! its elegant appearance and rich taste make it a fantastic choice for dinner parties or romantic meals. Pair with a simple dessert and a good bottle of wine, and you have a memorable feast that’s sure to impress.
Q10: Any final tips for making the ultimate savory garlic butter shrimp pasta?
A10: Fresh ingredients are key-garlic shoudl be fragrant, shrimp fresh, and butter real. Don’t rush the sauce; let the butter and garlic meld gently. finish with freshly chopped parsley and a squeeze of lemon to brighten the dish. Simple steps, extraordinary flavor!
Future Outlook
In the grand tapestry of comfort food, Savory Garlic Butter Shrimp Pasta weaves together simplicity and sophistication in every bite. This dish doesn’t just satisfy hunger-it tells a story of rich, buttery indulgence balanced by the bright warmth of garlic and the delicate sweetness of shrimp. Whether you’re crafting a quick weeknight meal or impressing friends at a dinner party, this flavorful delight offers a perfect harmony of textures and tastes that linger long after the last forkful.So next time you crave something both elegant and effortlessly delicious, remember that this pasta is more than a recipe-it’s an experience worth savoring.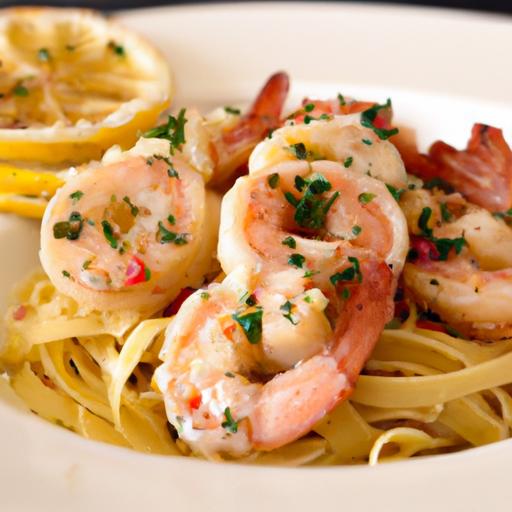
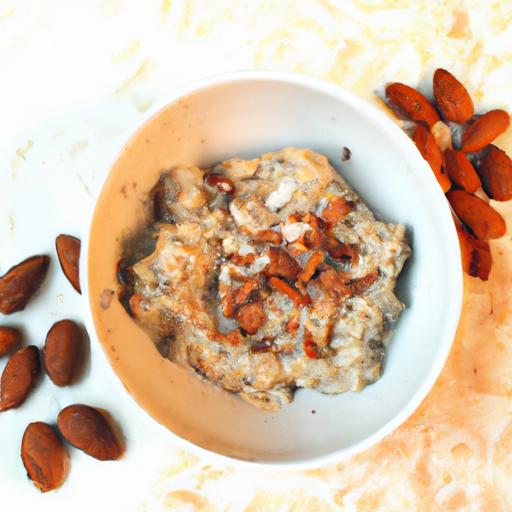
Benefits of Almond Butter and Flaxseed for a Nutrient-Dense Breakfast
Starting your day with the Power-Packed Almond Butter & Flaxseed Protein Porridge Recipe means fueling your body with a powerhouse combination of essential nutrients. Almond butter offers a rich source of heart-healthy monounsaturated fats, vitamin E, magnesium, and protein, which help maintain steady energy levels and support muscle function. Meanwhile, flaxseed is a nutritional marvel, bursting with fiber, omega-3 fatty acids, and lignans-compounds linked to improved digestion and anti-inflammatory benefits.
When paired together in a creamy porridge, these ingredients create a balanced meal that promotes sustained fullness, heart health, and better digestion. This combo is also ideal for those seeking plant-based protein and healthy fats in one bowl. The synergy of almond butter and flaxseed provides more than just nourishment-it’s a texture and flavor profile that wakes up and delights the taste buds.
How to Prepare the Perfect Creamy Protein Porridge with Simple Ingredients
Creating the ideal creamy porridge in this Power-Packed Almond Butter & Flaxseed protein porridge recipe is easier than you might imagine. Start with wholesome rolled oats as the base for a smooth, velvety consistency. Use a combination of water and milk (dairy or plant-based) to keep it creamy without heaviness. Adding the almond butter just after cooking enriches the porridge with silkiness and a slight nutty sweetness.
Flaxseed should be ground freshly or pre-ground to unlock its nutrients and avoid grit. Stir it in gently to thicken the porridge while boosting fiber content.Cook your oats over medium heat, stirring frequently enough, until the texture is luscious and slightly thickened but still spoonable. this simple method ensures no lumps, no dry edges, just a comforting bowl of warmth ready in under 15 minutes.
prep and Cook Time
- preparation: 5 minutes
- Cooking: 10 minutes
- Total: 15 minutes
Yield
Serves 2 hearty portions
Difficulty Level
Easy – beginner-pleasant and speedy to make
Ingredients
- 1 cup rolled oats
- 1 ½ cups water
- 1 cup unsweetened almond milk (or any milk of choice)
- 2 tbsp almond butter, creamy
- 2 tbsp ground flaxseed
- 1 scoop vanilla plant-based protein powder (optional for extra protein)
- 1 tbsp pure maple syrup or honey (optional)
- ½ tsp cinnamon
- Pinch of sea salt
- Fresh berries or sliced banana, for topping
Instructions
- Combine oats, water, almond milk, and salt in a medium saucepan over medium heat. Stir occasionally to prevent sticking and bring the mixture to a gentle simmer.
- Cook the oats for 8-10 minutes until tender and creamy.Stir frequently to achieve a smooth texture and prevent clumping.
- Remove from heat and immediately stir in almond butter, ground flaxseed, cinnamon, and protein powder (if using). Mix thoroughly to blend the flavors and thicken the porridge slightly.
- Add sweetener to taste, stirring gently so it dissolves evenly without overpowering the nutty base.
- Serve immediately topped with fresh berries or banana slices for contrast in color and brightness in flavor.
Tips for Enhancing Flavor and Texture without Compromising Nutrition
For an extra boost of creaminess, stir in a tablespoon of Greek yogurt or coconut cream just before serving. If you love a bit of crunch, sprinkle toasted slivered almonds or pumpkin seeds on top. To deepen aroma and warmth, a dash of nutmeg or cardamom can transform this simple porridge into a sensory delight. Avoid thinning the porridge too much with excess liquid; balance is key to maintaining that luxurious mouthfeel.
When using flaxseed, always opt for ground rather than whole to maximize nutrient absorption and avoid any gritty texture. If your protein powder is flavored,adjust the amount of cinnamon and sweetener accordingly to keep the balance harmonious.
Creative Variations to Customize Your Almond Butter and Flaxseed Porridge
- Chocolate Almond Bliss: Add 1 tbsp unsweetened cocoa powder during cooking and top with dark chocolate shavings for a rich twist.
- Tropical Sunrise: Stir in diced mango or pineapple and sprinkle with shredded coconut for a radiant, refreshing burst.
- Spiced Autumn: Incorporate pumpkin puree,a pinch of cloves,and extra cinnamon; top with chopped pecans.
- Berry Beet Boost: Blend a small roasted beet with the porridge before serving, then garnish with mixed berries and a drizzle of almond butter.
- Green Goodness: Mix in a handful of chopped kale or spinach while cooking and finish with a spoonful of almond butter and hemp seeds.
Serving Suggestions
Present your porridge in deep,colorful bowls that show off the creamy texture and vibrant toppings. add a sprig of fresh mint or a light dusting of cinnamon on the surface for a lovely finish. Pair with a cup of freshly brewed herbal tea or a citrusy green smoothie to balance the nutty richness. This breakfast not onyl satisfies hunger but also makes a striking centerpiece for mindful morning rituals.
| nutrient | Per Serving |
|---|---|
| Calories | 320 kcal |
| Protein | 15 g |
| Carbohydrates | 38 g |
| Fat | 14 g |
Discover more delicious and nutrient-dense oatmeal recipes to expand your breakfast repertoire.
Learn more about the health benefits of flaxseed at the Harvard T.H. Chan school of Public health.

Q&A
Q&A: Power-Packed Almond Butter & Flaxseed Protein Porridge Recipe
Q: What makes this Almond Butter & Flaxseed protein Porridge so special?
A: This porridge is a powerhouse breakfast that combines creamy almond butter with nutrient-dense flaxseeds and a boost of protein. It’s not just comforting and delicious, but it also fuels your body with healthy fats, fiber, and sustained energy-all morning long.
Q: Why should I add flaxseeds to my porridge?
A: Flaxseeds are tiny nutritional dynamos! Packed with omega-3 fatty acids, lignans, and fiber, they support heart health, digestion, and hormone balance. Ground flaxseeds blend smoothly into porridge,making it both tasty and incredibly nutritious.
Q: Can I use any protein powder in this recipe?
A: Absolutely! Whether you prefer plant-based protein, whey, or collagen, choose one that fits your dietary needs and taste preferences.The key is to select a protein powder that mixes well and complements the nutty flavors of almond butter and flaxseed.
Q: Is this porridge good for weight management?
A: Yes, as it’s high in protein and fiber, this porridge helps keep you full and satisfied, reducing mid-morning cravings. The healthy fats from almond butter provide long-lasting energy without blood sugar spikes, making it a balanced meal to support weight goals.
Q: How can I make this recipe vegan and dairy-free?
A: It’s naturally vegan when you use a plant-based protein powder and a dairy-free milk option like almond or oat milk! Plus, almond butter is already plant-based, so you’ve got a creamy, vegan-friendly breakfast ready to go.
Q: Any tips for perfecting the texture?
A: Start with rolled oats for a creamy yet hearty base. Stir the ground flaxseeds in early to let them thicken the porridge naturally. Mix in almond butter off the heat to preserve its silky richness. Adjust the liquid to find your ideal consistency-some like it spoonable, others prefer it more soupy.
Q: Can I prep this porridge in advance?
A: Definately! Make a batch of the oat-flax base, then portion it out in jars. Add fresh almond butter and protein powder each morning to keep flavors vibrant. Or prepare the entire porridge the night before and warm it up for a quick, nourishing start.
Q: What are some delicious add-ins or toppings?
A: Elevate your porridge with fresh berries, sliced bananas, a drizzle of honey or maple syrup, crushed nuts, or even a sprinkle of cinnamon and cacao nibs for a dessert-like twist. The possibilities are endless to keep your breakfast exciting.
Q: Who is this porridge perfect for?
A: Whether you’re an athlete needing muscle fuel, a busy professional seeking convenient nutrition, or someone aiming for a heart-healthy start-this recipe fits all lifestyles. It’s as versatile as it is indeed empowering!
Q: Where can I find the full recipe?
A: Stay tuned below the article for the step-by-step guide to your new favorite morning ritual-your body and taste buds will thank you!
The Conclusion
As you savor each spoonful of this power-packed almond butter and flaxseed protein porridge, you’re not just enjoying a hearty breakfast-you’re fueling your body with wholesome ingredients designed to energize and nourish. Rich in healthy fats, fiber, and plant-based protein, this creamy blend is an effortless way to boost your mornings and support sustained vitality throughout the day. Whether you’re powering through a busy schedule or simply craving a comforting, nutrient-dense start, this recipe proves that wholesome can be both delicious and satisfying. So go ahead-embrace the goodness, and let every breakfast be a step toward a stronger, more vibrant you.