Decadent No-Bake Chocolate Ice Cream is a luscious frozen delight that combines ease and elegance in every scoop. Originating as a quick, no-fuss option to conventional ice cream, this recipe delivers a velvety texture and rich cocoa flavor without ever turning on a stove or ice cream maker. I remember first making this when unexpected guests arrived, and it’s silky, chocolatey goodness earned instant praise.Whether you’re a beginner or a seasoned dessert enthusiast, this creation will quickly become a favorite for spontaneous gatherings or sweet cravings.
Prep and Cook Time
Preparation: 15 minutes
Freezing time: 4 hours minimum (preferably overnight)
Yield
Serves 6 generous portions
difficulty Level
Easy – Perfect for any skill level
Ingredients That Elevate Every Spoonful
- 2 cups heavy cream,chilled
- 1 cup sweetened condensed milk
- ½ cup unsweetened cocoa powder,sifted for smoothness
- 1 teaspoon pure vanilla extract
- ¼ teaspoon fine sea salt to balance richness
- ¼ cup dark chocolate chips or chunks for delightful texture
- Optional: 2 tablespoons espresso or strong brewed coffee (enhances depth)
Step-by-Step Guide to Creating the Perfect Frozen Treat
- Whip the cream: Using a chilled bowl and beaters,whip the heavy cream to soft peaks. This light texture will give your ice cream a fluffy, airy creaminess.
- Combine dry ingredients: In a seperate large bowl, sift together unsweetened cocoa powder and sea salt. This ensures no lumps and an even chocolate flavor throughout.
- Add sweetness and flavor: Stir in sweetened condensed milk, vanilla extract, and your optional coffee. Mix thoroughly until smooth and glossy.
- Fold in whipped cream: Gently fold the whipped cream into the chocolate mixture using a spatula, preserving the airy texture.Avoid overmixing – the key to light ice cream lies here.
- Add chocolate chips: sprinkle in dark chocolate chips for added texture and bursts of chocolatey indulgence.
- Transfer to a container: Pour the mixture into a loaf pan or airtight container.Smooth the top with a spatula.
- Freeze: Cover and freeze for at least 4 hours, ideally overnight, until firm but scoopable.
- Serve: Remove from freezer 5 minutes before serving to soften slightly for perfect scooping.
Expert Tips for Customizing Your frozen Chocolate Delight
- Flavor twists: Add a swirl of salted caramel, raspberry puree, or a sprinkle of chili powder for an exciting kick.
- Substitutions: Use coconut cream instead of heavy cream for a dairy-free option; maple syrup can replace sweetened condensed milk, though texture will be less creamy.
- Texture tweaks: For a crunchier bite, fold in chopped nuts, crushed cookies, or toasted coconut flakes.
- Make-ahead magic: This no-bake ice cream can be prepared up to 2 days in advance and kept tightly sealed to maintain freshness.
- Presentation pro tip: Letting the ice cream temper at room temperature before scooping ensures luminous,scoopable perfection every time.
Serving Suggestions
Serve your Decadent No-Bake Chocolate Ice Cream in chilled bowls or waffle cones for an elegant touch. Garnish with a sprig of fresh mint, a dusting of cocoa powder, or shaved chocolate curls to elevate presentation. Pair it with warm berry compote or a drizzle of rich espresso sauce to create delightful flavor contrasts. For extra indulgence,add a scoop alongside warm brownies or a slice of rich chocolate cake.

| Nutrient | Per Serving |
|---|---|
| Calories | 320 kcal |
| Protein | 4 g |
| Carbohydrates | 28 g |
| Fat | 21 g |
For more creative no-bake desserts, check out our collection of no-bake recipes. To better understand the science behind no-churn ice cream techniques and tips, visit the ScienceDaily article on frozen dessert textures.
Q&A
Q&A: decadent No-Bake Chocolate Ice Cream – Your Easy Frozen Delight
Q1: What makes this no-bake chocolate ice cream so special?
A1: This no-bake chocolate ice cream is special because it combines rich, velvety chocolate flavor with effortless preparation. You skip the oven entirely, making it perfect for those who crave indulgence without the hassle or heat of baking. It’s basically dessert magic in the freezer!
Q2: Do I need an ice cream maker to make this recipe?
A2: Not at all! One of the best things about this recipe is that it requires zero special equipment. No ice cream maker, no churner-just a bowl, some basic ingredients, and your freezer. It’s truly foolproof.
Q3: What ingredients do I need for this decadent treat?
A3: At its core,this frozen delight calls for heavy cream,sweetened condensed milk,good quality cocoa powder or melted chocolate,and a pinch of vanilla extract. Optional extras like chocolate chips, nuts, or a swirl of caramel can add a personal touch.Q4: How long does it take to make and freeze?
A4: Prep time is just about 10 to 15 minutes-whipping cream, folding in the chocolate mixture, and into the container it goes! Though, for the perfect scoopable texture, you’ll wont to freeze it for at least 6 hours, preferably overnight.Q5: Can I customize this recipe for dietary needs?
A5: Absolutely! You can swap out the dairy for coconut cream or almond-based alternatives, and use dairy-free sweetened condensed milk available at many markets. Just note texture might be slightly different, but the decadence remains.
Q6: How do I get the ice cream perfectly creamy without cooking?
A6: The secret lies in whipping air into the heavy cream-it acts like a natural churn. Folding in the sweetened condensed milk and chocolate gently keeps everything light and smooth. The result? Creaminess without ice crystals!
Q7: Can kids help make this dessert?
A7: definitely! This no-bake ice cream is a fantastic family project. Kids can whisk the cream (with a handheld mixer or even by hand if they’re up for the challenge),mix ingredients,and decorate with toppings. It’s a fun, educational way to enjoy a cool treat together.Q8: What’s the best way to serve this decadent no-bake chocolate ice cream?
A8: Serve it straight from the freezer in a chilled bowl or cone. For an extra touch, add fresh berries, a drizzle of fudge sauce, or a sprinkle of sea salt to heighten the chocolate flavor explosion. pair it with warm cookies or brownies for a sublime contrast.Q9: How long can I store no-bake chocolate ice cream in the freezer?
A9: Properly stored in an airtight container, this homemade ice cream will stay delicious for up to two weeks. Just remember to let it thaw a few minutes at room temperature before scooping for the best texture.
Q10: Why should I try making no-bake chocolate ice cream at home?
A10: Because it’s a luscious, rewarding dessert with minimal effort and maximum flavor. Plus, homemade means you control the ingredients-no preservatives, just pure chocolate bliss.It’s the ultimate frozen treat for chocoholics and casual dessert lovers alike!
in summary
As the summer sun blazes and time feels fleeting, this decadent no-bake chocolate ice cream offers a sweet escape-an effortless frozen delight that transforms simple ingredients into a luscious treat. Whether you’re a seasoned dessert lover or a novice in the kitchen, this recipe invites you to savor the rich, creamy magic of chocolate without turning on the oven.So next time the craving strikes, remember: indulgence doesn’t have to be complicated. With just a few steps, you can create your own cool oasis of flavor, ready to be enjoyed anytime, anywhere. Here’s to easy elegance in every bite!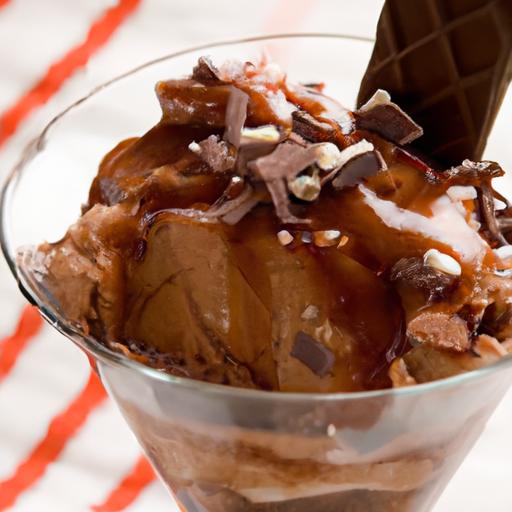
Decadent Chocolate Peanut Butter Cheesecake Cake Recipe begins with selecting the finest ingredients that transform a simple dessert into an indulgent experience. The secret to the cake’s rich and creamy texture lies in the perfect harmony between premium cream cheese, smooth peanut butter, and high-quality chocolate. Opting for full-fat cream cheese ensures a velvety base, while natural peanut butter (unsweetened or lightly salted) brings depth without overpowering sweetness. For the chocolate layers, use bittersweet or semisweet chocolate with at least 60% cocoa content to balance the peanut butter’s richness and add an intense cocoa punch.
Prep and Cook Time
- Preparation: 30 minutes
- Baking: 1 hour 15 minutes
- Cooling and Chilling: 6 hours (preferably overnight)
Yield
Serves 10-12 slices
Difficulty Level
Medium – Ideal for bakers familiar with layered cheesecakes seeking a rewarding challenge.
Ingredients
- For the Crust:
- 1 ½ cups chocolate graham cracker crumbs
- 5 tbsp unsalted butter, melted
- 2 tbsp granulated sugar
- for the Peanut Butter Cheesecake Layer:
- 16 oz full-fat cream cheese, softened
- ¾ cup smooth natural peanut butter
- ¾ cup powdered sugar, sifted
- 2 large eggs, room temperature
- 1 tsp pure vanilla extract
- ¼ cup sour cream
- For the Chocolate Cheesecake Layer:
- 16 oz full-fat cream cheese, softened
- 1 cup granulated sugar
- 3 tbsp unsweetened cocoa powder
- 4 oz bittersweet chocolate, melted and slightly cooled
- 3 large eggs, room temperature
- 1 tsp vanilla extract
- ¼ cup sour cream
- For the Ganache Topping:
- 6 oz bittersweet chocolate, chopped
- ½ cup heavy cream
- 2 tbsp peanut butter (optional, for swirls)
Instructions
- Prepare the crust: In a medium bowl, combine chocolate graham cracker crumbs, melted butter, and sugar. press the mixture firmly into the base of a 9-inch springform pan. Place in the fridge while preparing the cheesecake layers.
- Make the peanut butter cheesecake layer: Beat softened cream cheese and peanut butter until smooth. Gradually add powdered sugar, then eggs one at a time. Mix in vanilla and sour cream until silky. Pour evenly over the chilled crust.
- Create the chocolate cheesecake layer: Beat cream cheese with sugar and cocoa powder until fully combined. Stir in the melted chocolate. Blend in eggs one at a time, then add vanilla and sour cream. Pour carefully over the peanut butter layer.
- Bake the cake: Place the springform pan in a water bath (wrap bottom with foil to prevent leaks) and bake at 325°F (160°C) for 1 hour 15 minutes,or until the edges are set but the centre slightly jiggles. This gentle baking prevents cracks and ensures moistness.
- Cool and chill: Turn off the oven and leave the cheesecake inside with the door ajar for 1 hour. Remove and cool to room temperature, then refrigerate for at least 6 hours or overnight to let the flavors meld.
- Prepare ganache: heat heavy cream until simmering and pour over chopped chocolate. Let sit 2 minutes,then stir until glossy and smooth. Swirl in peanut butter if desired for an extra flavor punch.
- Decorate and serve: Spread ganache over the chilled cheesecake surface, using a spatula to create gentle peaks. Chill for 15 minutes before slicing. Garnish with chopped roasted peanuts, chocolate shavings, or a drizzle of melted peanut butter for stunning presentation.
Tips for Success
- Always use room-temperature ingredients to ensure a smooth batter and avoid lumps.
- To prevent cheesecake cracks, avoid overmixing and don’t open the oven during the first 45 minutes of baking.
- If peanut butter is too thick, microwave it for 15 seconds for easier blending.
- Make the cheesecake a day in advance to enhance flavor complexity and ease serving.
- For a gluten-free option, substitute chocolate graham cracker crumbs with almond flour or gluten-free biscuit crumbs.
Serving Suggestions
Serve this rich chocolate peanut butter cheesecake cake chilled, accompanied by fresh raspberries or a light raspberry coulis to cut through the richness. Complement each slice with a dollop of whipped cream dusted with cocoa powder or finely chopped dark chocolate. For an elegant finish, add edible gold leaf accents or toasted peanut halves along the edges. Pair with a bold espresso or a creamy milk stout to elevate the indulgence.

| Nutrition (per slice) | Calories | Protein | Carbs | Fat |
|---|---|---|---|---|
| Chocolate Peanut Butter cheesecake Cake | 520 kcal | 10 g | 40 g | 35 g |
For more decadent dessert inspirations, explore our Ultimate Chocolate Desserts Collection or discover expert baking tips at Serious Eats: How to Make Cheesecake.
Q&A
Q&A: Decadent Chocolate Peanut Butter Cheesecake Cake Recipe
Q1: What makes this Chocolate Peanut Butter Cheesecake Cake so decadent?
A1: The decadence lies in the harmonious layering of rich, velvety chocolate cake, creamy peanut butter cheesecake, and luscious ganache. Each bite offers an indulgent mix of smooth textures and bold flavors that elevate a simple dessert into a show-stopping treat.
Q2: How challenging is this recipe for a beginner baker?
A2: While this recipe involves multiple components-chocolate cake layers, peanut butter cheesecake filling, and a glossy chocolate glaze-it’s broken down into straightforward steps. With a bit of patience and basic baking tools, even novice bakers can achieve stunning results.
Q3: can I substitute the peanut butter for a different nut butter?
A3: Absolutely! Almond butter, cashew butter, or even hazelnut spread can be delicious alternatives. Just keep in mind that each nut butter has its own flavor profile and texture, which may subtly alter the overall taste of your cake.
Q4: what type of chocolate works best for the cake and ganache?
A4: for a rich chocolate flavor, opt for high-quality bittersweet or semi-sweet chocolate with at least 60% cocoa. This balances the sweetness of the peanut butter and cheesecake while providing a luscious depth to both the cake layers and the ganache topping.
Q5: How should I store the cheesecake cake to keep it fresh?
A5: Because it contains cream cheese, it’s best stored in the refrigerator, tightly covered with plastic wrap or placed in an airtight container. It can last up to 4-5 days chilled,but for peak flavor and texture,enjoy within 2-3 days.
Q6: Can I make this cake ahead of time for a party?
A6: Yes! This cake actually benefits from some resting time in the fridge, allowing the flavors to meld and the cheesecake layer to set beautifully. Prepare it a day in advance,keep it chilled,and bring it out just before serving.
Q7: What sides or drinks pair well with this rich dessert?
A7: To balance the cake’s richness, consider serving with a scoop of vanilla ice cream or fresh berries to add brightness. Beverage-wise, a strong cup of black coffee, espresso, or even a smooth glass of cold milk complements the chocolate-peanut butter extravaganza perfectly.
Q8: Is there a gluten-free version of this recipe?
A8: You can create a gluten-free variant by replacing the all-purpose flour with a gluten-free baking blend. Just ensure the blend includes xanthan gum or another binder to maintain the cake’s structure and texture.
Q9: What tips help achieve a flawless peanut butter cheesecake layer?
A9: Use room-temperature cream cheese and peanut butter to ensure smooth mixing without lumps. Avoid overmixing to prevent cracking, and bake the cheesecake layer gently in a water bath or on a lower oven rack to maintain moisture and prevent browning.
Q10: What’s the best way to cut and serve this layered marvel?
A10: Use a sharp knife warmed under hot water and dried before slicing. This helps create clean, defined slices without dragging ganache or cheesecake layers. Serve on chilled plates to keep the cheesecake firm and mess-free.
This Q&A brings you the insider scoop on making- and savoring- the ultimate decadent Chocolate Peanut Butter Cheesecake Cake. Ready to bake? Let the delicious adventure begin!
To Conclude
As you savor each bite of this decadent chocolate peanut butter cheesecake cake, you’ll discover a perfect harmony of rich, creamy textures and bold, irresistible flavors. Whether you’re celebrating a special occasion or simply indulging a sweet craving, this recipe promises to elevate your dessert game to new heights.So go ahead-bake it, share it, and watch as this luscious masterpiece becomes a beloved favorite around your table. because when chocolate and peanut butter unite in cheesecake form, every forkful is a celebration of pure, blissful indulgence.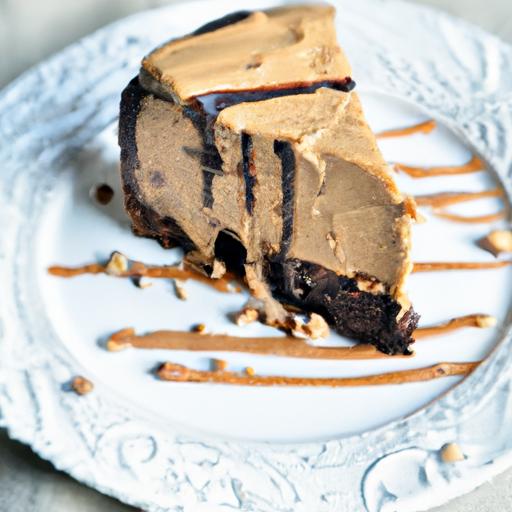
Decadent Delight: The Allure of White Chocolate Strawberries is a stunning fusion of creamy, luxurious white chocolate paired with the naturally sweet and juicy essence of ripe strawberries. This classic treat, beloved for weddings and special occasions worldwide, invites you into a celebration of texture and flavor that’s surprisingly simple to recreate at home. imagine biting into a plump strawberry enveloped in smooth,glossy white chocolate-the perfect balance of indulgence and freshness in each mouthwatering bite.
Prep and Cook Time
Preparation: 20 minutes
Cooling & Setting: 30 minutes
Yield
Makes approximately 20-25 white chocolate strawberries
Difficulty Level
Easy – perfect for beginners and seasoned chocolatiers alike
Ingredients
- 1 pound fresh strawberries, washed and thoroughly dried (preferably with stems intact)
- 8 ounces high-quality white chocolate, finely chopped or in chips
- 1 teaspoon coconut oil (optional, for smoother melting)
- Colorful sprinkles, chopped nuts, or crushed freeze-dried strawberries for decoration (optional)
- Parchment paper or silicone baking mat for cooling
Instructions
- Prepare your workspace. Line a baking sheet with parchment paper or a silicone mat to allow the chocolate-coated strawberries to set without sticking.
- dry strawberries perfectly. Gently pat each strawberry dry with paper towels, ensuring no moisture remains; water will cause the chocolate to seize and not adhere properly.
- Melt the white chocolate. In a heatproof bowl set over a pot of simmering water (double boiler method), melt the white chocolate along with the coconut oil, stirring frequently until smooth and glossy.
Tip: You can also use a microwave in 20-second bursts,stirring in between to avoid overheating. - Dip strawberries carefully. Holding each strawberry by the stem,gently dip it into the melted white chocolate until almost fully coated. allow excess chocolate to drip back into the bowl.
- Decorate immediately. Before the chocolate sets, sprinkle with your choice of decorations like chopped nuts or festive sprinkles for a pop of color and texture.
- Set and chill. place dipped strawberries onto the prepared baking sheet and refrigerate for at least 30 minutes until the chocolate hardens wholly.
- Serve and savor. once set, transfer to a serving platter and enjoy the divine creaminess paired with juicy strawberry sweetness.
Tips for Success
- Always use room temperature strawberries that are as dry as possible; cold, wet berries will cause chocolate bloom.
- Adding a teaspoon of coconut oil helps achieve a silkier texture and glossy finish to the white chocolate coating.
- For easy cleanup, melt chocolate using a double boiler method.
- Customize by dipping strawberries halfway and drizzling with dark or milk chocolate for a gorgeous contrast and added depth.
- These treats can be made up to 24 hours ahead-store in an airtight container refrigerated to maintain freshness and crisp chocolate.
Serving Suggestions
Present your white chocolate strawberries on a pristine white platter to highlight their glossy sheen.Garnish with fresh mint leaves or edible flowers for elegance. For a decadent celebration, pair these delights with a sparkling Rosé or a crisp late-harvest Riesling-both beautifully complement the creamy sweetness and fruity freshness.
Looking to elevate your dessert table? Serve alongside a velvety panna cotta or a tangy lemon tart for contrasting flavors and textures that will captivate your guests.

| Nutrient | Per Serving (1 strawberry) |
|---|---|
| Calories | 70 kcal |
| Protein | 1 g |
| Carbohydrates | 10 g |
| Fat | 3.5 g |
For an expanded exploration of pairing white chocolate strawberries with other desserts or wines, be sure to visit our detailed pairing guide, enhancing your expertise in crafting show-stopping gourmet experiences.
Q&A
Q&A: Decadent Delight – The Allure of White Chocolate Strawberries
Q: What makes white chocolate strawberries so irresistibly alluring?
A: It’s the perfect marriage of creamy sweetness and juicy freshness. The velvety, buttery notes of white chocolate envelop the bright, tangy burst of ripe strawberries, creating a sensory harmony that feels both indulgent and refreshing.Q: How did white chocolate strawberries become a beloved treat?
A: while dipped strawberries have long been a classic, white chocolate lent an elegant twist. Their rise in popularity stems from the visual appeal of glossy, ivory-coated berries and the unique flavor contrast that white chocolate offers – sweeter and milder then dark or milk chocolate, highlighting the strawberry’s natural vibrancy.
Q: Are there specific occasions that call for white chocolate strawberries?
A: Absolutely! These gems shine at romantic celebrations like Valentine’s Day and anniversaries, making any moment feel extra special.Their elegant appearance also makes them a favorite at weddings, upscale parties, and even as thoughtful gifts for chocolate and fruit lovers alike.
Q: What should one look for when selecting or making white chocolate strawberries?
A: Freshness is key - choose strawberries that are ripe but firm, with deep red hues and fresh green stems. For the chocolate, opt for high-quality couverture white chocolate for a smooth, glossy finish. When dipping, tempering the chocolate ensures a perfect snap and sheen, elevating the treat from simple to spectacular.
Q: Can the allure of white chocolate strawberries be enhanced with extra flavors?
A: Definitely! Adding a sprinkle of crushed pistachios, a drizzle of dark chocolate, or a hint of sea salt can create delightful contrasts. Some also enjoy infusing the chocolate with vanilla or citrus zest to deepen the complexity, turning each bite into an unexpectedly luxurious experience.
Q: How do white chocolate strawberries embody decadence?
A: They symbolize indulgence with every bite - combining the richness of chocolate that melts like silk with the juicy burst of strawberry sweetness. This dual texture and flavor sensation feels like a treat crafted for the senses,embodying pleasure in it’s most elegant and unpretentious form.
Wrapping Up
In the world of confections, few treats manage to capture both elegance and indulgence quite like white chocolate strawberries. Their creamy sweetness paired with the vibrant, juicy burst of fresh berry creates a sensory experience that is as much a feast for the eyes as it is for the palate. Whether enjoyed as an everyday luxury or reserved for special occasions, these decadent delights continue to enchant and inspire, reminding us that sometimes, the simplest combinations can be the most irresistible.As you savor each bite, you’re not just tasting a dessert-you’re embracing a timeless indulgence that celebrates the art of sweetness in its most exquisite form.
Decadent no-bake chocolate truffles captivate with their luxurious creaminess and velvety texture-without ever heating up your kitchen. born from timeless European traditions and cherished for their simplicity, these treats offer indulgence at its purest.Imagine biting into a luscious bite where rich dark chocolate melts effortlessly, harmonized by subtle hints of vanilla or a playful twist of unexpected spice.This recipe unlocks the secrets to mastering the perfect texture, blending premium ingredients with creative flair to elevate every homemade truffle to unparalleled decadence.
Prep and Cook Time
- Preparation: 20 minutes
- Chilling: 2 hours
- total: Approximately 2 hours 20 minutes
Yield
Makes approximately 24 medium-sized truffles
Difficulty Level
easy – Perfect for beginners and seasoned dessert lovers alike
Ingredients
- 8 oz (225g) high-quality dark chocolate (70% cocoa, finely chopped)
- ½ cup (120ml) heavy cream
- 3 tbsp unsalted butter, softened and cubed
- 1 tsp pure vanilla extract
- ¼ tsp fine sea salt
- For rolling/coating:
- Cocoa powder, sifted
- Finely crushed toasted nuts (e.g., pistachios, hazelnuts)
- Edible gold flakes or sea salt flakes (optional for garnish)
Instructions
- Warm the heavy cream gently: In a small saucepan, heat the cream over low heat just until it begins to simmer. Avoid boiling as overheating changes the texture of your ganache.
- Combine cream and chocolate: Place the chopped dark chocolate in a heatproof bowl. Pour the hot cream over the chocolate and let it sit for 2 minutes to soften the pieces.
- Stir into a silky ganache: Using a spatula or whisk, gently stir the mixture until smooth and glossy. Add the softened butter, vanilla extract, and sea salt, stirring continuously until fully incorporated.
- Chill for firmness: Cover the bowl with plastic wrap and refrigerate for about 1.5 to 2 hours, or until the ganache is firm enough to shape but still pliable.
- portion and roll: Using a melon baller or teaspoon,scoop the ganache and quickly roll into smooth balls using your palms. Work swiftly to prevent melting.
- Coat creatively: Roll each truffle in your choice of cocoa powder, crushed nuts, or other coatings. For a touch of elegance, sprinkle with edible gold flakes or a pinch of sea salt.
- Final chill: Place the coated truffles on a parchment-lined tray and refrigerate for an additional 30 minutes to set completely before serving.
Tips for Success
- Chocolate quality matters: Use premium dark chocolate with at least 70% cocoa content for the richest flavor and smoothest texture.
- Room temperature butter: Softened butter lends extra silkiness and helps the ganache set with a creamy finish.
- Keep your hands cool: Rolling truffles can warm the ganache-chill your hands periodically or use gloves for easier shaping.
- Experiment with flavors: Add a splash of coffee liqueur, orange zest, or a pinch of chili powder to the ganache for exciting variations.
- Make ahead advantage: Truffles can be stored in an airtight container in the refrigerator for up to 1 week or frozen for up to 1 month.
Serving Suggestions
Present these decadent delights on a sleek slate platter or in petite paper cups to highlight their elegant form. Garnish with fresh mint leaves for a pop of color or sprinkle finely chopped candied ginger for a zesty surprise. Pair with a robust espresso or a glass of vintage port to fully embrace the luxurious experience. These chocolate truffles also make exquisite gifts-wrap them in cellophane tied with a ribbon for a personal touch.
| Nutrient | amount per Truffle |
|---|---|
| Calories | 90 kcal |
| protein | 1 g |
| Carbohydrates | 7 g |
| Fat | 7 g |

For more inspiration, explore our collection of rich chocolate desserts, or learn about professional chocolate tempering techniques to further transform your chocolate expertise.
Q&A
Q&A: Decadent No-Bake Chocolate Truffles – Simple & Irresistible
Q1: What makes these no-bake chocolate truffles so decadent?
A1: The decadence comes from the rich, velvety chocolate combined with a luscious, creamy filling that melts in your mouth. Using high-quality cocoa or dark chocolate adds deep,complex flavors,while the absence of baking preserves their silky texture and indulgent charm.
Q2: How simple are these chocolate truffles to make?
A2: Surprisingly simple! With just a handful of ingredients-usually chocolate, cream, butter, and a touch of flavoring-you mix, chill, and shape. No need for ovens or intricate techniques. Even beginners can whip up these divine bites in under 30 minutes.Q3: Can I customize these truffles to suit my taste?
A3: Absolutely! The beauty of no-bake truffles lies in their versatility. Add espresso powder for a mocha twist, a splash of liqueur for grown-up glamour, or roll them in crushed nuts, cocoa powder, or sprinkles for texture and flair. Your taste buds are the limit.
Q4: What’s the secret to perfectly smooth and glossy truffle filling?
A4: Patience and technique. Gently melting the chocolate with warm cream to create a ganache, then chilling it thoroughly before shaping, ensures a silky consistency. Avoid overheating the chocolate-gentle heat is key to that glossy finish and melt-in-your-mouth softness.Q5: How should I store these truffles to keep them fresh and delicious?
A5: Store them in an airtight container in the refrigerator if you want them firm or at cool room temperature for a softer bite. they typically stay fresh for up to two weeks. For longer storage, freeze them wrapped well, thawing slowly before serving.
Q6: Are these truffles suitable for special occasions or gifts?
A6: Definitely! Their elegant appearance and rich flavor make them a perfect treat for celebrations or heartfelt gifts. Package them in pretty boxes or decorative tins, and you’ve got a luxurious homemade delight that’s sure to impress.
Q7: Can these no-bake chocolate truffles fit into a vegan or dairy-free diet?
A7: With a few smart substitutions, yes! Use coconut cream or plant-based cream alternatives, paired with high-quality dairy-free dark chocolate. The result is an equally creamy, indulgent truffle that’s kind to both your palate and dietary preferences.
Indulge your senses without the fuss – these decadent no-bake chocolate truffles prove that simplicity and luxury truly can go hand in hand.Ready to start rolling?
wrapping Up
As the rich, velvety allure of these no-bake chocolate truffles melts effortlessly on your tongue, it’s clear that indulgence doesn’t have to be complicated. With just a handful of simple ingredients and no oven required, you’ve discovered a timeless recipe that transforms everyday moments into decadent celebrations. Whether gifting them to loved ones or savoring a quiet treat solo, these truffles embody the perfect balance of simplicity and sophistication. So go ahead-embrace the art of effortless luxury and let each bite remind you that sometimes,the sweetest pleasures are the simplest to create.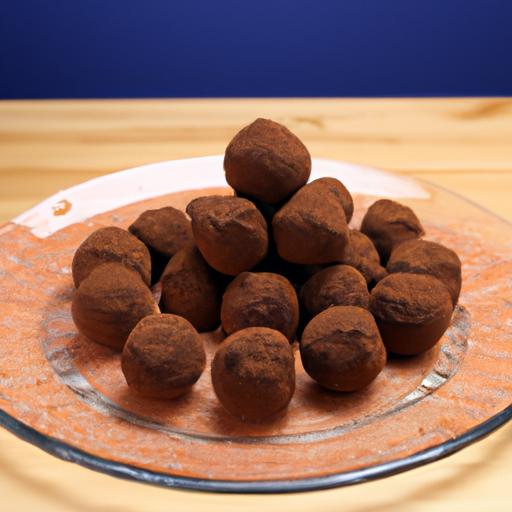
Ingredients That Transform Avocado Into Silky Chocolate Bliss
Decadent Avocado Chocolate Pudding unlocks a world where velvety texture meets nourishing indulgence, proving that healthy desserts can be utterly decadent. This luscious treat began as a simple experiment to bring creamy richness without heavy cream or refined sugars-and the result is nothing short of magic.
Harnessing the buttery smoothness of perfectly ripe avocados, combined with dark cocoa’s deep, bittersweet notes, this pudding achieves a harmony of flavor and nutrition. Let’s dive into what makes these ingredients heroes in transforming avocado into a creamy, chocolatey sensation.
Prep and Cook Time
- Preparation: 10 minutes
- Chill Time: 1 hour
- Total Time: 1 hour 10 minutes
Yield
Serves 4 rich and satisfying portions
Difficulty Level
Easy – perfect for beginner cooks and dessert lovers alike
Ingredients
- 2 large ripe avocados, peeled and pitted, the creaminess backbone of this pudding
- 1/4 cup unsweetened cocoa powder, for that deep chocolate intensity
- 1/4 cup pure maple syrup or honey, adding natural sweetness with subtle floral notes
- 1/4 cup unsweetened almond milk, or any plant-based milk, to smooth the texture
- 1 teaspoon pure vanilla extract, elevating and rounding out the flavor
- 1/4 teaspoon sea salt, enhancing the chocolate’s depth and balancing sweetness
- Optional toppings: shaved dark chocolate, chia seeds, fresh berries, or crushed nuts
Step by Step Guide to Crafting Perfectly Creamy Avocado Chocolate Pudding
- Prepare the avocados: Scoop out the flesh from two ripe avocados into a high-speed blender or food processor. Ripe avocados are key-they should be soft but not mushy, ensuring the pudding will be creamy, not gritty.
- Add cocoa powder and sweetener: Pour in the unsweetened cocoa powder and maple syrup. This combination yields rich chocolate flavor balanced by natural sweetness.
- Incorporate liquid and flavor: Add the almond milk, vanilla extract, and sea salt. The milk loosens the mixture for silky smoothness, while vanilla and salt enhance the dessert’s complexity.
- Blend until silky: Process on high speed for 1-2 minutes, scraping down the sides as needed, until the mixture is ultra-smooth and creamy. Pause occasionally to avoid overheating the motor.
- Chill thoroughly: Transfer the pudding to a serving bowl or individual cups. Cover and refrigerate for at least 1 hour to deepen flavors and firm up the luscious texture.
- Serve and garnish: Before serving, garnish with your choice of toppings like dark chocolate shavings, fresh raspberries, or a sprinkle of crunchy chia seeds for added texture and visual appeal.
Tips and Variations to Customize Your Healthy Decadent Treat
- Sweeteners: Swap maple syrup for agave nectar or coconut sugar to suit dietary preferences.
- Milk options: Coconut milk adds a tropical twist and richer mouthfeel; oat milk offers natural sweetness.
- Boost protein: Stir in a scoop of plant-based protein powder or nut butter to make it more filling.
- Make it spicy: Add a pinch of cayenne or cinnamon for an adventurous, warming note.
- Make ahead: This pudding stores beautifully for 2-3 days in the fridge, making it ideal for meal prep or unexpected guests.
- Texture tweaks: For a mousse-like consistency, whip in a spoonful of coconut cream just before chilling.
Serving Suggestions
Present this Decadent Avocado chocolate Pudding in clear glass ramekins or petite jars to showcase its glossy, rich surface.Top with vibrant fresh berries-such as raspberries or sliced strawberries-or sprinkle toasted coconut flakes for contrast. A sprig of mint adds fresh color and aroma. For a more decadent touch, drizzle a little melted dark chocolate or dollop unsweetened whipped cream made from coconut milk.
| Nutrient | Per Serving |
|---|---|
| Calories | 210 |
| Protein | 3g |
| Carbohydrates | 18g |
| Fat | 15g |
Discover more healthy dessert inspirations in our healthy desserts collection or learn about the remarkable health benefits of avocados on the Harvard T.H. chan School of Public Health.

Q&A
Q&A: Decadent Avocado chocolate Pudding – A Healthy Twist Revealed
Q1: What exactly is avocado chocolate pudding?
A: Imagine the luscious creaminess of ripe avocado fused with rich,velvety chocolate-this is avocado chocolate pudding. It’s a dairy-free,guilt-free dessert that transforms humble avocados into an indulgent treat,perfect for chocoholics seeking a healthier choice.
Q2: How does avocado change the conventional chocolate pudding game?
A: Avocado adds an irresistibly smooth texture and natural creaminess without needing heavy cream or butter. Plus,it sneaks in a powerhouse of nutrients-good fats,fiber,and antioxidants-turning a typically indulgent dessert into a nourishing delight.
Q3: Will the avocado flavor overpower the chocolate?
A: Not at all! When blended with cocoa powder and sweetened just right, the avocado’s flavor softly recedes, allowing the chocolate to shine while quietly boosting the pudding’s health credentials. Think of it as the perfect sidekick to the rich chocolate hero.Q4: Is this pudding suitable for special diets?
A: Absolutely! It’s naturally vegan, gluten-free, and free from refined sugars if you choose natural sweeteners. Whether you’re dairy-free, plant-based, or just aiming to eat cleaner, this pudding fits the bill.
Q5: How easy is it to make at home?
A: Super simple! With just a handful of ingredients-avocado, cocoa powder, a sweetener like maple syrup or honey, and a splash of vanilla extract-you blend them all together until silky smooth. chill, and voilà! A ready-to-eat dessert that’s as speedy as it is appetizing.
Q6: can you customize the pudding?
A: Definitely! Add a pinch of sea salt for depth, a dash of cinnamon or chili powder for a twist, or top it with fresh berries, nuts, or coconut flakes for texture and extra flavor layers. Creativity is your playground.
Q7: Why should dessert lovers give this recipe a shot?
A: Besides tasting divine, it offers a smart way to indulge.It redefines dessert by combining pleasure and nutrition. So you can savor each spoonful knowing that it’s not just decadent-it’s decadently healthy. Who says you can’t have your pudding and eat it, too?
To Wrap It Up
In the world of indulgent desserts, the decadent avocado chocolate pudding stands out as a delicious rebel-marrying rich, velvety chocolate with the creamy goodness of avocado. This healthy twist not only satisfies your sweet tooth but also nourishes your body with wholesome fats and antioxidants. So next time you crave something luscious yet guilt-free,remember this creamy concoction that redefines dessert decadence. Embrace the fusion of flavor and nutrition, and let every spoonful remind you that healthy can be truly indulgent.
Molten Magic begins with selecting the right chocolate-a cornerstone to crafting the perfect chocolate lava mug cake that’s as indulgent as it is indeed comforting. When you choose chocolate, focus on quality and cocoa content; this ensures a rich, velvety molten core that oozes with every spoonful.
Choosing the Ideal Chocolate for an Irresistible Lava Center
For that luscious molten heart, avoid overly sweet or compound chocolates. Rather, opt for high-quality bittersweet or semi-sweet chocolate with a cocoa content between 60% and 70%. This balance lends depth and silky texture without bitterness overpowering the sweetness.Chunky chocolate bars work wonderfully, melting evenly and creating gooey pockets. If you’re adventurous, mixing a hint of single-origin chocolate introduces subtle fruity or nutty notes that elevate the experiance.
For a more accessible option, good-quality baking chocolate chips or chunks ensure consistent melt and easy measurement. Remember, the lava center thrives on contrast-rich, dark chocolate melding with a soft cake crumb.
mastering the Mug Cake Texture for That Perfect Gooey Melt
Achieving the perfect balance between cake and molten center hinges on batter consistency and ingredient ratios. A batter that’s too dry will yield a crumbly cake without a molten core, while too wet can be undercooked or soup-like. Use room-temperature eggs and freshly sifted flour for smooth mixing, integrating air to create a tender crumb that surrounds and supports the lava.
Incorporating a spoonful of butter or oil is critical for moisture and glossy texture. Mix thoroughly but avoid over-beating to prevent toughening the cake. The batter should be slightly thick but pourable,with chocolate pieces peeking through-ready to burst forth as a molten surprise.
Temperature Tips to Achieve the Flawless Molten Core
Temperature is your secret weapon. The mug cake cooks rapidly, so mastering microwave power and timing is essential. Start with medium power (~70% wattage) to cook the edges and crumb gently while preserving the gooey interior. Experiment with short bursts of 30 seconds to avoid overcooking or drying out the cake.
Remove the mug cake when the edges appear set but the center still jiggles slightly-it will continue to cook from residual heat,preserving that iconic molten center. For ovens, preheat to 425°F (220°C) and bake for 10-12 minutes; look for a firm crust with a pillowy interior.
Creative Toppings and Serving Suggestions to Elevate Your Lava cake Experience
Presentation is the final magic touch. Pair your masterpiece with cooling contrasts and complementary textures. A scoop of vanilla bean ice cream or whipped cream adds velvety richness. Fresh berries like raspberries or strawberries bring vibrant tartness and color to the plate.
Sprinkle toasted nuts (hazelnuts or pecans) for crunch, or a dusting of powdered sugar and a drizzle of melted caramel or raspberry coulis enhance visual appeal and flavor complexity.For a decadent flair, serve with a small glass of rich, full-bodied red wine or a frothy cappuccino.
Prep and Cook Time
- Readiness: 5 minutes
- Cooking: 1-2 minutes (microwave) / 10-12 minutes (oven)
- Total Time: Approximately 10-15 minutes
Yield
Serves 1 decadent chocolate lava mug cake-perfect for a single-serve indulgence or easily multiplied for a small gathering.
Difficulty Level
easy – ideal for beginners and chocolate lovers looking for quick, impressive desserts.
Ingredients
- 4 tablespoons all-purpose flour, sifted
- 3 tablespoons granulated sugar
- 2 tablespoons unsweetened cocoa powder
- 1/4 teaspoon baking powder
- Pinch of salt
- 3 tablespoons whole milk, room temperature
- 2 tablespoons melted unsalted butter
- 1/2 teaspoon pure vanilla extract
- 2 tablespoons chopped bittersweet or semi-sweet chocolate
- Optional: A sprinkle of powdered sugar or cocoa powder for garnish
Instructions
- Mix dry ingredients: In a microwave-safe mug (12 oz or larger), combine flour, sugar, cocoa powder, baking powder, and salt. Stir with a fork to break any lumps.
- Add wet ingredients: Pour in the milk, melted butter, and vanilla extract. Whisk gently until the batter is smooth and thick, but not runny.
- Fold in chocolate pieces: Stir in the chopped chocolate, distributing chunks evenly to ensure a molten surprise.
- Microwave carefully: Cook on medium power for 1 minute, then check the cake’s firmness. If the center jiggles excessively, microwave in 15-second bursts until edges are set but the core remains soft.
- Cool briefly: Let the mug cake rest for 1-2 minutes to allow the molten center to settle but remain delightfully liquid.
- Garnish and serve: add your favorite toppings, then dive in instantly for a molten chocolate experience you won’t forget.
chef’s Notes
- For a dairy-free version, substitute milk with almond or oat milk, and butter with coconut oil.
- If using a conventional oven, bake in a small ramekin at 425°F (220°C) for 10-12 minutes, keeping a close eye to avoid overbaking.
- For extra gooeyness, add an unwrapped piece of chocolate at the center before microwaving.
- Struggling with uneven cooking? experiment with microwave power levels-lower power allows more even heat distribution.
- Make-ahead tip: Prepare dry ingredients in a jar for quick assembly-just add wet ingredients and chocolate chunks when ready.
Serving Suggestions
Serve your molten magic alongside a scoop of creamy vanilla ice cream or a dollop of fresh whipped cream. Garnish with crushed pistachios or a sprig of mint for vibrant contrast and texture. A few fresh berries punctuate the richness with natural sweetness and color.For a stunning visual, dust with cocoa powder or powdered sugar and drizzle warm caramel or raspberry sauce right before serving.
| Nutrient | Amount per Serving |
|---|---|
| Calories | 350 kcal |
| Protein | 5 g |
| Carbohydrates | 45 g |
| Fat | 17 g |

Discover more quick chocolate desserts in our Quick Chocolate Recipes collection to keep your sweet cravings satisfied with ease.
Q&A
Q&A: Molten Magic – How to Make the Perfect Chocolate Lava Mug Cake
Q1: What exactly is a chocolate lava mug cake?
A1: Imagine the rich decadence of a molten chocolate cake, shrunk down to a single-serving marvel, cooked right in your mug! It’s a warm, gooey chocolate cake with a molten center that bursts with luscious, flowing chocolate as you dig in-a perfect quick-fix for chocoholics craving instant gratification.
Q2: Why use a mug for this cake? Can’t I just bake a regular cake?
A2: The mug is magic! It’s your personal, oven-safe cake vessel that lets you whip up a fresh, steamy dessert in mere minutes-no mixing bowls or trays required. Plus, cooking in a mug ensures even heat distribution, giving you that signature molten core every time.Q3: What are the essentials for crafting the perfect molten center?
A3: The lava heart relies on balance: enough batter to form a cake exterior, but with a chocolatey center that stays semi-liquid. This means precise measurements of flour, butter, sugar, and most importantly, chocolate or cocoa powder. Using a chunk of chocolate or a spoonful of Nutella in the center before microwaving can amp up the molten experience.Q4: Can I make this cake in a regular oven, or is the microwave necessary?
A4: While the classic mug cake is a microwave marvel-taking under two minutes-an oven can do the job too. Use a small ramekin and bake at 350°F (175°C) for about 10-12 minutes. The microwave,however,is what gives that quick,gooey indulgence unmatched by traditional baking.
Q5: Any tips for avoiding the dreaded rubbery or overcooked mug cake?
A5: Timing is everything. Start with 70-90 seconds in the microwave and adjust based on your wattage. The cake should be set on the edges but still slightly jiggly in the center-remember, it cooks a bit more even after removal. Overcooking dries it out and kills the lava flow.
Q6: How can I personalize my chocolate lava mug cake?
A6: The sky’s the limit! Add a pinch of chili powder for a spicy kick, a splash of vanilla extract for warmth, or fold in some mini marshmallows for a melty surprise.Top your cake with whipped cream, ice cream, or fresh berries to elevate your molten masterpiece.
Q7: Is it possible to make this dessert vegan or gluten-free?
A7: Absolutely! Swap cow’s milk for almond or oat milk, replace eggs with flaxseed meal or mashed bananas, and select gluten-free flour blends. There are also plenty of dairy-free chocolate chips that melt beautifully, ensuring no one misses out on your molten magic.
Q8: What’s the best way to serve and enjoy the mug cake?
A8: Dive in straight from the mug while it’s still warm and molten for maximum ooze effect. Bring a spoon, a cozy blanket, and perhaps a glass of chilled milk or coffee to balance the deep chocolate richness. This is pure comfort in a cup-best enjoyed with slow, appreciative bites.
Ready to ignite that molten magic in your kitchen? With these tips and tricks, your perfect chocolate lava mug cake is just minutes away.Let the chocolate flow!
Final Thoughts
As the molten center oozes seductively with every spoonful, your chocolate lava mug cake transforms from a simple dessert into a moment of pure edible alchemy. With just the right balance of rich cocoa, a whisper of sweetness, and the magic of microwave convenience, you’ve mastered a treat that’s both fast and fantastically indulgent. Whether it’s a last-minute craving or the grand finale to a cozy night in, this molten marvel proves that sometimes, the simplest ingredients-and a little heat-are all you need to create chocolate perfection in a mug. So next time the mood strikes, remember: magic is just a mug away.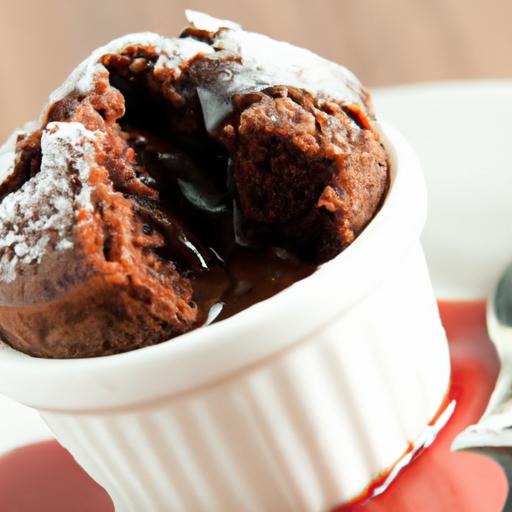
Sweet Surprise: Your Guide to Chocolate covered Strawberries Delivery begins with understanding that freshness and impeccable quality transform a simple fruit into a luxurious bite of delight. As someone who’s styled and created countless sweet moments, I’ve learned that the magic truly starts at the selection stage-only the juiciest, ripest strawberries paired with the finest chocolate yield that unforgettable experience you crave.
Prep and cook Time
Planning: 15 minutes
Chilling: 30 minutes
Total Time: 45 minutes
Yield
Serves 6-8 (approximately 18-24 strawberries)
Difficulty Level
Easy – Perfect for both beginners and seasoned chocolatiers
Ingredients
- 24 large fresh strawberries, washed and thoroughly dried (room temperature)
- 8 oz high-quality bittersweet chocolate (70% cocoa recommended), chopped
- 4 oz white chocolate, optional for drizzling
- 1 tsp coconut oil or unsalted butter (to smooth melting)
- Optional toppings: finely chopped nuts, edible gold leaf, shredded coconut, or sea salt flakes
Instructions
- Prepare the Strawberries: Gently rinse your strawberries and pat dry with paper towels. Ensuring they are completely dry is crucial; any moisture will cause the chocolate to seize.
- Melt the Bittersweet Chocolate: In a heatproof bowl, place chopped bittersweet chocolate and coconut oil. Melt using a double boiler method or in 20-second bursts in the microwave, stirring frequently for smoothness.
- Dip the Strawberries: Hold each strawberry by the green leaf and dip into the melted chocolate, swirling to coat 3/4 of the strawberry. Shake off excess and place on a parchment-lined baking sheet.
- Chill the Dipped Strawberries: Place the chocolate-coated berries in the fridge for 20 minutes to set the chocolate firmly.
- Decorate with White Chocolate: Melt the white chocolate using the same method, then use a small spoon or piping bag to drizzle thin lines over the dipped strawberries for contrast and elegance.
- Add Toppings: While the chocolate is still wet, sprinkle finely chopped nuts, sea salt, or edible gold leaf to elevate each bite to a visual and flavorful masterpiece.
- Final Chill: Refrigerate for an additional 10 minutes to let all decorations set perfectly before serving or packaging for delivery.
Tips for Success
- Choose your delivery service based on freshness guarantees. A reputable vendor will ship strawberries harvested within 24 hours and use insulated packaging to maintain berry integrity.
- Room temperature strawberries absorb chocolate better but avoid warm surfaces which cause condensation.
- Experiment with chocolate types: Milk, white, or ruby chocolates provide different flavor profiles, but always opt for couverture or high cocoa content for smooth finish and snap.
- Make-ahead tip: Prepare and refrigerate dipped strawberries up to 6 hours before gifting or serving; avoid freezing as strawberries lose texture.
- Keep your strawberries dry at every step – this is key to a glossy chocolate coating.
Creative Presentation ideas to Impress
Wrap your Sweet Surprise in a luxe gift box lined with parchment or colored paper. Add a personalized tag and sprinkle edible glitter over the box’s tissue paper for a hint of sparkle. Alternatively, present strawberries on a wooden platter nestled in fresh mint leaves or place them in transparent cellophane bags with curled ribbons for an elegant party favor look. For an elevated dessert table, pair with mini jars of champagne or sparkling wine-sweet, decadent bites perfect to complement bubbly.
Nutritional Data Per Serving
| Calories | Protein | Carbohydrates | Fat |
|---|---|---|---|
| 160 | 2g | 22g | 8g |
For more tips on selecting the finest chocolate and fruit pairings,check out our Chocolate Pairing Guide. For scientific insights on freshness and berry storage, visit the USDA’s official website.

Q&A
Sweet Surprise: Your Guide to Chocolate Covered strawberries Delivery – Q&A
Q1: What makes chocolate covered strawberries the perfect gift?
A1: Chocolate covered strawberries combine the luscious freshness of ripe berries with the rich, velvety allure of chocolate. This duo creates a sensory delight that feels both indulgent and thoughtful-a sweet surprise that says “I care” in every bite. Whether it’s for a birthday, anniversary, or just because, they’re a universally loved treat that brightens any occasion.
Q2: How does the delivery process ensure strawberries arrive fresh and flawless?
A2: Reputable delivery services use specially designed insulated packaging and chilled gel packs to maintain optimal temperature. Strawberries are hand-dipped and arranged with care, then packaged to avoid bruising or melting during transit. Some providers offer same-day or express options, minimizing time in transit and guaranteeing sweetness upon arrival.
Q3: Can I customize my chocolate covered strawberries order?
A3: Absolutely! Many chocolatiers and delivery services allow you to choose from a variety of chocolate coatings-dark, milk, white, or even ruby chocolate. You can add toppings like crushed nuts, drizzled caramel, sprinkles, or edible glitter. Some even offer personalized messages on the box or chocolate, turning each delivery into a unique, heartfelt gift.
Q4: What occasions are best suited for chocolate covered strawberries delivery?
A4: From Valentine’s Day and Mother’s day to weddings, graduations, or corporate gifts, chocolate covered strawberries fit perfectly. They also make a charming surprise for “just because” moments-turning an ordinary day into something remarkable. their elegant appearance and delicious taste make them ideal for celebrations big and small.
Q5: Are there any tips for enjoying delivered chocolate covered strawberries at their best?
A5: For the freshest taste, enjoy your chocolate covered strawberries within 24-48 hours of delivery. keep them refrigerated but allow them to come slightly closer to room temperature before eating to fully appreciate the chocolate’s texture and flavor. And of course, savor every bite slowly-this is a fleeting luxury meant to be enjoyed mindfully!
Q6: how can I choose the best delivery service for chocolate covered strawberries?
A6: Look for companies with excellent customer reviews, transparent sourcing practices, and clear delivery guarantees. Quality matters-freshness, presentation, and promptness make all the difference. Some services also offer tracking and flexible scheduling,helping ensure your sweet surprise arrives exactly when you want it.
With this guide, ordering chocolate covered strawberries online transforms from a simple purchase into a thoughtful experience, delivering joy, flavor, and a touch of magic right to your door. Ready to unwrap your sweet surprise?
Final Thoughts
As you unwrap the world of chocolate-covered strawberries delivery, you’ll discover that this sweet surprise isn’t just a treat-it’s an experience crafted to delight the senses and brighten any occasion. From selecting the perfect berry to choosing decadent chocolate coatings, your guide ensures every bite is a moment of joy delivered right to your doorstep. Whether for a romantic gesture, a thoughtful gift, or simply an indulgent self-treat, embracing the convenience and charm of delivered chocolate-covered strawberries transforms ordinary days into extraordinary memories. So go ahead, savor the sweetness and let the luscious combination of ripe strawberries and rich chocolate make every festivity a little more deliciously unforgettable.
Starbucks Iced white Chocolate Mocha captivates coffee lovers with its irresistible blend of rich espresso, creamy white chocolate, and a hint of sweetness, making it a beloved treat around the globe.This iconic beverage originally emerged as a decadent twist on a classic mocha, balancing the bold bitterness of espresso with the velvety smoothness of white chocolate. Recreating this indulgent drink at home not only offers a satisfying experience but also invites you to explore personal flavour nuances and customization, elevating every sip into a moment of pure delight.
Prep and Cook Time
- Planning: 5 minutes
- Cook Time: 5 minutes
- Total Time: 10 minutes
Yield
Serves 2 generous iced white chocolate mochaccinos
difficulty Level
Easy to Medium: Perfect for home baristas looking to expand their coffee repertoire
Ingredients
- 2 shots (approximately 2 oz) freshly brewed espresso, hot
- 1 cup whole milk (or preferred milk alternative)
- 4 tbsp white chocolate sauce or finely chopped white chocolate
- 2 tsp vanilla syrup (optional for added sweetness)
- 1.5 cups ice cubes
- Whipped cream,for topping (optional)
- White chocolate shavings or curls,for garnish (optional)
Instructions
- Prepare the espresso: Brew 2 fresh shots of espresso using an espresso machine or a strong stovetop moka pot. For the best flavor, use freshly ground coffee beans, and ensure your espresso is piping hot to melt the white chocolate sauce effectively.
- Warm the milk: In a small saucepan, gently heat the milk over medium-low heat until warm but not boiling (around 140°F / 60°C). Heating the milk helps to infuse the white chocolate flavor smoothly and enhances creaminess.
- Melt the white chocolate: In a heatproof bowl or large glass jug, combine the warm milk and white chocolate sauce or chopped white chocolate. Whisk briskly until the white chocolate is fully melted and the mixture is silky and homogeneous.
- Add sweetness: Stir in the vanilla syrup if you desire a touch more sweetness and aromatic depth. This is optional but recommended for an authentic Starbucks flavor profile.
- Assemble the iced mocha: Fill two tall glasses with ice cubes. Pour the white chocolate milk mixture over the ice, distributing evenly.
- pour the espresso shots: Slowly pour the hot espresso over the milk and ice to produce a lovely layered affect before mixing. The interplay between the dark espresso and light white chocolate milk creates a visually enticing drink.
- Top and garnish: Optionally, crown each glass with fluffy whipped cream, then sprinkle white chocolate shavings or curls for an elegant finish.
- Serve immediatly: Insert a wide straw or long spoon, give a gentle stir to marry the flavors, and enjoy your homemade iced white chocolate mocha masterpiece.
Tips for Success
- Fresh espresso matters: A freshly brewed, high-quality espresso shot ensures a robust coffee flavor that balances the sweetness perfectly.
- choosing white chocolate sauce: Use premium white chocolate sauce or finely chopped bars with minimal additives for the creamiest texture and richest taste.
- Milk alternatives: Almond, oat, or coconut milk variants work wonderfully, but ensure they are unsweetened to maintain control over sweetness levels.
- Make-ahead hack: Prepare the white chocolate milk base in advance and refrigerate it. Warm slightly before combining with espresso and ice.
- Avoid dilution: Use large ice cubes to reduce wateriness, or chill your serving glasses beforehand to keep your drink cold longer without over-melting.
- Espresso substitute: If espresso is unavailable, a concentrated strong coffee brewed with a French press can suffice in a pinch.
Serving Suggestions
Serve this iced white chocolate mocha in a clear glass to showcase its luscious layers-starting with the white chocolate milk base and topped with the dark espresso cascade. Enhance the tasting experience by pairing it with a buttery almond biscotti,buttery vanilla shortbread,or even a slice of lemon pound cake which beautifully contrasts the mocha’s richness.
for a festive twist, dust cinnamon or nutmeg atop the whipped cream, or drizzle with additional white chocolate sauce for extra decadence. Add a sprig of fresh mint as a refreshing garnish that complements the drink’s sweet profile.

| Nutrient | Per Serving |
|---|---|
| Calories | 320 kcal |
| Protein | 8 g |
| Carbohydrates | 38 g |
| Fat | 14 g |
Looking to deepen your coffee knowledge? Discover more Starbucks-inspired homemade beverages for instant café vibes at home.For an expert guide to espresso preparation, check out this resource from National Coffee Association USA.
Q&A
Q&A: Unveiling Starbucks’ Iced White Chocolate Mocha Delight
Q1: What exactly is the Iced White Chocolate Mocha from Starbucks?
A1: The Iced White Chocolate Mocha is a luscious, chilled coffee beverage that combines Starbucks’ rich espresso with velvety white chocolate sauce, finished with creamy cold milk and a generous swirl of whipped cream. It’s a harmonious blend of sweet and bold flavors, perfect for those craving a decadent yet refreshing coffee treat.
Q2: How does the Iced White Chocolate Mocha differ from other Starbucks iced coffees?
A2: Unlike standard iced coffees or even regular mochas, the Iced White Chocolate Mocha features white chocolate-a sweeter, creamier alternative to traditional dark chocolate. This elevates the drink’s flavor profile, adding a smooth, buttery sweetness balanced by the robust espresso, resulting in a uniquely indulgent experience.
Q3: Can the Iced White chocolate Mocha be customized?
A3: Absolutely! Starbucks thrives on personalization. Customers can opt for different milk choices-from almond to oat to traditional dairy-or adjust the sweetness level by requesting fewer pumps of white chocolate sauce. For an extra caffeine kick, an additional espresso shot can be added, or you can even make it a blended frappuccino twist.
Q4: When is the best time to enjoy this drink?
A4: The iced white Chocolate Mocha is a versatile delight-equally enjoyable as a mid-afternoon pick-me-up on a sunny day or a comforting treat to cool down after a busy morning. Its balance of sweetness and espresso makes it a mood-lifting companion whenever you need a little indulgence.
Q5: Is the Iced White Chocolate Mocha a seasonal offering or available year-round?
A5: While Starbucks often rotates seasonal specials, the Iced White Chocolate Mocha is typically available year-round in many locations, solidifying its status as a beloved classic in the iced coffee lineup. However, availability can vary by store and region.
Q6: How does Starbucks create the perfect chilled texture for this drink?
A6: The magic lies in layering freshly pulled espresso shots over rich white chocolate sauce and cold milk, then thoroughly mixing them with ice. This careful crafting ensures the drink is icy-cold without being watered down, preserving every luscious drop of flavor in each sip.
Q7: Is the Iced White Chocolate Mocha suitable for those with dietary restrictions?
A7: Starbucks offers various milk alternatives and sugar-free syrups, allowing those with lactose intolerance or dietary preferences to enjoy a modified version. However, since the white chocolate sauce contains dairy and sugar, it’s best to consult with your barista for personalized recommendations.
Q8: Why has the Iced White Chocolate Mocha become so popular among coffee lovers?
A8: its appeal lies in the perfect marriage of creamy sweetness and invigorating espresso-a combination that satisfies both dessert lovers and caffeine seekers alike. The drink’s refreshing chill and smooth texture make it an irresistible treat that stands out from typical iced coffees.
Q9: Any insider tips for ordering the Iced White Chocolate Mocha?
A9: For a richer twist, ask for an extra shot of espresso or request it “light” with fewer pumps of white chocolate sauce to balance sweetness.Also, pairing it with a complementary Starbucks pastry can turn your coffee break into a mini indulgence.
Q10: Can this drink be replicated at home?
A10: You can definitely attempt it! Brew a strong espresso or strong coffee, mix in white chocolate syrup (available online or specialty stores), pour over cold milk and ice, then top with whipped cream. While it might lack the espresso bar finesse, homemade versions capture the essence of this delightful concoction.
In Conclusion
As the final swirl of whipped cream melts into the creamy blend of espresso and white chocolate, starbucks’ Iced White Chocolate Mocha Delight leaves more than just a refreshing taste-it offers a moment of indulgence wrapped in icy perfection. Whether you’re a devoted coffee aficionado or simply exploring new flavors, this chilled concoction invites you to savor the art of balance between sweetness and boldness. So next time the heat rises, let this iced masterpiece be your go-to escape, a appetizing reminder that sometimes, the perfect pick-me-up comes chilled, creamy, and delightfully white.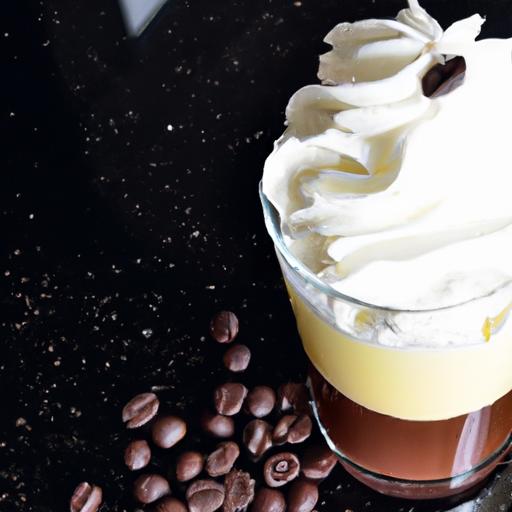
Decadent chocolate Chia Seed Pudding is more than just a dessert; it’s a nourishing treat packed wiht rich flavors and wholesome nutrition that appeals to both your palate and wellbeing. Originating from ancient superfoods embraced by health enthusiasts worldwide, this pudding beautifully marries the deep, velvety taste of chocolate with the subtle crunch of chia seeds, creating a delightfully creamy texture without any dairy or guilt.
Prep and Cook Time
- Preparation: 10 minutes
- Chilling Time: 4 hours (or overnight for best results)
- Total Time: 4 hours 10 minutes
Yield
Serves 4 generous portions
Difficulty Level
Easy – perfect for beginners and experienced cooks alike
Ingredients
- 1/4 cup chia seeds
- 1 1/2 cups unsweetened almond milk (or any preferred plant-based milk)
- 3 tbsp unsweetened cocoa powder, sifted
- 2 tbsp pure maple syrup or honey
- 1 tsp vanilla extract
- Pinch of sea salt
Instructions
- Whisk together the almond milk, cocoa powder, maple syrup, vanilla extract, and a pinch of sea salt in a medium bowl until the cocoa is fully incorporated and the mixture is smooth with no lumps.
- Add the chia seeds and stir vigorously to prevent clumps from forming. Let the mixture sit for 5 minutes, then stir again to evenly distribute the seeds.
- Cover the bowl and refrigerate for at least 4 hours or overnight. The seeds will absorb the liquid, yielding a creamy, pudding-like texture.
- Before serving, stir the pudding to soften any gelled seeds and uncover the chocolate richness.
- Transfer to serving dishes and add your favourite garnishes.
Tips for Success
- Use fresh cocoa powder for maximum flavor impact. Sifting it removes lumps and ensures smooth blending.
- For a thicker pudding, increase chia seeds to 1/3 cup, adjusting liquid accordingly.
- If you prefer a sweeter pudding, add a little more maple syrup, but balance sweetness with the rich cocoa.
- Make it the night before-this enhances both texture and flavor.
- Experiment with milk alternatives like oat or coconut milk to match your dietary needs or taste preferences.
Serving Suggestions
Serve this decadent chocolate chia seed pudding chilled for a refreshingly creamy treat. Top with:
- Fresh berries such as raspberries or strawberries for a vibrant tartness
- Crunchy toasted coconut flakes or chopped nuts for texture contrast
- A dollop of dairy-free whipped cream or Greek yogurt for an added creamy layer
- A drizzle of dark chocolate sauce or a sprinkle of cacao nibs for extra indulgence and complexity
Pair it with a hot herbal tea or a strong espresso to fully embrace the pudding’s luscious chocolate notes without any guilt.
| nutrient | Per Serving |
|---|---|
| Calories | 180 |
| Protein | 6g |
| Carbohydrates | 20g (of which sugars 7g) |
| Fat | 8g (mostly healthy fats) |
| Fiber | 10g |

For a deeper dive into superfoods and their powerhouse properties,check out our thorough guide to superfoods. To explore the scientific benefits of chia seeds,see this Healthline article,a trusted resource for nutrition insights.
Q&A
Q&A: Decadent Chocolate Chia Seed Pudding – A Healthy Delight
Q1: What makes chia seed pudding a healthy indulgence rather than just a dessert?
A1: Chia seed pudding strikes the perfect balance between health and indulgence. Packed with omega-3 fatty acids, fiber, and plant-based protein, chia seeds support digestion, heart health, and sustained energy. When combined with rich, antioxidant-filled cocoa or dark chocolate, you get a creamy treat that satisfies sweet cravings while nourishing your body.
Q2: How do chia seeds transform in pudding form, and why is that texture so delightful?
A2: When chia seeds soak in liquid, they swell and form a gel-like coating that creates a luscious, pudding-like consistency. This natural thickening magic gives the dessert a silky texture that feels both creamy and slightly chewy-inviting you to savor each bite while enjoying a nutrient-packed snack.
Q3: Can you customize the chocolate chia seed pudding to suit different dietary needs or flavor preferences?
A3: Absolutely! Whether you prefer dairy-free, vegan, low-sugar, or keto-friendly options, chocolate chia pudding is highly adaptable. Swap almond or coconut milk for dairy,use raw cacao nibs for extra crunch,or sweeten with natural alternatives like maple syrup or stevia. Add a pinch of cinnamon,vanilla extract,or a spritz of orange zest to take your pudding on a flavor adventure.
Q4: How simple is it to prepare decadent chocolate chia seed pudding at home?
A4: Surprisingly simple! just mix chia seeds with your favorite milk and cocoa powder,sweeten a touch,and let it chill for a few hours or overnight. No baking required. In minutes of prep and some patience, you’ll have a ready-to-eat, decadent dessert or breakfast that feels gourmet but is mere moments away.
Q5: What occasions or moments are perfect for enjoying chocolate chia seed pudding?
A5: This pudding shines anytime you want a treat without the guilt-whether it’s a cozy breakfast, a post-workout snack, or a late-night dessert. Its richness and nourishment make it ideal for impressing guests with a healthy twist or indulging in a quiet moment of self-care.
Q6: Are there any fun toppings or mix-ins that elevate the chocolate chia pudding experience?
A6: The sky’s the limit! Fresh berries, toasted nuts, shredded coconut, a dollop of almond butter, or a sprinkle of chili flakes for a spicy kick. Each addition adds texture, flavor, and a splash of personality, turning your pudding into a canvas for creativity and taste exploration.
In essence, why should chocolate chia seed pudding be a staple in your kitchen?
Because it’s where decadence meets nutrition, where simplicity meets sophistication, and where every spoonful reminds you that healthy eating can be deliciously indulgent. this pudding isn’t just a dessert-it’s a celebration of flavor, wellness, and pure joy.
The Conclusion
As you savor the last spoonful of this decadent chocolate chia seed pudding, you’re not just indulging in a luscious treat-you’re nourishing your body with wholesome ingredients that marry health and indulgence effortlessly. This delightful dessert proves that eating well doesn’t meen sacrificing flavor or satisfaction. Whether enjoyed as a guilt-free breakfast, a post-workout snack, or a nighttime indulgence, it’s a simple yet sophisticated way to embrace wellness with every bite. So go ahead, treat yourself to this luscious fusion of rich chocolate and nutrient-packed chia seeds-as healthy can be deliciously decadent too.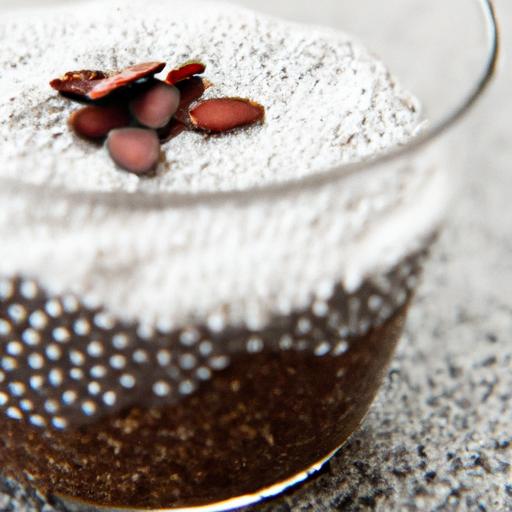
Ingredients that Elevate Flavor and Texture in Gluten-Free Chocolate Cake
Decadent gluten-free chocolate cake begins with a purposeful selection of ingredients that unite to create a moist, tender crumb and a rich, luscious taste that rivals any customary chocolate cake. By carefully balancing gluten-free flours with natural binders and intense cocoa, this recipe achieves a flawless harmony of flavor and texture.
- 1 cup almond flour – lends a subtle nuttiness and moist crumb, crucial for depth and softness.
- 1/2 cup gluten-free oat flour – adds lightness and structure, preventing heaviness.
- 3/4 cup unsweetened cocoa powder – opt for Dutch-processed for a smoother, less acidic chocolate flavor.
- 1 teaspoon baking soda – provides necessary lift and rise without a bitter aftertaste.
- 1/2 teaspoon baking powder – balances leavening to create an airy texture.
- 1/2 teaspoon xanthan gum – essential for binding and elasticity, mimicking gluten’s role.
- 3/4 cup coconut sugar – a natural, low-glycemic sugar lending caramel undertones and moisture.
- 3 large eggs – deliver richness and help with structure and moisture retention.
- 3/4 cup full-fat coconut milk – infuses creaminess and enhances the cake’s density.
- 1/4 cup melted coconut oil or unsalted butter – adds richness and tenderness.
- 2 teaspoons pure vanilla extract – heightens the chocolate’s warmth and complexity.
- 1/4 teaspoon fine sea salt – amplifies sweetness and balances flavors.
- 1/2 cup hot coffee (optional but recommended) – deepens the chocolate intensity without overpowering the cake.
Step-by-Step Guide to Baking a Moist and Rich Gluten-Free Chocolate Cake
- Preheat your oven to 350°F (175°C). Grease and line a 9-inch round cake pan with parchment paper for a clean release.
- In a large bowl, sift together almond flour, oat flour, cocoa powder, baking soda, baking powder, xanthan gum, and salt. this ensures even distribution and prevents lumps, vital for a smooth crumb.
- In a separate bowl, whisk the eggs and coconut sugar vigorously until pale and slightly fluffy-this aerates the batter for lift.
- Slowly add the coconut milk, melted coconut oil (or butter), and vanilla extract to the egg mixture, stirring gently. Incorporating wet ingredients gradually avoids curdling.
- Pour the wet ingredients into the dry mixture. Fold carefully with a spatula until just combined. Avoid overmixing to maintain tender texture.
- Stir in hot coffee gently. This intensifies the chocolate flavor and keeps the cake moist.
- Transfer batter to the prepared cake pan, smoothing the top with a spatula. Tap the pan lightly on the counter to release any air bubbles.
- Bake for 30-35 minutes. Check doneness by inserting a toothpick into the center-it should come out with a few moist crumbs, not wet batter.
- Let the cake cool for 15 minutes in the pan. Then, turn out onto a wire rack to cool entirely before frosting.
Expert Tips for Perfect Frosting and Presentation
The perfect frosting for this decadent gluten-free chocolate cake combines a velvety texture with complementary depth. Consider a classic chocolate ganache or a dairy-free whipped coconut cream frosting. To elevate the presentation:
- Use high-quality dark chocolate (70% or higher) for ganache-melt with heavy cream in a 1:1 ratio, then chill until spreadable.
- For whipped coconut cream, chill a can overnight, scoop thick cream, and whip with a touch of powdered sugar and vanilla.
- Pipe delicate swirls or waves using a star or round tip for visual elegance.
- Garnish with fresh raspberries, edible gold leaf, or toasted almond flakes to add color and textural contrast.
- Layer the cake with a thin spread of raspberry jam beneath the frosting for a surprise tartness.
- Use a warm palette plate or slate board to serve, highlighting the deep chocolate tones.
Creative Variations to Customize Your Gluten-Free Chocolate Cake Experience
Adapt this decadent gluten-free chocolate cake to suit your mood or celebration by introducing creative twists:
- spiced Mocha Delight: Add 1 teaspoon ground cinnamon and a pinch of cayenne to the dry ingredients for subtle warmth.
- Orange Zest Infusion: fold in 1 tablespoon finely grated orange zest into the batter for a radiant, citrusy note.
- Nutty Surprise: Mix in 1/2 cup chopped toasted walnuts or pecans for crunch and earthiness.
- Berry Swirl: Drop spoonfuls of homemade berry compote between cake layers for fruity bursts.
- Vegan Version: Substitute eggs with flax eggs (3 tbsp flaxseed meal + 9 tbsp water) and use coconut yogurt rather of coconut milk to maintain moisture.
- Mini Bundt Cakes: Bake in mini bundt pans for charming individual servings, perfect for gifts or parties.
Prep and Cook Time
- Preparation: 20 minutes
- Cooking: 30-35 minutes
- Cooling: 30 minutes
Yield
Serves 8-10 generously sized slices
Difficulty Level
Easy to Medium – perfect for bakers familiar with gluten-free ingredients or eager beginners
Tips for Success
- Measure your gluten-free flours precisely. Too much almond flour can weigh down the cake.
- Don’t skip the hot coffee! It dramatically enhances chocolate depth.
- Ensure all ingredients are at room temperature for smooth mixing and even baking.
- Cool completely before frosting to prevent melting or sliding.
- Store covered at room temperature for up to 2 days or refrigerated for 5 days. Bring to room temperature before serving.
- Freeze unfrosted cake layers in airtight containers up to 3 months; thaw overnight in the fridge.
Serving Suggestions
Serve slices alongside a scoop of vanilla bean ice cream or coconut whipped cream. Drizzle warm chocolate sauce or a salted caramel reduction for extra indulgence. A dusting of cocoa powder or powdered sugar adds rustic charm, while fresh mint sprigs bring a splash of green freshness.
| Nutrient | Per Serving |
|---|---|
| Calories | 320 kcal |
| Protein | 6 g |
| Carbohydrates | 28 g |
| Fat | 20 g |

For more inspiring gluten-free desserts, check out our complete gluten-free dessert guide. to learn about how cocoa beans are sourced sustainably, visit World Cocoa Foundation.
Q&A
Q&A: Decadent Gluten-Free Chocolate Cake – Delicious and Easy Recipe
Q1: What makes this gluten-free chocolate cake so decadent?
A: The magic lies in the rich, velvety texture and intense cocoa flavor that rivals any traditional chocolate cake. using high-quality gluten-free ingredients like almond flour and cocoa powder, this cake delivers moistness and depth without sacrificing that indulgent, melt-in-your-mouth experience.
Q2: How can the cake be both gluten-free and deliciously moist?
A: Gluten often contributes to the structure and moisture retention in baked goods,but this recipe cleverly swaps in almond flour and a combination of eggs and oil to keep the cake tender and moist. Thes ingredients create a dense, luscious crumb that feels indulgent while being free from gluten.
Q3: Is this recipe suitable for beginners or onyl experienced bakers?
A: Absolutely perfect for beginners! The instructions are straightforward, with easy-to-find ingredients and minimal fuss. Even if you’ve never attempted gluten-free baking before, this recipe guides you through each step to baking success.Q4: Can I substitute any ingredients if I have dietary restrictions like dairy-free or vegan?
A: Definitely! For a dairy-free version, substitute the butter with coconut oil or a plant-based margarine. for egg-free or vegan adaptations, flax or chia seeds mixed with water can replace eggs, though you may need to experiment slightly for the perfect bind and texture.
Q5: How should I store this gluten-free chocolate cake to keep it fresh?
A: Store the cake in an airtight container at room temperature for up to 3 days. For longer freshness, wrap it well in plastic wrap and refrigerate for up to a week, or freeze individual slices wrapped tightly for up to 3 months. Just thaw at room temperature before serving!
Q6: Can I add frosting or toppings to make the cake extra special?
A: Absolutely! This cake pairs wonderfully with a rich chocolate ganache, creamy vanilla buttercream, or even fresh berries and a dusting of powdered sugar. The neutral yet decadent base invites creative flair, so feel free to dress it up or keep it simple.
Q7: Is this cake suitable for people with celiac disease or gluten intolerance?
A: This cake is made with gluten-free ingredients and is safe for most people with gluten intolerance or celiac disease. Though, always ensure your ingredients are certified gluten-free and avoid cross-contamination in your kitchen to keep it truly safe.
Q8: What’s the secret tip to making this cake extra fudgy and irresistible?
A: Don’t overmix the batter-combine ingredients just until incorporated to keep the texture tender. Also, a pinch of espresso powder added to the batter intensifies the chocolate flavor without adding a noticeable coffee taste, amplifying that rich, decadent profile.
Feel empowered to bake this sinfully delicious gluten-free chocolate cake with confidence-the perfect treat to impress your family,friends,or simply yourself!
Future Outlook
Whether you’re catering to dietary needs or simply craving a rich,luscious treat,this decadent gluten-free chocolate cake proves that indulgence need not be intricate-or compromised. With its moist texture,deep chocolate flavor,and surprisingly simple preparation,it’s a dessert that welcomes both seasoned bakers and kitchen novices alike. So go ahead, whip up this divine cake, and savor every bite knowing that gluten-free can be just as deliciously satisfying. Your next favorite chocolate experience awaits!