mediterranean chickpea salad is a marvel of freshness and vibrant flavors that instantly transport you to sunlit shores and bustling markets of the Mediterranean coast. This dish celebrates the humble chickpea, bursting with texture and paired with fresh, zesty ingredients that awaken every bite. Whether enjoyed as a light lunch or a colorful side, mastering the perfect balance of crunch, creaminess, and tang is the key to elevating this timeless classic.
Prep and cook Time
- Planning: 15 minutes
- Cooking: 10 minutes (for chickpeas if using dried)
- Total Time: 25 minutes
Yield
Serves 4 generous portions
Difficulty level
Easy
Ingredients
- 2 cups cooked chickpeas (or 1 can, rinsed and drained)
- 1 cup cherry tomatoes, halved
- 1 medium cucumber, diced with skin on for crunch
- ½ red onion, finely chopped
- ¼ cup Kalamata olives, pitted and sliced
- ½ cup crumbled feta cheese
- ¼ cup fresh parsley, finely chopped
- 2 tablespoons extra virgin olive oil
- 1 tablespoon fresh lemon juice
- 1 teaspoon dried oregano
- Salt and freshly ground black pepper, to taste
- Optional: pinch of smoked paprika or a few mint leaves for garnish
instructions
- Prepare chickpeas: If using dried, soak overnight and cook until tender but not mushy (about 45 minutes). For canned, rinse thoroughly under cold water to remove excess sodium and preserve a fresh flavor.
- Dice vegetables: Carefully halve cherry tomatoes and cube cucumber, leaving skin intact for added texture. Finely chop red onion to avoid overpowering sharpness.
- Mix base ingredients: In a large bowl, combine chickpeas, tomatoes, cucumber, onion, olives, and parsley. Gently toss to blend colors and textures beautifully.
- Dress the salad: Whisk olive oil,lemon juice,dried oregano,salt,and pepper together. Pour dressing over the salad and fold gently, ensuring every bite is infused with bright Mediterranean notes.
- Add finishing touches: Sprinkle crumbled feta over the salad, allowing its creamy saltiness to contrast with the crisp veggies. Optionally, dust lightly with smoked paprika or garnish fresh mint leaves for an aromatic lift.
- Chill before serving: let the salad rest in the fridge for at least 15 minutes to let flavors marry perfectly, enhancing the overall depth and complexity.
Chef’s Notes: Tips for Success
- Achieving perfect chickpea texture: Avoid overcooking chickpeas to prevent mushiness; they should hold their shape and offer a slight bite to complement crunchy vegetables.
- Make-ahead magic: This salad tastes even better the next day as flavors meld; store covered in the fridge for up to 2 days.
- For varied texture: Add toasted pine nuts or chopped walnuts for a delightful crunch.
- Vegan adaptation: Simply omit feta or substitute with vegan cheese or toasted nutritional yeast for savory depth.
- Brighten flavors: Consider adding a splash of red wine vinegar or finely chopped sun-dried tomatoes for extra zing.
Serving Suggestions
serve this Mediterranean chickpea salad chilled on a rustic ceramic platter to showcase its vibrant colors. Garnish with extra parsley sprigs, lemon wedges, or edible flowers for a stunning presentation. Pair beautifully with warm pita bread, grilled chicken, or as a refreshing, nutrient-packed topping for your next grain bowl.

| Nutrient | Per serving |
|---|---|
| Calories | 320 |
| Protein | 12g |
| Carbohydrates | 30g |
| Fat | 14g |
For those eager to further explore Mediterranean-inspired recipes, visit our Mediterranean recipes Collection. To dive deeper into the nutritional benefits of chickpeas, check this Healthline article on chickpea nutrition.
Q&A
Q&A: A Vibrant Guide to Making Mediterranean Chickpea Salad
Q1: What makes a Mediterranean chickpea salad stand out from other salads?
A1: Mediterranean chickpea salad bursts with freshness and vibrant flavors thanks to its colorful ingredients-think sun-ripened tomatoes, crisp cucumbers, fragrant herbs, tangy olives, and creamy feta-all tossed with protein-packed chickpeas and a zesty lemon-olive oil dressing. It’s a harmony of textures and tastes, embodying the sunny spirit of the Mediterranean coast in every bite.
Q2: Why are chickpeas the star ingredient in this salad?
A2: Chickpeas are nutritional powerhouses, boasting a brilliant balance of fiber, protein, and complex carbs. They provide a satisfying, hearty base that holds up beautifully against the bright, crunchy veggies and punchy dressing, making the salad not just refreshing but truly filling.
Q3: Can I customize the salad to suit my taste or dietary needs?
A3: Absolutely! the Mediterranean chickpea salad is like a blank canvas for your culinary creativity.Swap out feta for a vegan cheese or omit it for a dairy-free option. Add a handful of toasted pine nuts or fresh avocado for richness, or amp up the heat with a sprinkle of red pepper flakes. Herbs like parsley, mint, or dill can be mixed and matched to your liking.
Q4: What’s the secret to making the dressing pop with flavor?
A4: the magic lies in balancing fresh lemon juice’s bright acidity with smooth, fruity extra-virgin olive oil. A touch of garlic, a pinch of sea salt, and freshly cracked black pepper elevate the dressing, while a hint of oregano or sumac lends authentic Mediterranean flair. Whisk it all together just before tossing the salad to keep those vibrant flavors alive.
Q5: How far in advance can I prepare the salad?
A5: You can prep most ingredients ahead of time-chickpeas can be cooked or drained if canned, vegetables diced, and herbs chopped. Though, it’s best to toss the salad with dressing right before serving to keep veggies crisp and the flavors fresh. If you need to make it earlier, store the dressing separately and combine when ready to enjoy.
Q6: What are some perfect occasions to serve Mediterranean chickpea salad?
A6: This salad shines as a light lunch, a colorful side dish at picnics and barbecues, or a quick, nourishing dinner. Its vibrant look and delightful crunch also make it a fantastic dish to impress guests at warm-whether gatherings or potlucks without splurging a ton of time in the kitchen.
The Way Forward
As the sun-soaked flavors of the mediterranean come alive in this vibrant chickpea salad, you’re reminded that cooking is not just about ingredients-it’s about culture, color, and celebration on a plate. Whether you’re seeking a wholesome lunch, a refreshing side, or a dish to impress at your next gathering, this salad invites you to savor simplicity infused with zest. So next time you crave something bright, nutritious, and bursting with personality, remember that a bowl of Mediterranean chickpea salad is more than just food-it’s a delicious journey to the heart of the Mediterranean table. Happy cooking, and buon appetito!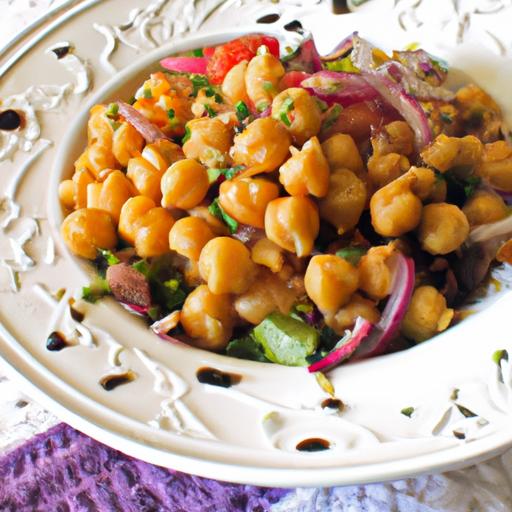
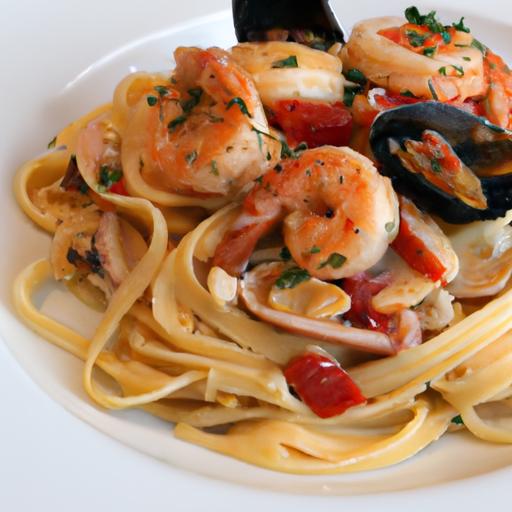
Savor the Sea with a vibrant sardines pasta dish that combines coastal tradition and bold Mediterranean flavors. This recipe celebrates the understated brilliance of sardines, delivering a rich, velvety texture balanced with zesty brightness-perfect for an inspiring weeknight dinner or an elegant gathering.
Prep and Cook Time
- Preparation: 15 minutes
- Cooking: 20 minutes
- Total Time: 35 minutes
Yield
Serves 4 generous portions
Difficulty Level
Easy to Medium – ideal for anyone pleasant with basic sautéing and pasta cooking techniques
Ingredients
- 350g spaghetti or linguine
- 2 cans (120g each) high-quality sardines in olive oil, drained and roughly flaked
- 4 cloves garlic, thinly sliced
- 1 small red chili, finely chopped (adjust to taste)
- 1 medium shallot, finely diced
- 2 tbsp extra virgin olive oil
- Zest and juice of 1 lemon
- 1/4 cup fresh flat-leaf parsley, chopped
- 1/4 cup toasted breadcrumbs (optional, for garnish)
- Salt and freshly ground black pepper, to taste
- Grated Pecorino Romano or Parmesan, to serve (optional)
Instructions
- Cook the pasta: Bring a large pot of salted water to a rolling boil. Add the spaghetti and cook according to package instructions until al dente (usually 9-11 minutes). Reserve ½ cup of pasta water before draining.
- Prepare the flavor base: While pasta cooks, heat the olive oil over medium heat in a large skillet. Add the sliced garlic, chopped shallot, and chili. Sauté gently until fragrant and golden, about 3-4 minutes. Stir frequently to avoid burning.
- Incorporate sardines: Add the flaked sardines to the skillet, breaking them up further with a spoon. Cook for 3 minutes, allowing the sardines to warm and meld with the garlic and chili.
- Brighten with lemon: Stir in the lemon zest and juice, instantly lifting the rich sardines with a fresh, zesty brightness.Season with salt and plenty of black pepper, tasting carefully because the sardines and oil add natural saltiness.
- Combine pasta and sauce: Add the drained pasta directly to the skillet with the sardine mixture.Toss well to coat, adding reserved pasta water a tablespoon at a time until the sauce reaches a smooth, creamy consistency that clings lovingly to each strand.
- Finish with herbs: Remove from heat and fold in the fresh parsley, infusing a vibrant green note and depth.
- Serve: Plate the pasta, sprinkle with toasted breadcrumbs for crunch, and finish with freshly grated Pecorino Romano if desired for a sharper, salty accent.
Tips for Success
- Sardines Selection: Choose sardines packed in quality olive oil for richness; if oily sardines aren’t available, those in tomato sauce create a tangier choice.
- Oil Control: Drain sardines well but reserve a teaspoon of the oil to preserve flavor when cooking.
- Heat Management: Keep heat moderate when adding garlic and chili to avoid bitterness.
- Make-ahead: Prepare the sardine sauce ahead, refrigerate, and quickly toss with freshly cooked pasta when ready.
- Gluten-Free Option: Substitute pasta for gluten-free varieties-gluten-free pasta absorbs sauce best when heated with the sardine mixture briefly.
Serving Suggestions
Serve your sardines pasta with a crisp, chilled white wine-like a dry Vermentino or Sauvignon Blanc-that complements the oceanic flair and lemon zest. A simple green salad with a sharp vinaigrette or grilled vegetables adds contrast without overwhelming the dish’s delicate complexity.
For garnishes, consider fresh basil leaves or a light drizzle of chili oil for added heat and visual appeal. Rustic crusty bread or garlic focaccia are perfect for soaking up every last bit of the luscious sauce.
| Nutrient | Per serving |
|---|---|
| Calories | 440 kcal |
| Protein | 25 g |
| Carbohydrates | 55 g |
| Fat | 12 g |

For more detailed pairing tips and exploring sardine varieties, visit Food & wine’s Seafood Wine Pairings. Don’t miss our guide on Mediterranean Pasta Recipes for more culinary inspiration rooted in sun-soaked shores.
Q&A
Q&A: Savor the Sea - A Guide to Flavorful Sardines Pasta Recipes
Q1: Why are sardines a great choice for pasta dishes?
A1: Sardines bring the ocean’s essence straight to your plate with their rich, savory flavor and healthy omega-3 boost. Their natural oiliness and slight brininess elevate simple pasta into an remarkable culinary experience. Plus, they’re lasting and budget-friendly-proof that great taste doesn’t have to come at a high cost.
Q2: What types of pasta pair best with sardines?
A2: Think rustic and hearty to balance sardines’ bold character. Bucatini,spaghetti,and linguine are ideal as their long,slender shapes allow the flavorful sauce to coat every strand. Twists like trofie or fusilli can also catch sardine bits and herbs beautifully, making every bite a sea-inspired delight.
Q3: how can I avoid the “fishy” overpowering taste some people fear with sardines?
A3: The trick is balance.Combine sardines with fresh ingredients like lemon zest, garlic, chili flakes, and vibrant herbs (think parsley or mint). These brightness boosters lift the sardines’ flavor, turning it from “fishy” to ”flavorful and fresh.” Toasted breadcrumbs add crunch and depth, too, mellowing any excess intensity.
Q4: Can canned sardines be used interchangeably with fresh ones for pasta recipes?
A4: Absolutely! High-quality canned sardines, especially those preserved in olive oil, are convenient and packed with flavor, often more tender and mellow than fresh. fresh sardines deliver a different texture and a slightly more delicate taste but require cleaning and cooking finesse. Either way, both make stellar pasta partners with the right seasoning.
Q5: What are some creative twists to try in sardine pasta recipes?
A5: don’t be afraid to get adventurous.Add capers or olives for a salty punch, sun-dried tomatoes for sweetness, or a splash of white wine to brighten the sauce. For a smoky note, toss in some toasted almonds or smoked paprika. And for herb lovers,fresh dill or basil can transform the dish into something uniquely aromatic.
Q6: How do I ensure the pasta and sardine sauce come together perfectly?
A6: Timing is everything. Cook your pasta al dente and reserve some pasta water before draining.Use that starchy water to emulsify the sardine sauce,binding the flavors and creating a glossy,luscious coating. Finish with a drizzle of good-quality olive oil and a squeeze of lemon for that final pop of freshness.
Q7: Are sardine pasta recipes suitable for beginners?
A7: Definitely! Simple, quick, and forgiving, these recipes are perfect for cooks of any skill level.With just a handful of ingredients and straightforward steps, you can whip up a gourmet-feeling meal that celebrates the sea-no culinary degree required.
Q8: What’s the best way to serve sardine pasta for maximum impact?
A8: Serve it fresh and hot, garnished with a sprinkle of toasted breadcrumbs and freshly chopped parsley or chives. pair it with a crisp white wine or a light citrusy cocktail to complement the flavors. And don’t forget a wedge of lemon on the side-for that satisfying squeeze just before the first bite.
Dive into the depths of flavor with sardine pasta-it’s an unexpected,appetizing way to savor the sea right at your dinner table!
To Conclude
As the final forkful of your sardine pasta lingers on the palate,you’ll recognise that this humble fish is more than just a pantry staple-it’s a gateway to oceanic depth and vibrant flavor. From zesty lemon twists to garlic-kissed olive oil drizzles, these recipes invite you to dive into the rich, savory world of sardines with confidence and creativity. Whether you’re a seasoned seafood lover or a curious culinary adventurer, savoring sardines in pasta promises a meal that is as nourishing as it is memorable.So next time you seek a dish that bridges simplicity and sophistication, remember: the sea’s tiny treasure is ready to transform your plate into a celebration of bold, unforgettable taste.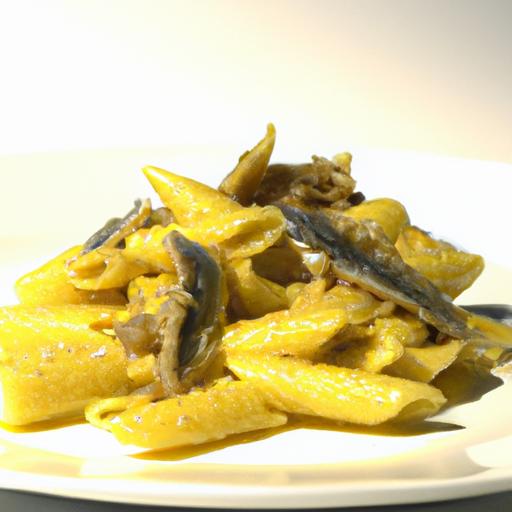
Unlocking flavor begins with understanding the soulful essence that sesame korean grill brings to your table. Rooted deeply in Korea’s vibrant culinary traditions, this technique celebrates the marriage of bold, nutty sesame notes with the rich, smoky char of grilled meats. I vividly remember my first taste of sesame Korean grill at a bustling street market in Seoul, where the aroma alone was hypnotic-each bite bursting with layers of marinated goodness that lingered long after the grill cooled. this dish isn’t just about fire and meat; it’s about mastering the art of balanced marinades, selecting premium cuts, and coaxing out texture that mesmerizes the senses.
Prep and cook Time
- Planning: 30 minutes
- Marinating: 4 hours (preferably overnight for deeper flavor)
- Cooking: 10-15 minutes
- Total Time: Approximately 5 hours including marinating
Yield
Serves 4 hungry diners
Difficulty Level
Medium – approachable for home cooks ready to elevate their grilling skills
Ingredients
- 2 lbs beef ribeye or short ribs, thinly sliced (well-marbled for grilling excellence)
- 3 tbsp toasted sesame oil
- 1/4 cup soy sauce (use Korean soy sauce for authenticity)
- 2 tbsp honey or brown sugar (balances saltiness)$
- 4 cloves garlic, minced
- 1 tbsp freshly grated ginger
- 2 tbsp toasted sesame seeds
- 1 small Asian pear, grated (for tenderizing)
- 2 green onions, finely chopped
- 1 tsp freshly ground black pepper
- 1 tbsp Gochujang (optional, for a spicy kick)
- Vegetable oil for grilling
Instructions
- Prepare the marinade: In a medium bowl, combine toasted sesame oil, soy sauce, honey, minced garlic, grated ginger, grated Asian pear, green onions, black pepper, and toasted sesame seeds. Stir well untill the honey dissolves and the mixture is homogenous.
- Marinate the meat: Add thinly sliced beef to the marinade,tossing to coat each piece evenly. Cover the bowl tightly with plastic wrap and refrigerate for at least 4 hours, ideally overnight, to unlock flavor fully and tenderize the meat.
- Preheat the grill: Bring your grill to medium-high heat and brush the grates lightly with vegetable oil to prevent sticking. A cast-iron grill pan works beautifully indoors.
- Grill the meat: Lay the marinated slices across the hot grill. Cook for 2-3 minutes on each side until you achieve a beatiful char and slightly crispy edges. avoid overcrowding to ensure even cooking.
- Rest and serve: Transfer grilled meat to a platter and let rest for 2 minutes. This preserves juiciness and ensures that each bite is tender and flavorful.
- Optional finishing touch: Sprinkle extra toasted sesame seeds and finely sliced green onions over the meat for a visually stunning presentation.
Tips for Success
- Choose well-marbled cuts like ribeye or short ribs to lock in moisture and enhance flavor during grilling.
- Proper marination time is crucial. Rushing this step will result in less flavorful and tougher meat.
- Use an asian pear for natural tenderizing and sweetness; if unavailable, pineapple juice can be a stand-in but use sparingly.
- For an easier cleanup and char perfection, consider using grill mats or cast iron pans indoors.
- If you want to dial up the heat, adding Gochujang to the marinade provides a splendid spicy dimension without overwhelming the sesame notes.
- Make sure to remove excess marinade before grilling to prevent flare-ups and burning sugars.
Serving Suggestions
This grilled sesame Korean delight pairs exquisitely with fluffy steamed white rice and crisp, fresh kimchi to balance its rich and savory profile.Serve alongside a simple lettuce wrap basket,accompanied by sliced garlic,fresh chili peppers,and a dollop of ssamjang sauce. Garnish with extra toasted sesame seeds and thinly cut green onions for vibrant texture and visual appeal.
| Nutritional Info | Per Serving |
|---|---|
| Calories | 420 kcal |
| Protein | 35 g |
| Carbs | 8 g |
| Fat | 25 g |
For deeper insights on Korean marinades that complement sesame Korean grill,explore our complete marinade guide. To learn more about authentic Korean grilling traditions, visit Korea.net’s official cultural page.

Q&A
Q&A: Unlocking Flavor – A Guide to sesame Korean Grill Delights
Q1: What makes Sesame Korean Grill unique compared to other korean barbecue experiences?
A1: Sesame Korean Grill stands out by marrying conventional Korean grilling with a fresh, nutty twist-sesame. From the signature sesame oil marinades to sprinklings of toasted seeds, this approach adds layers of aroma and flavor that elevate every bite. Unlike more generic grills, the sesame element creates a balance of smoky, savory, and subtly sweet notes that dance on your palate.
Q2: Which dishes should first-timers absolutely try at Sesame Korean Grill?
A2: for newbies, the Bulgogi marinated in sesame-soy sauce is an absolute must-think tender beef glossy with sesame goodness. Next, sample the Samgyeopsal (grilled pork belly) served with sesame dipping sauce and wrapped in fresh lettuce.Don’t miss the Sesame japchae; sweet potato noodles stir-fried with veggies and a hint of sesame oil, delivering comfort in every forkful.
Q3: How does the grilling technique enhance the sesame flavors?
A3: At Sesame Korean Grill, the art of fire meets delicate flavor infusion. Charcoal or gas flames sear meats quickly, locking in juices while subtly toasting the sesame coatings and oils. This caramelization intensifies nuttiness and creates a crispy, fragrant crust that complements the juicy interior. The grill becomes a flavor catalyst, making sesame notes richer and more complex.
Q4: Are there vegetarian options that showcase the sesame flair?
A4: Absolutely! Grilled shiitake mushrooms brushed with sesame oil and dusted with toasted seeds are a savory delight. There’s also a grilled tofu platter, where firm tofu is marinated in sesame-soy and grilled until golden. Paired with sesame-dressed kimchi and fresh veggies,these options prove the grill is just as vibrant without meat.
Q5: how can diners best enjoy the interactive experience of Sesame Korean Grill at the table?
A5: Korean grilling is as much about the experience as the food. Use the tongs to grill your meat bites to your preferred crispness, while chatting and sharing with friends. wrap grilled morsels in lettuce leaves, top with sesame-enriched sauces and kimchi for flavor bursts. Don’t forget to dip each bite in sesame oil mixed with salt and pepper for that authentic touch.The hands-on approach heightens anticipation and makes every flavor finding more satisfying.
Q6: What drinks pair well with the rich, toasted flavors of Sesame Korean Grill?
A6: A chilled Korean rice wine, makgeolli, with its slightly sweet and tangy profile, beautifully cuts through the richness. For those who prefer beer, a crisp lager refreshes the palate between savory bites. If you’re feeling adventurous, a lightly toasted sesame-infused tea offers a warm, complementary harmony that extends the sesame theme beyond the plate.
Q7: Can home cooks recreate Sesame Korean Grill flavors in their own kitchens?
A7: Definitely! Start with high-quality sesame oil-its aroma is the secret weapon. Marinate meats in a mixture of soy sauce, sesame oil, garlic, and a touch of sugar. Use a hot grill or cast-iron skillet to achieve that slight char. Toast sesame seeds separately to sprinkle at the end for crunch and fragrance. While the communal grilling vibe might be tricky at home, the bold, nutty flavors are easily within reach.
Unlocking the secrets of Sesame Korean Grill delights reveals a world where tradition meets innovation. Next time you fire up the grill, remember: a sprinkle of sesame can turn ordinary into remarkable.
In Retrospect
As you close the chapter on this flavorful journey through Sesame Korean Grill Delights, remember that every grain of sesame, every sizzling morsel, and every smoky hint tells a story steeped in tradition and innovation.Unlocking these flavors is more than just a culinary adventure-it’s an invitation to experience Korean culture one bite at a time.Whether you’re a seasoned grill master or a curious food lover,embracing these vibrant tastes will ignite your palate and inspire your next kitchen creation. So fire up the grill, sprinkle those sesame seeds generously, and savor the delicious harmony that awaits. Your gateway to unforgettable flavor has just been unlocked.
Sweet Surprise: Your Guide to Chocolate covered Strawberries Delivery begins with understanding that freshness and impeccable quality transform a simple fruit into a luxurious bite of delight. As someone who’s styled and created countless sweet moments, I’ve learned that the magic truly starts at the selection stage-only the juiciest, ripest strawberries paired with the finest chocolate yield that unforgettable experience you crave.
Prep and cook Time
Planning: 15 minutes
Chilling: 30 minutes
Total Time: 45 minutes
Yield
Serves 6-8 (approximately 18-24 strawberries)
Difficulty Level
Easy – Perfect for both beginners and seasoned chocolatiers
Ingredients
- 24 large fresh strawberries, washed and thoroughly dried (room temperature)
- 8 oz high-quality bittersweet chocolate (70% cocoa recommended), chopped
- 4 oz white chocolate, optional for drizzling
- 1 tsp coconut oil or unsalted butter (to smooth melting)
- Optional toppings: finely chopped nuts, edible gold leaf, shredded coconut, or sea salt flakes
Instructions
- Prepare the Strawberries: Gently rinse your strawberries and pat dry with paper towels. Ensuring they are completely dry is crucial; any moisture will cause the chocolate to seize.
- Melt the Bittersweet Chocolate: In a heatproof bowl, place chopped bittersweet chocolate and coconut oil. Melt using a double boiler method or in 20-second bursts in the microwave, stirring frequently for smoothness.
- Dip the Strawberries: Hold each strawberry by the green leaf and dip into the melted chocolate, swirling to coat 3/4 of the strawberry. Shake off excess and place on a parchment-lined baking sheet.
- Chill the Dipped Strawberries: Place the chocolate-coated berries in the fridge for 20 minutes to set the chocolate firmly.
- Decorate with White Chocolate: Melt the white chocolate using the same method, then use a small spoon or piping bag to drizzle thin lines over the dipped strawberries for contrast and elegance.
- Add Toppings: While the chocolate is still wet, sprinkle finely chopped nuts, sea salt, or edible gold leaf to elevate each bite to a visual and flavorful masterpiece.
- Final Chill: Refrigerate for an additional 10 minutes to let all decorations set perfectly before serving or packaging for delivery.
Tips for Success
- Choose your delivery service based on freshness guarantees. A reputable vendor will ship strawberries harvested within 24 hours and use insulated packaging to maintain berry integrity.
- Room temperature strawberries absorb chocolate better but avoid warm surfaces which cause condensation.
- Experiment with chocolate types: Milk, white, or ruby chocolates provide different flavor profiles, but always opt for couverture or high cocoa content for smooth finish and snap.
- Make-ahead tip: Prepare and refrigerate dipped strawberries up to 6 hours before gifting or serving; avoid freezing as strawberries lose texture.
- Keep your strawberries dry at every step – this is key to a glossy chocolate coating.
Creative Presentation ideas to Impress
Wrap your Sweet Surprise in a luxe gift box lined with parchment or colored paper. Add a personalized tag and sprinkle edible glitter over the box’s tissue paper for a hint of sparkle. Alternatively, present strawberries on a wooden platter nestled in fresh mint leaves or place them in transparent cellophane bags with curled ribbons for an elegant party favor look. For an elevated dessert table, pair with mini jars of champagne or sparkling wine-sweet, decadent bites perfect to complement bubbly.
Nutritional Data Per Serving
| Calories | Protein | Carbohydrates | Fat |
|---|---|---|---|
| 160 | 2g | 22g | 8g |
For more tips on selecting the finest chocolate and fruit pairings,check out our Chocolate Pairing Guide. For scientific insights on freshness and berry storage, visit the USDA’s official website.

Q&A
Sweet Surprise: Your Guide to Chocolate Covered strawberries Delivery – Q&A
Q1: What makes chocolate covered strawberries the perfect gift?
A1: Chocolate covered strawberries combine the luscious freshness of ripe berries with the rich, velvety allure of chocolate. This duo creates a sensory delight that feels both indulgent and thoughtful-a sweet surprise that says “I care” in every bite. Whether it’s for a birthday, anniversary, or just because, they’re a universally loved treat that brightens any occasion.
Q2: How does the delivery process ensure strawberries arrive fresh and flawless?
A2: Reputable delivery services use specially designed insulated packaging and chilled gel packs to maintain optimal temperature. Strawberries are hand-dipped and arranged with care, then packaged to avoid bruising or melting during transit. Some providers offer same-day or express options, minimizing time in transit and guaranteeing sweetness upon arrival.
Q3: Can I customize my chocolate covered strawberries order?
A3: Absolutely! Many chocolatiers and delivery services allow you to choose from a variety of chocolate coatings-dark, milk, white, or even ruby chocolate. You can add toppings like crushed nuts, drizzled caramel, sprinkles, or edible glitter. Some even offer personalized messages on the box or chocolate, turning each delivery into a unique, heartfelt gift.
Q4: What occasions are best suited for chocolate covered strawberries delivery?
A4: From Valentine’s Day and Mother’s day to weddings, graduations, or corporate gifts, chocolate covered strawberries fit perfectly. They also make a charming surprise for “just because” moments-turning an ordinary day into something remarkable. their elegant appearance and delicious taste make them ideal for celebrations big and small.
Q5: Are there any tips for enjoying delivered chocolate covered strawberries at their best?
A5: For the freshest taste, enjoy your chocolate covered strawberries within 24-48 hours of delivery. keep them refrigerated but allow them to come slightly closer to room temperature before eating to fully appreciate the chocolate’s texture and flavor. And of course, savor every bite slowly-this is a fleeting luxury meant to be enjoyed mindfully!
Q6: how can I choose the best delivery service for chocolate covered strawberries?
A6: Look for companies with excellent customer reviews, transparent sourcing practices, and clear delivery guarantees. Quality matters-freshness, presentation, and promptness make all the difference. Some services also offer tracking and flexible scheduling,helping ensure your sweet surprise arrives exactly when you want it.
With this guide, ordering chocolate covered strawberries online transforms from a simple purchase into a thoughtful experience, delivering joy, flavor, and a touch of magic right to your door. Ready to unwrap your sweet surprise?
Final Thoughts
As you unwrap the world of chocolate-covered strawberries delivery, you’ll discover that this sweet surprise isn’t just a treat-it’s an experience crafted to delight the senses and brighten any occasion. From selecting the perfect berry to choosing decadent chocolate coatings, your guide ensures every bite is a moment of joy delivered right to your doorstep. Whether for a romantic gesture, a thoughtful gift, or simply an indulgent self-treat, embracing the convenience and charm of delivered chocolate-covered strawberries transforms ordinary days into extraordinary memories. So go ahead, savor the sweetness and let the luscious combination of ripe strawberries and rich chocolate make every festivity a little more deliciously unforgettable.
Master the Flame: A Guide to Perfectly grilled Scallops
master the flame when grilling scallops, and you unlock a world of succulent, slightly sweet seafood that melts effortlessly on your palate. Scallops, cherished in coastal cuisines worldwide, demand precision-from selection to serving-to truly shine. My journey began on a misty New England morning, where the freshest day’s catch revealed the magic of simply grilled scallops. Now, let’s dive into crafting that flawless sear and flavor boost that transforms these delicate morsels into a grilled masterpiece.
Prep and Cook Time
- Preparation: 15 minutes
- marinating: 20 minutes
- Grilling: 5-7 minutes
- Total Time: 40-45 minutes
Yield
Serves 4 as an appetizer or 2 as a main course
Difficulty Level
Medium – requires attention to timing and heat management but perfect for enthusiastic home chefs
Ingredients
- 1 lb dry-packed sea scallops (fresh, large dry-packed scallops without added water)
- 2 tbsp extra-virgin olive oil
- 1 tbsp fresh lemon juice
- 2 cloves garlic, minced
- 1 tsp smoked paprika
- 1/2 tsp sea salt
- 1/4 tsp freshly ground black pepper
- 1 tbsp chopped fresh parsley (for garnish)
- Wooden skewers or metal skewers (soaked, if wooden)
Instructions
- Selecting and prepping the scallops: Start with fresh, dry-packed sea scallops, ideally U10 or U12 size. remove the side muscle if still attached-it’s tough and chewy. Pat dry thoroughly with paper towels; moisture is the enemy of a good sear.
- Marinating the scallops: In a shallow bowl, whisk together olive oil, lemon juice, minced garlic, smoked paprika, sea salt, and black pepper. Add scallops and gently toss to coat. Allow to marinate for 20 minutes in the refrigerator, no longer, to keep the natural sweetness vibrant.
- Preparing the grill and skewers: Preheat your grill to a high temperature-aim for 450°F to 500°F for masterful flame control. If using wooden skewers, soak them in water for at least 30 minutes to avoid burning.
- Skewering the scallops: Thread scallops firmly but gently onto skewers, spacing them slightly apart for even heat circulation.
- Grilling: Oil grill grates lightly to prevent sticking. Place skewers directly over the hottest part of the flame. Grill for 2.5-3 minutes per side.Look for a golden crust forming-avoid constant flipping. The scallops should be opaque and tender but never rubbery.
- Resting and plating: remove skewers from heat and let rest for 2 minutes. This step locks in juices and flavors for every bite.
- Garnishing: Sprinkle chopped fresh parsley over grilled scallops for a fresh herbal pop. Serve with lemon wedges for an extra zesty burst.
Tips for Success When You Master the Flame with Grilled Scallops
- Dry-packed vs. Wet scallops: Always choose dry-packed scallops-they sear better without releasing excess water.
- Do not over-marinate: Acid from the lemon juice can start “cooking” the scallops like ceviche; 20 minutes max.
- Pat dry before grilling: For the signature caramelized crust, moisture must be minimized.
- Flame control: Maintain a steady, high heat but avoid flare-ups. Flare-ups will scorch and impart bitterness.
- Timing is everything: Scallops cook quickly-overcooking results in a tough texture, so vigilantly watch the sear.
- Make-ahead tip: Marinate scallops the night before and keep chilled; bring to room temperature 10 minutes before grilling.
Creative serving Suggestions to Elevate Your Grilled Scallops Experience
To truly feel like you’ve mastered the flame,presentation and complementary flavors are key. Lay the skewers atop a bed of vibrant arugula tossed in a citrus vinaigrette to cut through the richness. Drizzle a creamy basil pesto or charred lemon aioli alongside.Pair with grilled corn salsa or roasted fingerling potatoes with garlic and herbs for a hearty counterbalance.
For elegant plating,serve grilled scallops over a dollop of celeriac puree or alongside a sprinkle of toasted pine nuts and microgreens. Radiant edible flowers add a colorful gourmet touch.
Don’t forget a glass of chilled Sauvignon Blanc or a crisp sparkling wine to complement the subtle sweetness and smoky char.

| Nutritional Info (per serving) | Amount |
|---|---|
| Calories | 180 kcal |
| Protein | 22 g |
| Carbohydrates | 2 g |
| Fat | 8 g |
For a deeper dive into seafood preparation techniques, check out our comprehensive seafood cooking guide. For detailed scientific insights on scallop freshness and safety, visit the FDA Seafood Guidance.
Q&A
Q&A: Master the flame – A Guide to Perfectly Grilled Scallops
Q1: Why choose scallops for grilling?
A: Scallops are the ultimate canvas for grilling-they boast a naturally sweet, buttery flavor and a delicate, tender texture that crisps beautifully over open flames. Their fast cook time means you get succulent seafood with just a few minutes on the grill, perfect for elevating any summer evening.Q2: What’s the secret to perfectly grilled scallops?
A: It all starts with simplicity and attention. Pat your scallops dry to ensure a golden crust, season lightly with salt and pepper, and preheat your grill to high. Place the scallops directly on the grate-no overcrowding-and let them sear undisturbed for about 2 minutes per side. The result? A caramelized exterior that locks in juiciness.
Q3: Should scallops be marinated before grilling?
A: While scallops don’t need a marinade thanks to their inherent flavor, a quick soak in a citrusy or herbaceous marinade (think lemon zest, garlic, and thyme) can add a delightful zing. Just keep it short-15 to 30 minutes max-to avoid “cooking” the scallops with acid and compromising their texture.
Q4: How can I tell when scallops are done on the grill?
A: Perfectly grilled scallops are opaque in the center and slightly springy to the touch. They should have an inviting golden-brown crust but still be tender inside. Overcooking turns them rubbery, so trust the clock and your senses-roughly 4 minutes total usually does the trick.
Q5: What’s the best way to serve grilled scallops?
A: Grilled scallops shine when partnered with fresh, vibrant complements: a drizzle of lemon butter, a scatter of finely chopped herbs, or nestled atop a bed of grilled vegetables or a bright salad. To truly master the flame, pair them with a crisp white wine or sparkling water infused with citrus.
Q6: Any pro tips for grilling scallops like a chef?
A: absolutely! Use a clean, well-oiled grill to prevent sticking. For an extra layer of flavor, try finishing scallops with a quick brush of garlic-infused olive oil or a whisper of smoked paprika. And remember, freshness is key-choose scallops that smell like the ocean, not fishy, for the best results.
Grilling scallops is an art that combines fire, flavor, and finesse. With these tips in hand, you’re ready to turn simple scallops into a show-stopping dish that embodies the smoky spirit of summer. Master the flame, and let your grill work its magic!
to sum up
As the final embers fade and the tantalizing aroma of perfectly grilled scallops lingers in the air, you now hold the secret to mastering the flame-and crafting seafood that sings with smoky, buttery perfection. With each sear, you transform humble scallops into a culinary masterpiece, crisped just right on the outside while melting tender within. So fire up your grill with confidence,embrace the dance of heat and flame,and let your next batch of scallops transport your taste buds to new heights. Remember, mastering the flame isn’t just about technique-it’s about passion, timing, and a little bit of delicious patience. Happy grilling!
Gluten-free french toast can be just as crispy and flavorful as its traditional counterpart when you start by selecting the perfect gluten-free bread. Achieving that coveted golden crunch requires a keen eye for texture and the right batter blend, complemented by essential cooking techniques that transform ordinary slices into a memorable breakfast experience.
Selecting the Perfect gluten-Free Bread for Ultimate Crispiness
Begin with a hearty gluten-free bread that balances softness with sturdiness to hold up to the batter without becoming soggy. Look for breads made with almond flour, tapioca starch, or a blend of brown rice and sorghum flours-these tend to deliver a firm crumb with a slight chew. Day-old or lightly toasted gluten-free bread often performs best, providing the rigidity needed for crisp edges and a tender interior.
Mastering the Batter Blend for Fluffy and Flavorful French Toast
Create a luscious batter by whisking together eggs, whole milk (or a creamy dairy-free alternative), vanilla extract, and a touch of cinnamon. For fluffiness, adding a pinch of baking powder introduces lightness without altering the classic taste. Sweeten lightly with honey or maple syrup for natural depth and warmth, ensuring your gluten-free French toast carries both flavor and moisture perfectly balanced.
Essential Cooking Techniques to Achieve That golden Crunch
Preheat your skillet to medium heat and generously grease it with butter or coconut oil. Dip each slice of bread fully into the batter, allowing it to soak-but not oversaturate-to maintain structure. Place slices on the hot pan and cook undisturbed for about 3-4 minutes per side until a deep golden crust forms. Patience is key; flipping too soon prevents that satisfying crisp. A cast iron skillet is ideal for even heat distribution and superior crust development.
Tasty Toppings and Serving Ideas to Elevate Your Gluten-Free Breakfast
Layer your finished gluten-free French toast with fresh berries, sliced bananas, or a sprinkle of toasted nuts for a delightful crunch contrast. Drizzle with pure maple syrup or a dollop of greek yogurt for tangy creaminess. For extra indulgence, a dusting of powdered sugar or a smear of almond butter adds both visual appeal and flavor complexity, turning a simple breakfast into a feast for the senses.
Prep and Cook Time
- Prep Time: 10 minutes
- Cook Time: 15 minutes
- Total Time: 25 minutes
Yield
- Serves 4 (8 slices of gluten-free French toast)
Difficulty Level
- Easy to Medium
Ingredients
- 8 slices gluten-free bread, preferably day-old
- 3 large eggs
- 1 cup whole milk or almond milk
- 1 tsp vanilla extract
- 1/2 tsp ground cinnamon
- 1 tbsp honey or maple syrup
- 1/4 tsp baking powder
- Butter or coconut oil for cooking
- Pinch of salt
Instructions
- Prepare the batter. In a shallow bowl, whisk together eggs, milk, vanilla extract, cinnamon, honey, baking powder, and a pinch of salt until smooth and frothy.
- Soak the bread. Dip each slice of gluten-free bread fully into the batter, ensuring both sides are coated. Let excess drip off to avoid sogginess.
- Preheat your skillet. Heat a cast iron or non-stick skillet over medium heat and add a tablespoon of butter or coconut oil, swirling to coat evenly.
- Cook the toast. Place soaked slices into the skillet and cook for 3-4 minutes without moving until the underside is golden brown and crisp.
- Flip carefully. Turn the slices and cook for another 3-4 minutes until evenly browned and fully cooked through.
- Serve promptly. Transfer to a warm plate and repeat with remaining slices, adding more butter or oil as needed.
Chef’s Notes & Tips for Success
- Bread options: If gluten-free bread is scarce, dense gluten-free brioche or challah alternatives elevate richness.
- Milk swaps: Creamy oat or cashew milk work beautifully for dairy-free versions.
- Batter thickness: Adjust milk quantity slightly for thinner batters if your bread is very thick.
- make-ahead: Prepare the batter and soak bread in the fridge for up to 30 minutes to deepen flavor.
- Use moderate heat: Cooking too high may brown outside before inside cooks; too low prevents crispness.
Serving Suggestions
Serve your gluten-free French toast stacked high, crowned with a scattering of fresh seasonal berries like raspberries and blueberries, a light dusting of powdered sugar, and a drizzle of warm maple syrup.Add a side of crispy bacon or a dollop of whipped coconut cream for extra indulgence.Toasted pecans or chopped pistachios sprinkled on top add that irresistible crunch, perfectly mirroring the golden crust beneath.

| Nutrient | Per Serving |
|---|---|
| Calories | 320 |
| protein | 10g |
| Carbohydrates | 34g |
| Fat | 14g |
For more inspiration on gluten-free breakfast ideas, check out our article on delicious gluten-free pancakes. To understand the science behind gluten-free baking and ingredient substitutions, the Celiac Disease Foundation provides excellent resources.
Q&A
Q&A: Crispy & Delicious – Your Guide to Gluten-Free French toast
Q1: Can French toast really be crispy without gluten?
A: Absolutely! While gluten gives traditional bread its chewy texture, achieving crispy gluten-free French toast is all about the right bread choice and technique. Using sturdy gluten-free breads-like those made with rice flour, almond flour, or a hearty oat blend-helps create that golden crust. Plus, soaking the bread just enough (not too much!) and cooking it on a hot, buttered skillet ensures a satisfyingly crisp exterior.
Q2: What type of gluten-free bread works best for French toast?
A: Look for gluten-free bread that’s dense and slightly stale or toasted beforehand. Breads made with a mix of almond flour, tapioca starch, and xanthan gum tend to hold up well without becoming mushy. Avoid ultra-soft or super airy breads-they soak up too much batter and can get soggy. If you can find a gluten-free brioche or challah-style loaf,you’re in for a real treat!
Q3: How do I prevent gluten-free French toast from falling apart?
A: The secret lies in batter consistency and soaking time. Keep your egg mixture well balanced-combining eggs, milk (or dairy-free alternative), a splash of vanilla, and a pinch of cinnamon.Dip the bread quickly to avoid oversaturation. Also, cook on medium heat to give the toast time to firm up without burning. patience is key-the perfect crust forms when the heat’s just right.
Q4: Are there tips for making the French toast extra flavorful?
A: Definitely! Infuse your batter with spices like cinnamon, nutmeg, or cardamom for warmth. A touch of orange zest or a dash of vanilla extract can brighten the flavor profile.also, consider cooking your French toast in browned butter instead of plain butter to add a nutty depth. Topping your creation with fresh berries, maple syrup, or a dusting of powdered sugar creates a delightful finish.
Q5: Can I make this gluten-free French toast vegan too?
A: Yes! Swap eggs for a flax or chia seed “egg” (1 tablespoon ground seeds + 3 tablespoons water, soaked until gelatinous). Use almond milk or oat milk in place of dairy milk. Nutritional yeast and a pinch of turmeric can add savory notes and color,but don’t forget your vanilla and cinnamon for sweetness. Cooking in coconut oil or vegan butter helps maintain crispiness and flavor.Q6: What’s the best way to serve and store leftover gluten-free French toast?
A: Serve fresh and crispy right off the pan,but leftovers can be refrigerated tightly wrapped. Reheat them in a toaster oven or skillet to regain that crisp texture-avoid microwaving, as it can make the bread soggy. Leftover French toast also makes a fantastic base for bread pudding or breakfast sandwiches!
Embrace the magic of gluten-free French toast with this crispy and delicious guide-because everyone deserves a golden morning treat, no matter the dietary needs!
Future Outlook
Whether you’re tackling a busy morning or seeking a leisurely weekend treat, mastering the art of crispy and delicious gluten-free French toast means you never have to compromise on flavor or texture. Armed with the right ingredients, clever techniques, and a touch of patience, this guide empowers you to create a breakfast that’s both satisfying and safe for gluten-sensitive diets. So go ahead-flip that golden slice, drizzle on your favorite toppings, and savor every bite of a morning classic, reinvented just for you. Your perfect gluten-free French toast awaits!
Savor the Spice: A Guide to Cajun Seafood Pasta Delights invites you on an aromatic journey into the heart of Louisiana’s vibrant culinary heritage. The bold, smoky Cajun flavors paired with tender seafood create a mesmerizing dance on the palate, evoking the warmth of bayou gatherings and bustling New Orleans markets. This dish is more than just a meal-it’s an experience,a celebration of culture,and a testament to the art of seasoning. Let’s dive into the origins, essential ingredients, and masterful techniques that will help you craft an unforgettable Cajun seafood pasta masterpiece.
Origins of the Cajun Flavors and Their Perfect Pairing with Seafood
Cajun cuisine, born from French-speaking settlers in Louisiana, is a rich tapestry of spices, bold aromatics, and hearty proteins. Originally a resourceful blend of local ingredients and Old World techniques,Cajun seasoning is traditionally a balanced mix of paprika,cayenne,garlic powder,onion powder,oregano,thyme,and black pepper. These vibrant spices beautifully complement the natural brininess and sweetness of seafood, making dishes like cajun seafood pasta a staple for locals and food lovers worldwide.
The secret to this pairing lies in the spices’ ability to enhance, not overwhelm, allowing shrimp, crab, crawfish, and fish to shine through with the right punch of heat and earthiness. This harmonious relationship has made Cajun flavors perfect for creating a comfort dish that’s both rustic and refined.
Prep and Cook Time
- Planning: 20 minutes
- Cooking: 25 minutes
- total Time: 45 minutes
Yield
Serves 4 hearty portions
Difficulty Level
Medium – ideal for cooks agreeable with multi-step preparations, seasoning balance, and seafood handling
Essential Ingredients to Elevate Your Cajun Seafood Pasta Experience
- 12 oz linguine pasta (or fettuccine for a thicker bite)
- 1 lb mixed seafood (shrimp, scallops, and lump crab meat recommended)
- 2 tbsp Cajun seasoning (homemade or quality blend with smoked paprika, cayenne, garlic powder)
- 3 tbsp olive oil or unsalted butter for sautéing
- 1 medium onion, finely chopped
- 1 red bell pepper, diced
- 3 cloves garlic, minced
- 1 cup heavy cream or half-and-half for a lighter touch
- 1/2 cup chicken broth or seafood stock for depth
- 2 tsp fresh smoked paprika for smoky richness
- Juice of 1 lemon for bright acidity
- Fresh parsley, chopped, for garnish
- Salt and freshly cracked black pepper, to taste
Step-by-Step Techniques for Achieving Authentic Cajun Spice Balance
- Cook pasta al dente according to package instructions. Drain and gently toss with a drizzle of olive oil to prevent sticking. Set aside.
- Season seafood evenly with 1 tablespoon of Cajun seasoning; allow to rest for 5 minutes to absorb flavors.
- Heat 2 tablespoons of olive oil or butter over medium-high heat in a large skillet. Sauté the seafood for 2-3 minutes per side until just opaque and caramelized. Remove and set aside. Avoid overcooking to keep seafood tender.
- In the same skillet, add onion and bell pepper. Sauté until soft and fragrant, about 5 minutes. Stir in minced garlic and cook for an additional minute without browning.
- Add remaining Cajun seasoning and smoked paprika to the vegetables. Stir to toast the spices gently, releasing their aroma-about 30 seconds.
- Deglaze the pan with chicken broth or seafood stock, scraping up any browned bits to infuse extra flavor.
- Reduce heat to medium-low. Pour in the cream and stir until the sauce thickens slightly, about 3-4 minutes. Add lemon juice and season to taste with salt and black pepper.
- Return seafood to the skillet, gently combining it with the sauce. Allow to warm through for 2 minutes.
- Toss the cooked pasta directly into the sauce and seafood, coating every strand. Warm all together for a minute before plating.
Top Recommended Seafood Varieties and Wine Pairings for Your Cajun Pasta
The key to a memorable Cajun seafood pasta lies in the freshness and variety of the seafood. Shrimp, sweet scallops, and delicate crab meat offer contrasting textures and flavors that marry beautifully with cajun spices.
For the wine,opt for crisp whites such as Dry Riesling or sauvignon Blanc. These wines boast bright acidity and citrus notes that cut through the richness of the cream sauce and balance the spice intensity.
chef’s Notes and Tips for Success
- Homemade Cajun seasoning elevates freshness-try balancing smoked paprika, cayenne (adjust to heat preference), dried thyme, oregano, garlic and onion powders, salt, and black pepper.
- Seafood substitutions: Crawfish tails or firm white fish like grouper can be wonderful alternatives.
- Make-ahead: Prepare the Cajun seasoning and sauce base in advance. Store cooked seafood separately to avoid toughness.
- Balancing spice: If the heat feels overpowering, swirl in extra cream or a splash of honey to mellow flavors.
- For gluten-free: swap linguine with rice noodles or gluten-free pasta options.
- Finishing touch: A sprinkle of freshly chopped parsley and a lemon wedge serve as brilliant accents for freshness and color contrast.
Serving Suggestions
Serve Cajun seafood pasta steaming hot on large shallow bowls with a scattering of fresh parsley and optional grated Parmesan for luxurious richness. Accompany your plate with a crisp green salad and crusty French bread to soak up every drop of the delightful sauce. Complement the flavors with chilled glasses of Sauvignon Blanc or a vibrant craft beer for an authentic Cajun dining experience at home.
| nutrient | Per Serving |
|---|---|
| Calories | 520 kcal |
| Protein | 36 g |
| Carbohydrates | 48 g |
| Fat | 18 g |

Discover more on mastering seafood dishes with our Louisiana Seafood Recipes Guide.
Q&A
Q&A: Savor the Spice – A Guide to Cajun Seafood Pasta Delights
Q1: What makes Cajun seafood pasta uniquely flavorful?
A1: Cajun seafood pasta is a vibrant fusion of bold spices, fresh seafood, and hearty pasta.The magic lies in the Cajun seasoning-a fiery blend of paprika, cayenne, garlic, and herbs-that adds a smoky, peppery kick. When paired with succulent shrimp, crab, or crawfish, and tossed in a creamy, tomato-infused sauce, it creates a dance of flavors that’s both comforting and exhilarating.
Q2: Which types of seafood are best suited for Cajun pasta dishes?
A2: Shrimp and crawfish reign supreme in Cajun seafood pasta, offering sweet, tender bites that soak up the seasoning beautifully. Crab meat provides a delicate texture and subtle sweetness, while scallops and oysters can add luxurious richness.Freshness is key-the fresher the seafood, the more the dish sings.
Q3: Can I make Cajun seafood pasta at home, or is it best enjoyed at a restaurant?
A3: Absolutely! While many restaurants have perfected their signature takes, making Cajun seafood pasta at home is a rewarding experience. With accessible ingredients and a few culinary tricks-like creating the perfect Cajun spice blend and balancing the creaminess of the sauce-you can craft a dish that rivals any gourmet kitchen.
Q4: What pasta types work best with Cajun seafood dishes?
A4: Pasta shapes that hold the sauce well are ideal-think fettuccine, linguine, or penne. These strands and tubes catch the creamy, spicy sauce and bits of seafood, ensuring every bite is loaded with flavor. The pasta’s texture should complement the tender seafood without overpowering it.
Q5: how can I adjust the spice level to suit different palates?
A5: Cajun cooking is all about customizable heat.If you’re hesitant about spice, start with smaller amounts of cayenne and Cajun seasoning, then taste as you go. For a milder approach,incorporate more creamy elements like heavy cream or cheese to balance the heat.For heat seekers, add fresh jalapeños or a dash of hot sauce.
Q6: are there any traditional sides or accompaniments that pair well with Cajun seafood pasta?
A6: Yes! Crisp green salads with tangy vinaigrettes cut through the richness, while crusty garlic bread invites you to mop up every bit of sauce. Cornbread or roasted vegetables seasoned with Creole spices also complement the meal beautifully, creating a well-rounded Cajun feast.
Q7: What cultural influences shaped Cajun seafood pasta?
A7: Cajun cuisine is a beautiful mosaic of French, african, Spanish, and Native American flavors, born from the agriculture and seafood bounty of Louisiana. Seafood pasta dishes merge these traditions, reflecting the coastal lifestyle where bold spices meet fresh river and gulf ingredients, resulting in comforting, rustic dishes with a lively punch.
Q8: Any tips for sourcing authentic Cajun seasonings?
A8: Look for brands specializing in Louisiana-style blends,or create your own by combining paprika,smoked paprika,garlic powder,onion powder,cayenne,black pepper,thyme,and oregano.Freshly ground spices always bring more vibrancy. Farmers markets and specialty stores often carry excellent Cajun spice blends that capture the region’s essence perfectly.
Q9: How can vegetarians enjoy a Cajun-inspired pasta dish?
A9: Swap seafood for hearty vegetables like roasted bell peppers, okra, mushrooms, or even vegan sausage, and use a rich vegetable broth base. Keep the Cajun seasoning front and center to preserve that signature kick, and finish with creamy elements like cashew cream or vegan cheese for indulgence without compromise.
Q10: What wine or beverage pairs best with Cajun seafood pasta?
A10: A crisp, refreshing white wine like Sauvignon Blanc or a lightly oaked Chardonnay balances the spice and creaminess. for beer lovers, a pilsner or a citrusy IPA cuts through the heat and richness. Non-alcoholic lovers can opt for a sparkling lemonade or sweet iced tea to refresh the palate.
Dive fork-first into the spirited world of Cajun seafood pasta, where spice and sea intertwine in a celebration of taste, tradition, and texture. Ready to savor the spice?
Closing Remarks
as the last swirl of Cajun seasoning lingers on your palate and the comforting blend of seafood and pasta wraps you in its warm embrace, you’ve uncovered more than just a meal-you’ve discovered a vibrant tradition bursting with bold flavors and soulful heritage. Whether you’re a seasoned chef or a curious foodie, the art of crafting cajun seafood pasta invites you to savor every spicy, savory bite and celebrate the lively spirit of Louisiana’s coastal bounty. So gather your ingredients, turn up the heat, and let each forkful transport you to the heart of the bayou, where every dish tells a story worth savoring. your next tasty adventure awaits-bon appétit!
Deliciously Light gluten free banana muffins offer a delightful twist on a beloved classic, effortlessly combining natural sweetness with a moist, airy crumb. Originating from the humble kitchen experiments of many home bakers craving comfort without gluten,these muffins showcase how the right selection of flours and sweeteners can transform simple ingredients into an irresistible treat. Whether you’re catering to dietary needs or simply embracing a wholesome lifestyle, this recipe promises fluffiness and flavor in every bite.
Prep and Cook Time
- Preparation: 15 minutes
- Cook Time: 20 minutes
- Total time: 35 minutes
Yield
- 12 appetizing muffins
Difficulty Level
- Easy - perfect for beginners and seasoned bakers alike
ingredients
- 1 cup gluten free oat flour, finely ground
- 1 cup almond flour, blanched
- ½ cup tapioca starch (for lightness)
- 1 tsp baking powder, gluten free
- ½ tsp baking soda
- ¼ tsp fine sea salt
- 3 ripe bananas, mashed (about 1 ½ cups)
- 2 large eggs, at room temperature
- ⅓ cup pure maple syrup or honey (natural sweetener)
- ⅓ cup coconut oil, melted
- 1 tsp pure vanilla extract
- Optional add-ins: ½ cup chopped walnuts, dark chocolate chips, or shredded coconut
Instructions
- Preheat your oven to 350°F (175°C). Line a 12-cup muffin tin with paper liners or grease generously to prevent sticking.
- In a large bowl, whisk together the gluten free oat flour, almond flour, tapioca starch, baking powder, baking soda, and sea salt. Mixing these flours carefully ensures a balanced texture for moist muffins that don’t feel dense.
- In a separate bowl, combine the mashed bananas, eggs, maple syrup, melted coconut oil, and vanilla extract. Use a spatula or hand mixer to blend untill smooth and glossy. The ripe bananas not only add moisture but a rich natural sweetness that elevates flavor without overpowering.
- Gradually pour the wet ingredients into the dry mixture. Gently fold with a spatula until just combined – persistent overmixing can toughen gluten free batters. A few flour streaks remaining is okay as the batter will continue to hydrate.
- If using add-ins, fold them in now – chopped walnuts bring crunch, while chocolate chips add pockets of gooey richness.Keep the additions light to maintain the batter’s airy integrity.
- Divide the batter evenly among the prepared muffin cups, filling about ¾ full. This prevents overflow and encourages gorgeous doming during baking.
- Bake for 18-22 minutes,or until a toothpick inserted into the center emerges clean or with just a few moist crumbs attached. Oven temperatures vary so start checking at 18 minutes to avoid overbaking.
- Allow muffins to cool in the pan for 5 minutes, then transfer to a wire rack. Cooling entirely enhances the crumb structure and prevents sogginess.
Chef’s Notes
- Flour alternatives: For a different but equally fluffy result, try replacing oat flour with sorghum flour or brown rice flour, but keep the tapioca starch ratio for softness.
- Sweetener swaps: Maple syrup works beautifully here, but feel free to use agave nectar or date syrup as natural alternatives.
- Storage tips: Store cooled muffins airtight at room temperature for up to 3 days, or freeze individually wrapped for up to 2 months. Thaw at room temperature before enjoying.
- Extra moisture: If bananas are less ripe, add a tablespoon of unsweetened applesauce or Greek yogurt to the wet ingredients to maintain moistness.
- Egg-free version: Replace eggs with ½ cup mashed avocado or flax egg (1 tbsp ground flaxseed + 3 tbsp water, chilled) to keep the texture tender and light.
serving Suggestions
These muffins shine best when warmed slightly and served with a slather of creamy almond butter or a drizzle of raw honey. For a brunch spread, pair with fresh berries and a dollop of coconut yogurt. Garnish with toasted walnut halves or a sprinkle of cinnamon sugar to add extra visual charm and flavor depth.

| Nutrient | Per Muffin |
|---|---|
| Calories | 180 kcal |
| Protein | 4 g |
| Carbohydrates | 25 g |
| Fat | 8 g |
For those curious about the science behind why these flours work so well together, Gluten-Free Living offers an excellent resource exploring gluten free baking fundamentals. And don’t forget to explore our related gluten free breakfast recipes for inspired mornings!
Q&A
Q&A: Deliciously Light – Your Guide to Gluten Free Banana Muffins
Q1: What makes these gluten free banana muffins “deliciously light”?
A1: The magic lies in balancing wholesome ingredients with a touch of creativity. By using ripe bananas for natural sweetness and moisture, coupled with gluten free flours like almond or oat flour, these muffins avoid heaviness while staying satisfyingly soft. The result? A treat that feels indulgent without the usual dense, heavy texture often found in gluten free baked goods.
Q2: Can I use any gluten free flour to make these muffins?
A2: You can, but each flour brings its own personality to the muffin.Almond flour adds nuttiness and a tender crumb, oat flour provides a mild sweetness and chewiness, while rice flour can be a bit drier. Blending multiple gluten free flours often gives the best, most balanced texture-kind of like a symphony where every instrument plays a part.
Q3: How ripe should my bananas be?
A3: Think of ripe bananas as the secret stars of this recipe. Look for bananas that are heavily speckled or even with a few brown patches-these are sweeter and softer,which means they’ll blend right into the batter,delivering natural sweetness and moisture without the need for extra sugar or fats.
Q4: Are there any tips for ensuring the muffins rise well without gluten?
A4: Absolutely! As gluten normally provides structure, gluten free baking calls for a little extra magic. Incorporate leavening agents like baking soda and baking powder,and don’t skip the eggs (or well-chosen substitutes) which provide lift and stability. Also, gently fold the batter to keep some air in-it’s like giving your muffins a breath of fresh air in the oven.
Q5: Can these muffins be made vegan too?
A5: Yes! Simply replace eggs with flax or chia “eggs” (1 tablespoon of ground flax or chia seeds mixed with 3 tablespoons of water, set to gel), and use plant-based milk like almond or oat milk. A touch of coconut oil or vegan butter will keep them moist and tender, ensuring your muffins remain light and delightful.
Q6: how should I store these gluten free banana muffins?
A6: As gluten free baked goods can dry out faster, store your muffins in an airtight container at room temperature for up to 2 days.For longer freshness, pop them in the fridge for up to a week, or freeze individually wrapped muffins for up to 3 months. When ready, thaw and warm gently for that fresh-out-of-the-oven feel.
Q7: What’s a creative twist to make these muffins truly unique?
A7: Add a sprinkle of toasted pecans or walnuts for crunch, swirl in a spoonful of dark chocolate chips, or fold in fresh blueberries or shredded coconut. For a hint of spice,cinnamon or nutmeg works wonders. Each tweak brings a new chapter to your gluten free banana muffin story-deliciously light and enticing every time.
Dive into baking with this guide and discover how gluten free banana muffins can be fluffy, flavorful, and far from ordinary!
Closing Remarks
As you embark on your gluten-free baking adventures, these deliciously light banana muffins promise not only a burst of natural sweetness but also a comforting, wholesome treat that fits perfectly into your lifestyle. Whether you’re nourishing yourself or delighting friends and family, this guide has equipped you with the know-how to create muffins that are as fluffy as they are flavorful-proving that gluten-free doesn’t mean sacrificing taste. So, grab those ripe bananas, gather your ingredients, and let your oven work its magic. Your next favorite snack is just a muffin away!
Irresistible valentine’s chocolate-covered strawberries are the ultimate romantic treat, combining luscious, ruby-red fruit with a decadent, silky chocolate shell. Understanding how to select the freshest, sweetest strawberries and master the delicate dance of chocolate tempering is key to crafting this timeless classic. Each bite promises a perfect harmony of textures and flavors that can elevate any celebration or cozy evening.
Prep and cook Time
- Readiness: 15 minutes
- Tempering & Dipping: 20 minutes
- Total time: 35 minutes
Yield
Approximately 20-25 chocolate-covered strawberries
Difficulty Level
Medium – perfect for cooks ready to elevate their dessert presentation skills
Ingredients
- 1 pound fresh strawberries, vine intact, firm and radiant red
- 8 ounces high-quality semisweet or bittersweet chocolate (60-70% cocoa)
- 4 ounces white chocolate, for drizzling (optional)
- 1 teaspoon coconut oil or unsalted butter (to smooth chocolate)
- Pinch of sea salt (optional, for an elegant flavor contrast)
- Creative toppings: finely chopped pistachios, shredded coconut, edible gold flakes, crushed freeze-dried raspberries, or sea salt flakes
Instructions
- Choose the Perfect Strawberries: Rinse strawberries gently under cold water and pat dry thoroughly with paper towels. Selecting strawberries with a rich red hue and glossy skin guarantees maximum sweetness and freshness. Avoid any with white tips or bruised spots.
- Prepare Your Workspace: Lay parchment paper or a silicone mat on a baking sheet for drying the dipped berries.Make sure your strawberries are fully dry to prevent chocolate from seizing.
- Mastering Chocolate Tempering: Chop the semisweet chocolate into uniform pieces for even melting. Place 2/3 of the chocolate in a double boiler or heatproof bowl set over simmering water, stirring constantly until melted and reaching 115°F (46°C). Remove from heat, add the remaining 1/3 chocolate, stirring continuously until the temperature cools to 82°F (28°C). Return briefly to heat (not exceeding 88°F / 31°C) to finish tempering. Add coconut oil to smooth the texture.
- Dip the Strawberries: Holding a strawberry by the stem, dip it into the tempered chocolate, swirling to coat evenly.Let excess drip off before placing on the prepared sheet. Repeat with all berries.
- Decorate Creatively: Instantly sprinkle toppings such as crushed pistachios, freeze-dried raspberries, or edible gold flakes over the chocolate before it sets. For white chocolate drizzle, melt white chocolate gently and drizzle with a fork in thin lines across the dipped berries for elegant contrast.
- Let the Chocolate Set: Allow strawberries to rest at room temperature until chocolate hardens to a glossy finish, about 30 minutes. For quicker set, refrigerate for 10-15 minutes but avoid condensation.
Tips for Success
- Strawberry Selection: Opt for strawberries harvested recently and store them unwashed in the fridge to retain freshness until use.
- Tempering Precision: Use an instant-read thermometer for accurate chocolate tempering, ensuring a snappy, shiny finish that resists bloom.
- Moisture avoidance: Water is chocolate’s enemy. Make sure strawberries are bone dry to prevent the chocolate from seizing or dulling.
- Make-ahead: Chocolate-covered strawberries are best served within 24 hours for optimal freshness. Store in a single layer in a cool place or fridge, covered loosely to avoid moisture buildup.
- Substitutions: For variety, try white chocolate, milk chocolate, or ruby chocolate.For vegan options, select dairy-free chocolate varieties.
Serving Suggestions
Present your chocolate-covered strawberries on a beautiful platter lined with fresh green leaves or edible flowers to enhance their vibrant red and dark chocolate allure. Pair with a glass of bubbly champagne or a rich dessert wine to complete the indulgent experience. For personal touches, add heart-shaped sprinkles or edible glitter, perfect for Valentine’s Day celebrations.
| Nutrient | Per Serving (1 strawberry) |
|---|---|
| Calories | 75 |
| Protein | 1g |
| Carbohydrates | 10g |
| Fat | 3.5g |

For a deeper dive into chocolate tempering techniques, visit the Valrhona Chocolate Tempering guide.To explore more delightful fruit desserts, check our Fruit Dessert Recipes collection.
Q&A
Q&A: Irresistible Valentine’s Chocolate-Covered Strawberries Guide
Q1: Why are chocolate-covered strawberries the ultimate Valentine’s Day treat?
A: Chocolate-covered strawberries blend the luscious sweetness of ripe berries with the rich decadence of chocolate-offering a perfect harmony of flavors that screams romance. They’re elegant,delicious,and convey a heartfelt message,making them the quintessential Valentine’s indulgence.Q2: What type of chocolate works best for coating strawberries?
A: For the most irresistible results, use high-quality couverture chocolate or at least 60% cacao semi-sweet or bittersweet chocolate. Milk chocolate adds creamy sweetness, while dark chocolate offers a elegant, slightly bitter contrast to the juicy strawberry’s tartness. White chocolate can be fun for drizzles and decoration!
Q3: How can I ensure the chocolate coating is smooth and glossy?
A: The secret lies in tempering the chocolate. Gently melting the chocolate in a double boiler or microwave in short bursts,then cooling it slightly before dipping,creates a shiny,crisp shell. Avoid overheating, which can cause the chocolate to bloom or look dull.
Q4: What’s the best way to prep strawberries for dipping?
A: Choose firm, bright red strawberries with green tops for a fresh look.Wash them thoroughly, then dry completely-any moisture can prevent chocolate from sticking properly. Leave the green stem intact; it acts like a natural handle and adds visual charm.
Q5: Can I add extra flair to my chocolate-covered strawberries?
A: Absolutely! Sprinkle chopped nuts, shredded coconut, or edible glitter over the wet chocolate for texture and sparkle. Drizzle contrasting chocolate colors or add tiny heart-shaped sprinkles for Valentine’s-themed pizzazz. Creativity knows no bounds!
Q6: How do I store chocolate-covered strawberries to keep them fresh?
A: Store them in a single layer on parchment paper inside an airtight container in the refrigerator. Eat them within 24 hours for peak freshness-the chocolate stays crisp, and the strawberries remain juicy without turning mushy.Q7: Any tips for presenting these treats as a romantic gift?
A: Presentation is everything. Arrange the strawberries in a decorative box lined with tissue paper or nestled on a bed of rose petals. Add a handwritten love note or pair with a glass of bubbly for an unforgettable Valentine’s surprise.
Q8: Can I make chocolate-covered strawberries ahead of time?
A: You can prepare them several hours in advance, but ideally not more then a day before your celebration to maintain freshness and chocolate texture. If you must make them earlier, keep them refrigerated and covered but allow them to return to room temperature before serving.
Q9: Are there any creative twists to the classic chocolate-covered strawberry?
A: Definitely! Try dipping strawberries in caramel before chocolate for a layered flavor, or mix a sprinkle of sea salt or chili powder into the chocolate for a surprising kick. Stuff strawberries with cream cheese or mascarpone before dipping for a luscious surprise!
Q10: Where can I find the best strawberries for this Valentine’s treat?
A: Local farmers’ markets and specialty grocery stores frequently enough offer the freshest, juiciest berries during Valentine’s season. If fresh strawberries aren’t in season, opt for frozen ones and thaw them carefully, though fresh is always best for that perfect bite.
Enjoy crafting your chocolate-covered masterpieces and let love melt into every dip!
In Conclusion
As you embark on your chocolate-covered strawberry adventure, remember that the magic lies not just in the luscious pairing of ripe berries and rich chocolate, but in the love and care you pour into each dip and drizzle. Whether you’re crafting a simple treat or an elaborate confection,this guide has equipped you to create irresistible delights that captivate the heart and palate alike. So go ahead-whip up your sweetest Valentine’s surprise, and let every bite be a delicious declaration of affection that lingers long after the last strawberry is savored.

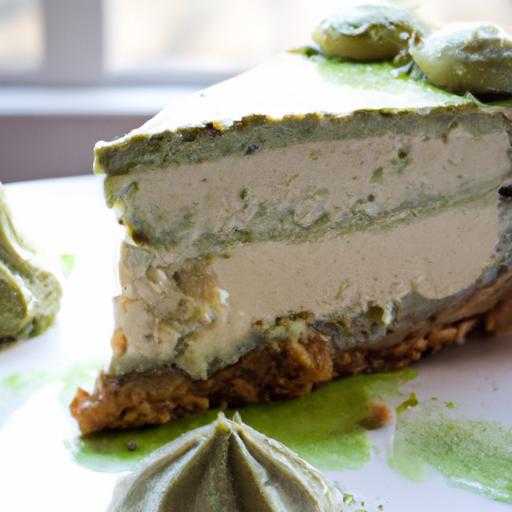
The Ultimate Guide to Decadent Matcha Cheesecake Bliss
The Ultimate Guide to Decadent Matcha Cheesecake bliss invites you on a journey that transcends a simple dessert experience. This vibrant green delicacy is not only a feast for the palate but also a tribute to centuries-old Japanese traditions, were matcha has held a sacred place in tea ceremonies and cultural celebrations. by weaving the earthy bitterness of premium matcha powder into the creamy, indulgent texture of cheesecake, you create a harmonious balance of flavors that captivate and comfort. Whether you’re a seasoned baker or a curious foodie, this recipe will inspire you to bring a touch of refined elegance to your dessert table.
Prep and Cook Time
- Preparation: 30 minutes
- Baking: 60 minutes
- Chilling: 4 hours (or overnight for best results)
Yield
Serves 12 generous slices of matcha cheesecake bliss
Difficulty Level
Medium – Perfect for bakers eager to master creamy textures and nuanced flavors
Ingredients
- Crust:
- 1 ½ cups graham cracker crumbs
- 5 tbsp unsalted butter, melted
- 2 tbsp granulated sugar
- Filling:
- 24 oz cream cheese, softened
- ¾ cup granulated sugar
- 3 large eggs, room temperature
- ⅔ cup sour cream
- 2 tbsp all-purpose flour
- 2 tbsp premium matcha powder (preferably ceremonial grade)
- 1 tsp vanilla extract
- Glaze and Garnish:
- ⅓ cup heavy cream, whipped to soft peaks
- 1 tsp matcha powder for dusting
- Fresh raspberries or edible gold leaf (optional)
Instructions
- Prepare the crust: Preheat your oven to 325°F (160°C). In a medium bowl, combine graham cracker crumbs, melted butter, and sugar. Stir until the mixture resembles wet sand. Press the crumb mixture firmly and evenly into the bottom of a 9-inch springform pan. Bake for 10 minutes, then remove and let cool while you prepare the filling.
- Mix the filling: In a large mixing bowl,beat the softened cream cheese on medium speed until smooth and creamy,about 3 minutes. Gradually add sugar and continue to beat until light and fluffy.
- Incorporate eggs: Add the eggs one at a time, fully incorporating each before adding the next. This helps prevent air bubbles and maintains a smooth texture.
- Blend in dry ingredients: Sift together the all-purpose flour and matcha powder to avoid clumps, then gradually fold them into the filling mixture along with the sour cream and vanilla extract. Mix gently but thoroughly, scraping the bowl sides carefully.
- Pour and bake: Pour the filling evenly over the cooled crust. Place the springform pan on a baking sheet to catch any drips and bake in the preheated oven for 60 minutes. The edges should be set but the centre will still have a slight wobble.
- Cool down carefully: Turn off the oven and crack the door open, allowing the cheesecake to cool gradually for 1 hour. This step helps prevent cracking by easing temperature shock.
- Chill thoroughly: Remove the cheesecake from the oven, run a knife around the edges to loosen it from the pan, then cool to room temperature before refrigerating for at least 4 hours or overnight.
- Finish and garnish: before serving, top the cheesecake with softly whipped heavy cream, dust lightly with matcha powder, and adorn with fresh raspberries or edible gold leaf to amplify the decadent appeal.
Tips for Success: Crafting the Ultimate Matcha Cheesecake
- Select ceremonial grade matcha powder for the richest flavor and vibrant color. Lower grades can taste bitter or dull.
- room temperature eggs and cream cheese are key to a smooth, luscious batter-skip this and risk lumps or cracks.
- Baking in a water bath can further prevent cracking if your oven has uneven heat.
- Letting the filling rest before baking (about 15 minutes) helps release air bubbles for an ultra-silky texture.
- Wrap leftover cheesecake tightly to maintain moisture and freshness, with flavors deepening over 1-2 days.
Serving Suggestions: Elevate Your Dessert Presentation
Slice your matcha cheesecake with a hot, clean knife for perfectly smooth edges. Serve chilled on minimalist white plates to showcase the striking green color. Pair with light herbal teas such as jasmine or hojicha to complement the earthy bitterness without overwhelming the palate. Garnishes like fresh raspberries add a burst of color and a tart contrast, while edible gold leaf delivers a luxurious visual flourish, perfect for celebrations or elegant gatherings.

| Nutrient | Per Serving (1 slice) |
|---|---|
| Calories | 340 |
| Protein | 6g |
| Carbohydrates | 28g |
| Fat | 22g |
For more inspiring matcha recipes and techniques, explore our collection of matcha dessert creations.To deepen your understanding of matcha’s cultural roots, visit the Japan Guide’s matcha Tea History page.
Q&A
Q&A: The Ultimate Guide to Decadent Matcha Cheesecake Bliss
Q1: What makes matcha cheesecake so special compared to conventional cheesecake?
A1: Unlike classic cheesecakes that lean towards creamy vanilla or tangy flavors, matcha cheesecake introduces an earthy, slightly bitter, and vibrantly green twist thanks to high-quality Japanese green tea powder. This unique flavor profile creates a harmonious balance between rich creaminess and refreshing vegetal notes, elevating the dessert experience to pure decadence.
Q2: Is it arduous to work with matcha powder in baking?
A2: Not at all! While matcha is delicate and best enjoyed fresh, incorporating it into cheesecake batter is surprisingly straightforward. The key lies in sifting the matcha powder to avoid clumps and using ceremonial-grade or culinary-grade matcha for a perfect depth of flavor without overpowering bitterness. This way, your cheesecake will have that signature emerald glow and authentic taste.
Q3: How do you achieve the perfect texture in a matcha cheesecake?
A3: The secret to luxurious matcha cheesecake texture is balancing richness and lightness. Using full-fat cream cheese blended until silky smooth, combined with the right amount of heavy cream or sour cream, creates a luscious mouthfeel. Additionally, baking the cheesecake in a water bath prevents cracks and dryness, resulting in a velvety, melt-in-your-mouth sensation.
Q4: What crust pairs best with a matcha cheesecake?
A4: While classic graham cracker crusts work beautifully, consider experimenting with almond or black sesame crusts for an extra layer of flavor that complements the matcha’s grassy undertones. A buttery, slightly nutty crust creates a lovely textural contrast and adds complexity to each decadent bite.
Q5: Can matcha cheesecake be made vegan or gluten-free?
A5: Absolutely! For a vegan twist, substitute cream cheese with cashew-based or coconut cream cheeses and use plant-based cream alternatives. Gluten-free crusts, made from ground nuts, gluten-free cookies, or oat flour, lend themselves well to maintaining that buttery crunch without compromising taste or texture.The matcha flavor remains vibrant and soul-satisfying in these variations.
Q6: How should you serve and garnish matcha cheesecake for the ultimate indulgence?
A6: Presentation is half the bliss! Dust the top with a light sprinkle of matcha powder or powdered sugar for a delicate finish. Fresh berries, whipped cream, or even a drizzle of white chocolate ganache can add sweetness and balance. Serve slightly chilled to let the flavors fully unfold on the palate-a slice of matcha cheesecake is truly a sensory escape.
Q7: Any tips for storing and enjoying leftover matcha cheesecake?
A7: Keep your matcha cheesecake tightly wrapped in the fridge, where it will stay fresh for up to 4-5 days.Interestingly, the flavors frequently enough deepen after resting overnight, so some say day-two cheesecake tastes even better! For longer storage, freezing individual slices works well-just thaw gently before savoring your decadent matcha delight again.
Dive in, savor every bite, and let this ultimate matcha cheesecake bliss become your new favorite indulgence!
To Conclude
As the final slice of this decadent matcha cheesecake melts into your memory, you’ll find that this guide isn’t just about a dessert-it’s a celebration of balance, flavor, and artistry in every bite. Whether you’re a seasoned baker or a curious newcomer, the journey through these rich, creamy layers infused with vibrant matcha has unlocked a world where tradition meets indulgence. So next time you crave a slice of bliss, remember: with a little patience, passion, and the perfect recipe in hand, your kitchen can become the gateway to matcha cheesecake mastery. Here’s to savoring every forkful of your own decadent creation-because life is too short for ordinary desserts.