Decoding Olive Garden’s Shrimp Fettuccine Alfredo brings a delightful journey into the balance of rich, creamy textures and briny ocean-fresh shrimp, inspiring home cooks to recreate this italian-American classic with flair. The secret behind its harmonious flavor lies in perfectly cooked shrimp nestled in a velvety Alfredo sauce, enveloping tender ribbons of fettuccine-a symphony of simplicity and indulgence that has captured hearts worldwide.
Prep and Cook Time
- Planning: 15 minutes
- Cooking: 20 minutes
- Total Time: 35 minutes
Yield
Serves 4 generous portions
Difficulty Level
Medium – accessible for confident beginners eager to elevate their Italian cooking skills
Ingredients
- 12 oz fresh fettuccine pasta (or dried high-quality fettuccine)
- 1 lb large shrimp (16-20 count, peeled and deveined, tails off)
- 4 tbsp unsalted butter
- 4 garlic cloves, minced
- 1 ½ cups heavy cream
- 1 cup freshly grated Parmesan cheese (preferably Parmigiano-Reggiano)
- Salt and freshly ground black pepper, to taste
- Fresh parsley, finely chopped (for garnish)
- 1 tbsp olive oil
- 1 tsp lemon zest (optional, for brightness)
- pinch of crushed red pepper flakes (optional, for subtle heat)
Instructions
- Prepare the pasta: Bring a large pot of salted water to a boil. Add the fettuccine and cook until just al dente (about 1-2 minutes less than package directions). Reserve 1 cup of pasta water before draining.
- Cook the shrimp: While pasta cooks, heat olive oil and 2 tablespoons butter in a large skillet over medium-high heat. Add the shrimp,seasoning lightly with salt and pepper.Sauté until pink and opaque, about 2-3 minutes per side. Remove shrimp and set aside to avoid overcooking.
- Build the Alfredo sauce: Lower heat to medium and add remaining butter to the skillet. Sauté the minced garlic until fragrant, about 1 minute, careful not to brown it.
- Add cream: Slowly pour in the heavy cream, gently stirring. Bring to a simmer and let thicken slightly,about 3-4 minutes. For extra silkiness, add a splash of reserved pasta water if needed.
- Incorporate cheese: gradually whisk in the freshly grated Parmesan cheese until melted and sauce is smooth. Season with salt, pepper, lemon zest, and crushed red pepper flakes to your taste.
- Combine pasta and shrimp: Add the drained fettuccine and cooked shrimp to the skillet. Toss gently to coat everything evenly in the creamy sauce. Warm through for 1-2 minutes.
- Serve immediately: Transfer to serving plates. Garnish with chopped fresh parsley for vibrant color and a fresh herbal lift.
Tips for Success
- Choosing shrimp: Opt for wild-caught shrimp if possible; their firm texture and subtle sweetness perfectly complement the rich Alfredo sauce.
- Pasta perfection: Cooking fettuccine al dente ensures it holds sauce without becoming mushy. Always reserve pasta water-it’s liquid gold for adjusting sauce consistency.
- Cheese matters: Use freshly grated Parmesan rather than pre-grated to achieve a creamy, luscious sauce free of grainy texture.
- Make-ahead sauce: Alfredo sauce is best freshly made, but you can prepare the cream base up to 1 day ahead. Reheat gently and whisk in cheese just before tossing with pasta.
- Variations: For a lighter touch, substitute half the heavy cream with whole milk; add sautéed mushrooms or spinach to enrich the dish.
serving Suggestions
Present your Shrimp Fettuccine Alfredo on large white plates or shallow bowls that showcase the creamy sauce and vibrant pink shrimp. Pair with crusty garlic bread or a crisp Caesar salad for a complete Olive Garden-inspired experience. A sprinkle of extra Parmesan and a drizzle of truffle oil can add a gourmet twist when entertaining guests.
| Nutrient | Per Serving |
|---|---|
| calories | 680 kcal |
| protein | 38 g |
| Carbohydrates | 55 g |
| Fat | 32 g |

For those craving more Italian-inspired elegance, explore our Classic Italian Fettuccine recipes and deepen your pasta expertise. additionally, to understand the science behind perfect emulsions in creamy sauces, check out this complete guide by Serious eats.
Q&A
Q&A: Decoding Olive Garden’s Shrimp Fettuccine Alfredo Magic
Q1: What makes Olive Garden’s Shrimp Fettuccine Alfredo stand out from other versions?
A1: Olive Garden’s take on Shrimp Fettuccine Alfredo is a harmonious blend of creamy richness and fresh, vibrant flavors. The magic lies in their perfectly cooked,succulent shrimp paired with a velvety Alfredo sauce that’s both indulgent and balanced. Unlike heavier, overly buttery versions, their sauce maintains a silky texture with just the right hint of garlic and Parmesan, creating a dish that feels comforting yet light.
Q2: How does Olive Garden achieve the perfect texture for their fettuccine?
A2: The secret is in the al dente technique. Olive Garden cooks their fettuccine just enough so it holds firm to the bite, providing a satisfying chew without slipping into mushiness. this optimal firmness allows the noodles to soak up the Alfredo sauce beautifully, ensuring each forkful is bursting with flavor and texture.Q3: Are there special ingredients that elevate the Alfredo sauce to its ”magical” status?
A3: Yes! While the classic Alfredo base is cream, butter, and Parmesan, Olive Garden elevates it by using high-quality imported cheeses and freshly cracked black pepper. They also add a subtle garlic infusion that enhances the depth without overpowering the creamy richness. This blend crafts a sauce that’s indulgently smooth with nuanced layers of flavor.
Q4: What role do the shrimp play beyond just being a protein addition?
A4: The shrimp are more than garnish-they’re a crucial flavor and texture component. Olive Garden sources plump, tender shrimp, which they sauté just right to preserve juiciness and impart a gentle smokiness. These bites of shrimp add a fresh, slightly briny contrast to the creamy pasta, lifting the dish and adding a satisfying dimension.
Q5: Can home cooks replicate Olive Garden’s Shrimp Fettuccine Alfredo magic?
A5: absolutely! The key is in quality ingredients and attentive technique: use fresh, large shrimp; cook pasta al dente; and prepare the sauce slowly, melting the cheese carefully to avoid clumping. Infuse the sauce with fresh garlic and season thoughtfully. With patience and love, home cooks can bring a taste of Olive Garden’s magic right to their kitchen table.
Q6: How does Olive Garden’s version reflect Italian-American culinary traditions?
A6: Olive Garden’s Shrimp Fettuccine Alfredo embodies Italian-American cuisine’s ethos of comforting, approachable dishes that celebrate rich flavors without complexity. It bridges authentic Italian techniques-like the delicate pasta cooking and fresh cheese usage-with American preferences for creaminess and hearty seafood,resulting in a dish that’s both nostalgic and indulgent.
Q7: What tips do the chefs share to enhance the overall experience of this dish?
A7: The chefs reccommend finishing the dish with a sprinkle of freshly chopped parsley for a pop of color and herbaceous brightness. they also suggest serving it with a crisp side salad or garlic bread to balance the richness. Lastly, savoring the meal slowly allows the creamy, savory, and oceanic notes to unfold fully-truly appreciating the magic behind Olive Garden’s famed Shrimp Fettuccine Alfredo.
Future Outlook
As we’ve peeled back the layers of Olive Garden’s Shrimp Fettuccine Alfredo, it’s clear that its magic lies in a harmonious blend of quality ingredients, time-honored techniques, and subtle culinary secrets. From the perfectly al dente fettuccine to the luscious, velvety sauce and tender, flavorful shrimp, each component dances together to create a dish that’s both comforting and indulgent.Next time you twirl that creamy,garlicky goodness on your fork,you’ll appreciate the craftsmanship behind every bite-a tasty reminder that sometimes,the simplest classics hold the most enchanting mysteries.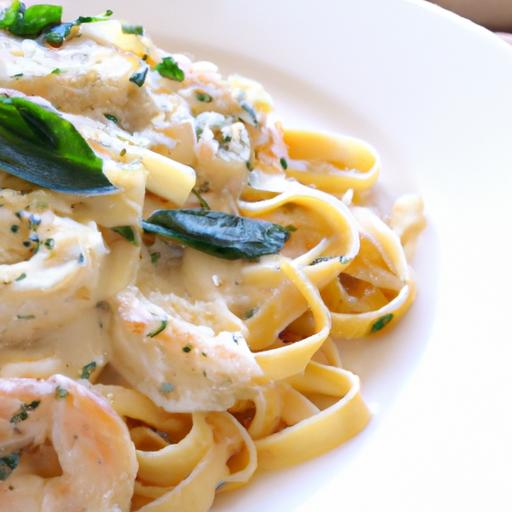
Crunchy air fryer coconut shrimp bursts with tropical flavor and an irresistibly golden crust,making it a standout appetizer or main dish that’s both quick and satisfying. This recipe celebrates the delightful contrast of juicy shrimp enveloped in a crisp, toasted coconut coating, elevated by the magic of air frying that cuts down on oil without sacrificing crunch. Inspired by coastal fare and perfected in my kitchen, it’s the perfect way to impress guests or treat yourself to something special with minimal fuss.
Prep and cook Time
- Preparation: 15 minutes
- Cooking: 10 minutes
- Total Time: 25 minutes
Yield
Serves 4 (about 16 shrimp)
Difficulty Level
Easy
Ingredients
- 1 lb large shrimp,peeled and deveined,tails optional
- 1 cup all-purpose flour,sifted
- 2 large eggs,beaten
- 1 cup shredded unsweetened coconut,finely shredded
- 1 cup panko breadcrumbs,preferably Japanese style for extra crunch
- 1 teaspoon garlic powder
- 1 teaspoon smoked paprika
- Salt and freshly ground black pepper,to taste
- Cooking spray,preferably avocado or olive oil based
- Fresh lime wedges,for garnish
Instructions
- Prepare your shrimp by rinsing under cold water and patting dry with paper towels.This step is crucial to help the coating adhere properly and avoid sogginess.
- Set up a dredging station: In three separate shallow bowls, place the all-purpose flour seasoned with a pinch of salt and pepper, the beaten eggs, and combine the shredded coconut with panko breadcrumbs, garlic powder, and smoked paprika.
- Coat each shrimp: First dredge in flour, shaking off excess. Then dip into the egg wash, allowing the excess to drip off. Lastly, press firmly into the coconut-panko mixture, ensuring an even coat.For extra crunch, gently press the coating onto the shrimp a second time.
- Preheat your air fryer to 400°F (200°C) for about 5 minutes. Lightly spray the basket with cooking spray to prevent sticking.
- Arrange the shrimp in a single layer in the air fryer basket, leaving space between each for even airflow. Mist the tops with cooking spray to promote a crispy, golden finish.
- Air fry for 8 to 10 minutes, flipping the shrimp halfway through. the shrimp should turn a lovely golden brown and feel firm to the touch but remain juicy inside.Avoid overcrowding to maintain maximum crunch.
- Remove and serve immediately, garnished with fresh lime wedges and your favorite dipping sauces.
Tips for Success
- Use shrimp sized around 16-20 per pound. Larger shrimp cook more evenly without drying out.
- For a more intense coconut flavor,toast the shredded coconut slightly in a dry pan before mixing with panko.
- If your air fryer doesn’t have a non-stick basket, line the basket with perforated parchment paper designed for air fryers to avoid sticking and breakage.
- Make-ahead tip: Bread the shrimp, place on a baking sheet, and freeze individually. once frozen, transfer to a freezer bag. Cook straight from frozen, adding 2-3 extra minutes to the cooking time.
- Feel free to switch panko for gluten-free breadcrumbs to accommodate dietary needs without losing crunch.
Serving Suggestions and Dipping sauces That Elevate Every Bite
Present your crispy coconut shrimp on a stylish platter nestled atop a bed of vibrant mixed greens and sliced tropical fruits like mango or pineapple to complement the shrimp’s sweetness. Fresh cilantro or finely chopped chives sprinkle a pop of color and freshness.
Pair it with dips that bring a balance of tang, heat, and creaminess for dynamic flavor contrasts:
- Spicy mango chutney aioli: Blend mayonnaise with mango chutney, lime juice, and a touch of Sriracha.
- Classic sweet chili sauce: Store-bought or homemade, its bright zing is perfect for coconut shrimp.
- Cilantro lime crema: Mix sour cream or Greek yogurt with freshly squeezed lime juice and chopped cilantro.
| nutrient | Per serving (4 shrimp) |
|---|---|
| Calories | 220 |
| Protein | 18g |
| Carbohydrates | 15g |
| Fat | 9g |

For more delightful seafood air fryer recipes, check out our Air Fryer Garlic Butter salmon. Curious about the science of air frying? Learn more from Serious Eats’ detailed guide.
Q&A
Q&A: Crunchy air Fryer Coconut Shrimp – Crispy delight Recipe
Q1: What makes this Crunchy air Fryer Coconut Shrimp recipe stand out from traditional fried shrimp recipes?
A: Unlike traditional deep-frying,this recipe uses an air fryer to achieve that golden,crispy texture without drowning the shrimp in oil. The coconut coating adds a tropical twist, giving every bite a sweet, nutty crunch that perfectly complements the tender shrimp inside-making it a healthier and equally appetizing alternative.
Q2: How do I ensure my shrimp stay juicy inside while getting crispy outside in the air fryer?
A: The key is in the prep and cooking time. Start with fresh or properly thawed shrimp, pat them dry to remove excess moisture, and coat them evenly with the coconut breading. Air frying at around 400°F (200°C) for 8-10 minutes, flipping halfway through, cooks the shrimp quickly enough to keep them succulent inside while crisping up the coating outside.
Q3: Can I customize the coconut breading to suit different flavor profiles?
A: Absolutely! While shredded coconut is the star, you can play with the seasoning in the breading. Add a pinch of cayenne or smoked paprika for a subtle kick, or mix in some finely chopped fresh herbs like cilantro or basil for a fragrant freshness. For a sweeter touch, a dash of cinnamon or brown sugar can enhance the tropical vibe.
Q4: What dipping sauces pair best with Crunchy Air Fryer Coconut Shrimp?
A: This shrimp loves company! Classic options include a tangy sweet chili sauce or a zesty mango salsa. For creamier dips, coconut-lime aioli or a spicy sriracha mayo add layers of flavor that marry beautifully with the crunchy, coconutty exterior.
Q5: Is this recipe suitable for weeknight dinners, or is it more of a special occasion dish?
A: It’s surprisingly quick and easy, making it perfect for any night of the week. The air fryer cuts down cooking time and cleanup, so you can whip up this crispy delight even on busy evenings. It’s also notable enough to serve at weekend gatherings or dinner parties!
Q6: Can I prepare the coconut shrimp in advance and reheat them later?
A: You can! For best results, cook the shrimp fresh and enjoy immediately. But if you need to prep ahead,coat and freeze the shrimp uncooked,then air fry from frozen with a slight increase in cooking time. To reheat cooked shrimp, a quick crisp-up in the air fryer keeps them crunchy without drying them out.
Q7: What shrimp size works best for this recipe?
A: Medium to large shrimp (about 31-40 count per pound) are ideal. They’re large enough to handle the coating without getting overwhelmed and cook quickly in the air fryer. Just make sure to devein and peel them before breading for the best texture and flavor.
Q8: Can this recipe be made gluten-free?
A: Definitely! Simply swap out regular panko breadcrumbs for gluten-free panko or crushed gluten-free crackers. The rest of the ingredients-coconut flakes,shrimp,and seasonings-are naturally gluten-free,so the crispy delight remains intact.
Feel ready to embark on a crunchy, tropical shrimp adventure? Let your air fryer work its magic and enjoy a guilt-free indulgence bursting with flavor and texture!
In Summary
There you have it-a golden, crispy batch of air fryer coconut shrimp that’s as easy to make as it is indeed delicious to devour. By combining the tropical sweetness of coconut with the satisfying crunch achieved through air frying, this recipe transforms a classic appetizer into a healthier, hassle-free indulgence. Whether you’re serving it at a casual gathering or enjoying a solo snack, these shrimp deliver a perfect balance of flavor and texture without the excess oil. So, next time craving strikes, dust off your air fryer and treat yourself to this crunchy delight-you’ll wonder how you ever did shrimp any other way!
Sizzling Broccoli Shrimp Stir fry is a vibrant, quick meal that combines the crisp freshness of broccoli with succulent, tender shrimp, all tied together by a luscious, savory sauce. Inspired by the dynamic flavors of classic Asian stir fries, this dish captures the essence of balance – bold yet delicate, light yet satisfying. Whether you’re new to stir frying or a seasoned cook, mastering these techniques will elevate your home cooking and transform weeknight dinners into memorable experiences.
Prep and Cook Time
Planning: 15 minutes | Cooking: 10 minutes | Total: 25 minutes
Yield
Serves 4 generous portions
Difficulty Level
Easy – perfect for busy weeknights or spontaneous gatherings
Ingredients
- 1 lb (450g) large shrimp, peeled, deveined, tails removed
- 4 cups broccoli florets, fresh and washed
- 2 tbsp vegetable oil or peanut oil, for high-heat cooking
- 3 cloves garlic, finely minced
- 1-inch piece fresh ginger, peeled and grated
- 1 medium red bell pepper, thinly sliced (optional for color)
- 3 green onions, chopped
- 2 tbsp soy sauce, low sodium preferred
- 1 tbsp oyster sauce
- 1 tbsp rice vinegar
- 1 tsp sesame oil (added at end for aroma)
- 1 tsp cornstarch mixed with 3 tbsp water (slurry)
- 1 tsp honey or maple syrup
- Fresh cracked black pepper, to taste
- 1/4 tsp red chili flakes (optional, for heat)
Instructions
- Prepare your ingredients. Rinse shrimp and pat dry. Cut broccoli into uniform florets for even cooking. Mix the sauce blend: soy sauce, oyster sauce, rice vinegar, honey, and cornstarch slurry in a small bowl. Set aside.
- Heat the wok or large skillet. Add vegetable oil and swirl it around until hot but not smoking – this is key for that signature stir fry sear and texture.
- Sauté aromatics. Add garlic and ginger, stirring constantly over medium-high heat, until fragrant (about 30 seconds). Be careful not to burn them.
- Add broccoli and bell pepper. Stir-fry for 3-4 minutes until broccoli turns vibrant green and just begins to soften, maintaining a crisp bite.
- Cook the shrimp. Push veggies to the side, add shrimp to the center of the wok.Let cook untouched for 1 minute to develop color, then stir and cook until pink and opaque, about 2-3 minutes total.
- Combine and add sauce. Mix all together in the wok, then pour in the prepared sauce. Toss constantly until sauce thickens and evenly coats shrimp and broccoli, about 1-2 minutes.
- Finish and flavor boost. Remove from heat. drizzle sesame oil and sprinkle green onions and chili flakes. Toss gently.
- Serve immediately. For best texture and taste, plate your stir fry while still hot and glossy.
Tips for Success
- Ingredient freshness: Opt for fresh, firm shrimp and shining green broccoli for the moast vibrant dish.
- High heat is crucial: Ensure your pan is sufficiently hot to quickly sear ingredients, which locks in flavor and keeps veggies crunchy.
- Prepping ahead: Chop veggies and mix the sauce in advance for a speedy assembly.
- Substitutions: swap broccoli with broccolini or snap peas,and shrimp for scallops or chicken thighs if preferred.
- Avoid sogginess: Don’t overcrowd the pan; cook in batches if needed to maintain that signature crisp texture.
Serving Suggestions
Present your broccoli shrimp stir fry over a bed of steamed jasmine or brown rice for a comforting meal.For a lighter option, serve alongside cauliflower rice or whole-grain noodles. Garnish with toasted sesame seeds and fresh cilantro or basil to add a fresh herbal note. A wedge of lime on the side invites a bright, zesty finish.
| Nutrient | Per Serving |
|---|---|
| Calories | 320 kcal |
| Protein | 35 g |
| Carbohydrates | 14 g |
| Fat | 10 g |
For a deeper dive into complementary recipes, explore our Quick & Healthy Stir Fries Collection. To understand why shrimp is a powerhouse of nutrition, visit Nutrition.org.

Q&A
Q&A: Sizzling Broccoli Shrimp stir Fry – A Flavorful Quick Meal
Q1: What makes the Sizzling Broccoli shrimp Stir Fry a standout dish?
A1: This dish strikes the perfect balance between vibrant, crisp-tender broccoli and succulent, juicy shrimp, all enveloped in a savory, slightly tangy sauce. It’s a symphony of textures and flavors that sizzle together in minutes, making it both nutritious and irresistibly delicious.
Q2: How quick is this stir fry to prepare?
A2: From chopping to plating, you’re looking at about 20 minutes total! The key is in prepping your ingredients beforehand and using high heat to cook the shrimp and broccoli quickly without losing their freshness or crunch.
Q3: Can I customize the flavors in this stir fry?
A3: Absolutely! Swap out the soy sauce for tamari if you want it gluten-free, add a dash of chili flakes for heat, or sprinkle some toasted sesame seeds and fresh ginger for an extra punch. The recipe is a flexible canvas for your taste buds.Q4: Is this dish healthy?
A4: Yes! Broccoli packs a powerful nutrient punch with fiber, vitamins C and K, while shrimp offers lean protein and omega-3 fatty acids. Cooking everything lightly ensures the nutrients stay intact,making it a wholesome,balanced meal.
Q5: What’s the best way to serve Sizzling Broccoli Shrimp Stir Fry?
A5: Serve it over steamed jasmine rice or fluffy quinoa to soak up the flavorful sauce. Garnish with sliced green onions or a squeeze of fresh lime to brighten the dish even further. It’s equally wonderful as a standalone, low-carb delight.
Q6: Any tips for achieving that perfect sizzle and texture?
A6: Pat your shrimp dry before cooking to get a nice sear. Don’t overcrowd the pan-cook in batches if needed-so everything crisps up just right. Also, preheat your wok or skillet until it’s truly hot; that’s where the magic-the sizzling sound and caramelized flavors-happens.Q7: Can I make this dish ahead of time?
A7: While it’s best enjoyed fresh to retain the shrimp’s tenderness and broccoli’s crunch, you can prepare the sauce and chop the veggies in advance. Just sauté quickly when ready to eat.Leftovers reheat well but might soften a bit.
Q8: What inspired this flavor combination?
A8: This stir fry draws inspiration from classic Asian cooking techniques that highlight fresh ingredients with minimal fuss. The marriage of broccoli’s earthiness and shrimp’s sweet brininess, enriched by a savory sauce, channels home-cooked comfort with a gourmet twist.
Ready to bring some sizzle to your dinner table? This Broccoli Shrimp Stir Fry is proof that quick meals can be bold, fresh, and utterly satisfying. Dive in and savor every vibrant bite!
Wrapping Up
In the whirlwind of busy days and packed schedules, the Sizzling Broccoli Shrimp Stir Fry emerges as a culinary hero-quick to prepare, bursting with vibrant flavors, and nourishing from the first bite to the last. This dish not only masters the art of simplicity but also celebrates the harmony between tender shrimp and crisp broccoli, all enveloped in a savory, sizzling sauce that awakens the palate. Whether you’re a seasoned cook or a kitchen novice, incorporating this recipe into your meal rotation promises a delicious escape that’s both satisfying and healthful. So next time you crave a meal that’s speedy yet sensational,let this stir fry be your go-to-because great food doesn’t have to wait.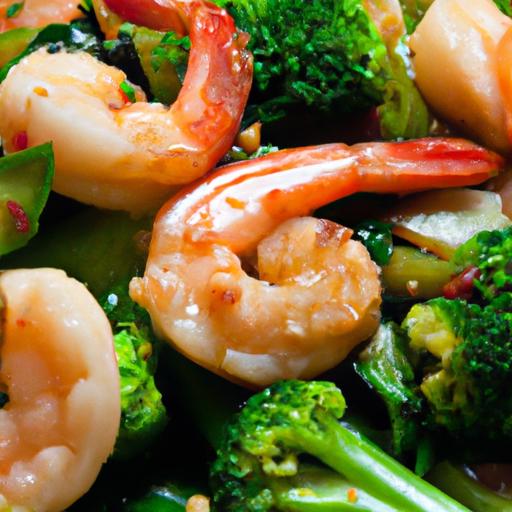
Sizzling Sausage & Shrimp Kabobs: A Flavorful Grill Guide
Sizzling sausage & shrimp kabobs bring together the smoky richness of seasoned sausages and the tender sweetness of fresh shrimp in a perfect harmony of textures and flavors. Inspired by the vibrant coastal grilling traditions, this dish is a festivity of summer evenings, family gatherings, and those unforgettable moments around the fire. Choosing the right ingredients and mastering grilling techniques will take your kabobs from ordinary to extraordinary.
Prep and Cook Time
- preparation: 20 minutes
- Marinating: 30 minutes (optional but recommended)
- Cooking: 12-15 minutes
- Total Time: Approximately 1 hour
Yield
Serves 4 generous portions (3 kabobs per person).
Difficulty Level
Medium – requires basic grilling skills and careful attention to timing for juicy results.
Ingredients
- 12 oz smoked sausage, cut into 1-inch pieces (andouille or kielbasa recommended)
- 16 large shrimp, peeled and deveined (tails on for presentation)
- 2 tbsp olive oil
- 2 cloves garlic, minced
- 1 tbsp smoked paprika
- 1 tsp cayenne pepper (adjust to heat preference)
- 1 tbsp lemon juice, freshly squeezed
- 1 tsp salt
- ½ tsp freshly ground black pepper
- 1 red bell pepper, cut into 1-inch squares
- 1 yellow bell pepper, cut into 1-inch squares
- 1 small red onion, cut into wedges
- Fresh parsley for garnish
Instructions
- Choose the perfect sausage and shrimp: Select sausage with bold seasoning and firm texture to hold up to grilling. For shrimp, opt for fresh or thawed large shrimp – their sweetness complements spice beautifully.
- Prepare the marinade: In a bowl, whisk together olive oil, minced garlic, smoked paprika, cayenne pepper, lemon juice, salt, and black pepper. This marinade infuses both sausage and shrimp with a smoky, zesty depth.
- Marinate the shrimp: Toss shrimp in half of the marinade and refrigerate for 20-30 minutes. Avoid marinating sausage to prevent it from becoming soggy; its natural flavor and texture shine on the grill.
- Preheat the grill: Set your grill to medium-high heat (about 400°F). It’s vital to have hot grates for searing while keeping the kabobs juicy.
- Skewer with care: Alternate sausage pieces, shrimp, bell peppers, and onions on soaked wooden or metal skewers. Space ingredients evenly to promote uniform cooking.
- Grill your kabobs: Place skewers on the grill, turning every 3-4 minutes. The sausage should develop a crispy exterior while the shrimp turn opaque and slightly charred, typically in 12-15 minutes total.
- Baste occasionally: Brush remaining marinade during grilling to build layers of flavor and keep ingredients moist.
- Finish and rest: Remove kabobs from heat and let rest for 3-5 minutes before serving to preserve juices.
- Garnish and serve: Sprinkle fresh parsley for a luminous contrast and serve kabobs with your favorite sides.
Tips for Success
- Marinating magic: While shrimp soak up the marinade beautifully, sausages benefit from a dry surface to crisp up. Keep this balance in mind to enhance every bite on the grill.
- Even skewering: avoid overcrowding; leave slight gaps to ensure heat circulates for even cooking and presentation that’s visually appealing.
- Grill temperature mastery: Medium-high heat delivers the ideal balance between searing and slow cooking, resulting in juicy kabobs that resist toughness.
- Wooden skewers: Always soak them for at least 30 minutes to prevent burning during grilling.
- Customize flavors: Add pineapple chunks or cherry tomatoes for a sweet and tangy twist.
- Make-ahead tip: Pre-cut vegetables and sausage early, then assemble kabobs just before grilling.
Serving Suggestions
Elevate your sizzling sausage & shrimp kabobs by serving over a bed of fragrant cilantro lime rice or alongside grilled corn salad.A dollop of cooling garlic aioli or a sprinkle of freshly chopped cilantro adds intrigue and freshness. Don’t forget a refreshing citrus wedge for that final bright pop.

| Nutrient | Per Serving |
|---|---|
| Calories | 320 kcal |
| Protein | 28 g |
| Carbohydrates | 10 g |
| Fat | 18 g |
for a deeper dive into seafood safety and selection, visit the FDA’s Seafood Safe Food Guide.
Q&A
Q&A: Sizzling Sausage & Shrimp Kabobs – A Flavorful Grill Guide
Q1: What makes sausage and shrimp a winning combo for kabobs?
A1: The magic lies in contrast and harmony. Sausage brings smoky, savory richness, often loaded with spices, while shrimp offer a sweet, tender bite with a hint of ocean freshness. Together, they create a dynamic flavor dance that’s bold, balanced, and downright irresistible on the grill.
Q2: How do I prepare the sausages and shrimp for skewering?
A2: Start with choosing sausages that hold up well on the grill-think smoked or spicy varieties. Slice them into bite-sized chunks, about 1 to 1.5 inches thick. For shrimp, peel and devein, leaving tails on for flair and easy handling. Marinate the shrimp briefly in olive oil, garlic, lemon juice, and herbs to infuse brightness without overpowering the sausage’s robust character.
Q3: Any tips for assembling the kabobs for even cooking?
A3: Absolutely! Alternate sausage pieces with shrimp and colorful veggies like bell peppers, cherry tomatoes, or red onions. This not only adds a vibrant palette to your skewers but also ensures moisture and flavors mingle. Keep pieces evenly sized for uniform grilling, and don’t overcrowd the skewers-space allows heat to circulate and caramelize perfectly.
Q4: What’s the secret to grilling these kabobs to perfection?
A4: Medium-high heat is your best friend-hot enough to sear, but gentle enough to avoid overcooking. Grill for about 3-4 minutes per side, turning carefully. Shrimp cook fast-watch for that gorgeous pink hue and slight firmness-while sausage needs a bit longer to crisp and heat through. Use a brush to baste with marinade or glaze during grilling for extra juicy flavor.
Q5: Can I prepare these kabobs ahead of time?
A5: Definitely! You can marinate shrimp and even assemble your kabobs a few hours in advance, keeping them refrigerated until grill time.Just make sure to pat shrimp dry before grilling to achieve that stunning char. Prepping ahead means more time enjoying the sizzle and less fussing at the grill.
Q6: What sides pair best with these sizzling kabobs?
A6: Think fresh, light, and complementary-grilled corn on the cob, a zesty cucumber salad, or fluffy lemon-herb couscous. Even a tangy yogurt dip or chimichurri can elevate the experience, cutting through the richness while boosting those vibrant grill flavors.
Q7: Any creative twists to try with this basic sausage and shrimp kabob?
A7: The grilling canvas is wide open! Swap customary sausages for chorizo or Italian varieties, experiment with tropical fruit like pineapple or mango for a sweet contrast, or add a smoky chipotle glaze to thrill your taste buds. Don’t forget fresh herbs or a squeeze of citrus at the end for bursts of freshness.
Ready to fire up the grill? These sizzling sausage and shrimp kabobs promise a mouthwatering journey that’s as fun to make as it is to devour. Happy grilling!
Future Outlook
As the last sizzle fades and the tantalizing aroma of sausage and shrimp lingers in the air, your grill masterpiece is ready to delight.These sizzling kabobs aren’t just a meal-they’re a celebration of bold flavors and shared moments around the fire. Weather you’re a seasoned griller or a curious foodie, this flavorful guide equips you with all the tips and tricks to elevate your backyard cookouts. So fire up your grill, skewer those vibrant ingredients, and let every bite transport you to a summer of unforgettable taste and warmth. Happy grilling!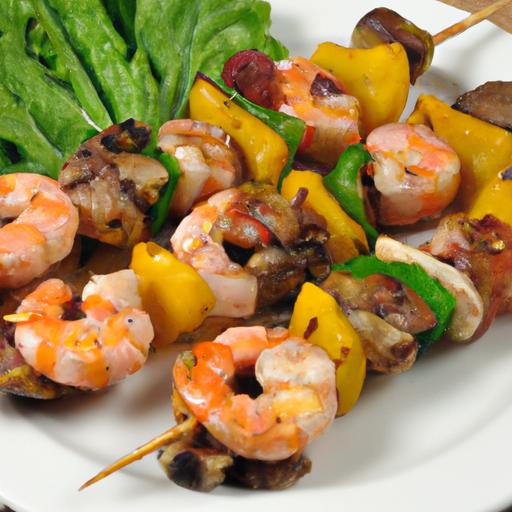
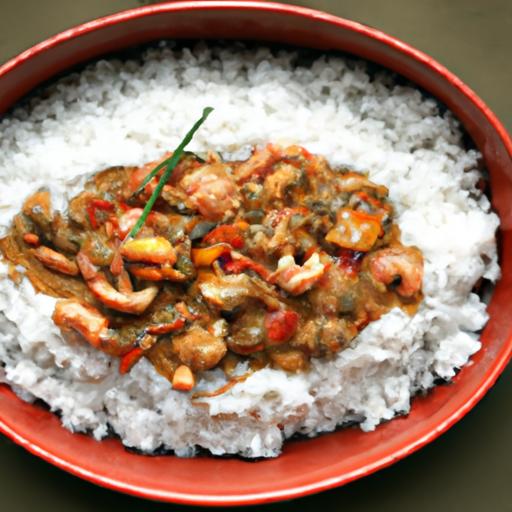
Savoring jambalaya invites you on a vibrant journey through the heart of Louisiana’s culinary soul, where Creole and Cajun traditions meld seamlessly in a single, hearty pot. This classic dish tells a story of cultural fusion, bringing together succulent shrimp, spicy sausage, and fragrant rice cooked in a rich blend of spices and aromatics. Savoring jambalaya is more than a meal-it’s an experience that bursts with layers of flavor, history, and passion.
Prep and Cook Time
Prep Time: 20 minutes
Cook Time: 45 minutes
Yield
Serves 6 hearty portions
Difficulty Level
Medium – Perfect for cooks ready to master those bold flavors and layered textures
Ingredients
- 1 lb andouille sausage, sliced into ½-inch rounds
- 1 lb raw shrimp, peeled and deveined
- 2 cups long-grain white rice
- 1 large onion, finely chopped
- 1 green bell pepper, diced
- 2 stalks celery, diced
- 4 cloves garlic, minced
- 1 can (14.5 oz) diced tomatoes,undrained
- 4 cups chicken stock,preferably low sodium
- 2 teaspoons smoked paprika
- 1 teaspoon dried thyme
- 1 teaspoon cayenne pepper (adjust to taste)
- 2 bay leaves
- 2 tablespoons vegetable oil
- Salt & freshly ground black pepper,to taste
- 2 green onions,sliced thinly for garnish
- Fresh parsley,chopped for garnish
Instructions
- Brown the Sausage: Heat the vegetable oil in a large heavy-bottomed pot over medium heat. Add the andouille sausage slices and sauté until golden and slightly crispy, about 6 minutes. Remove with a slotted spoon and set aside.
- Sauté the Vegetables: In the same pot, add chopped onion, green bell pepper, and celery. Sauté until softened, about 7 minutes, stirring frequently to prevent sticking. Stir in the minced garlic and cook for another minute until fragrant.
- Add Spices and Rice: Stir in smoked paprika, thyme, cayenne pepper, and bay leaves, allowing the spices to bloom for 1 minute. Then add the rice, tossing quickly to coat it with the spices and oil.
- Deglaze and Simmer: Pour in the chicken stock and diced tomatoes with their juices. Stir well,scraping the pot’s bottom to release any flavorful browned bits. Return the browned sausage to the pot. Bring everything to a boil, then reduce heat to low, cover, and simmer gently for 20 minutes, or until the rice is tender.
- Cook the Shrimp: Nestle the shrimp into the cooked jambalaya, cover, and cook for an additional 5-7 minutes until shrimp turn pink and opaque. Taste and adjust seasoning with salt and pepper.
- finish and Garnish: Remove bay leaves. Let the jambalaya rest off the heat for 5 minutes before fluffing it gently with a fork.Sprinkle with sliced green onions and chopped parsley to brighten each serving.
Tips for Success
- Choosing Quality Proteins: Opt for fresh,wild-caught shrimp for optimal texture and flavor. When selecting sausage, authentic smoked andouille adds depth, but spicy kielbasa can be a good substitute if unavailable.
- Spice Balance: Start with moderate cayenne and adjust to your heat preference. Remember, some smoked paprika varieties are stronger, so taste as you season to avoid overpowering the dish.
- Rice Texture: Rinse the rice briefly before adding to remove excess starch, ensuring fluffy grains rather than clumpy.
- Make-Ahead Magic: This dish tastes even better the next day as flavors intensify. Store in an airtight container refrigerated for up to 3 days and reheat gently with a splash of stock.
- Vegetarian Variation: Substitute sausage with smoked tofu or mushrooms and use vegetable stock. Add extra seasoning to maintain boldness.
Serving Suggestions
Serve your jambalaya steaming in rustic bowls to showcase the vibrant colors of the shrimp and sausage nestled within the golden rice. A side of crunchy French bread or crusty baguette is perfect for mopping up every flavorful bite.For a fresh contrast, a crisp green salad tossed with a light vinaigrette adds brightness. Pair with an ice-cold pilsner or a semi-dry white wine such as Riesling to balance the spice and richness on your palate.

| Nutritional Info (per serving) | Amount |
|---|---|
| Calories | 430 |
| Protein | 32g |
| Carbohydrates | 45g |
| Fat | 12g |
To deepen your culinary repertoire, check out our guide to Cajun cooking essentials. For more ancient insights into Creole flavors, the National Park Service’s Cajun and creole Food heritage page is a treasure trove.
Q&A
Q&A: Savoring Jambalaya – A Flavorful Shrimp & Sausage Feast
Q1: What exactly is jambalaya, and where does it come from?
A1: Jambalaya is a vibrant, hearty dish that hails from Louisiana’s rich culinary tapestry, influenced by French, Spanish, and Creole cultures. It’s a one-pot meal where rice mingles with an intoxicating blend of spices,tomatoes,and an assortment of proteins like shrimp and sausage-each bite a celebration of Southern soul and spice.
Q2: Why is shrimp and sausage the perfect pairing for jambalaya?
A2: The smoky, savory depth of sausage beautifully complements the sweet, tender pop of shrimp. Together, they create a harmonious balance of textures and flavors-sausage adds richness and spice while shrimp brings a delicate, briny freshness that keeps each mouthful exciting. It’s like a culinary duet singing the songs of land and sea!
Q3: What are the essential spices and ingredients that give jambalaya its signature flavor?
A3: Key players in the jambalaya flavor symphony include the “holy trinity” of Cajun cooking-bell peppers,onions,and celery-plus garlic,cayenne pepper,smoked paprika,and thyme. The slow-cooked rice soaks up these robust seasonings, while a dash of Worcestershire sauce and a pinch of bay leaves add layers of aromatic complexity.
Q4: can jambalaya be customized for dietary preferences or regional twists?
A4: Absolutely! while the classic shrimp and sausage jambalaya shines on its own, you can easily swap or add chicken, crawfish, or even make a vegetarian version with hearty mushrooms and chickpeas. Spice levels can be tweaked from mild to fiery, and some cook with a splash of Creole tomatoes for tang, or omit them altogether for a drier, darker Rice dish known as Cajun jambalaya.
Q5: What’s the secret to cooking jambalaya that’s flavorful but not mushy?
A5: The trick lies in layering flavors and controlling moisture. Sauté the vegetables and meats separately to build depth, then combine with the rice and broth just enough to let the rice cook through without drowning it. Avoid stirring too much once cooking begins to get that perfect fluffy texture with slightly crisped bits at the bottom-a true hallmark of great jambalaya!
Q6: How can one best serve and enjoy jambalaya to fully appreciate its flavors?
A6: Serve jambalaya piping hot with a garnish of fresh parsley and a squeeze of lemon to brighten the richness. It pairs wonderfully with a crisp, cold beer or a chilled white wine.A side of crusty french bread helps soak up every last spoonful of the savory sauce. Gather friends and family-the joy of jambalaya multiplies when shared!
Q7: Any fun facts or history tidbits about jambalaya that enhance the experience?
A7: Jambalaya likely evolved from paella brought by Spanish colonists but morphed through Creole ingenuity, turning local ingredients into a uniquely Louisiana treasure. The word “jambalaya” may originate from the Provençal word “jambalaia,” meaning a mix or mishmash-perfect for this melting pot of flavors! Eating jambalaya is savoring centuries of cultural fusion in every bite.
Concluding Remarks
As the last tender morsels of shrimp and sausage disappear from your plate, the rich, smoky warmth of jambalaya lingers-an invitation to savor not just a meal, but a story steeped in tradition and vibrant flavors. This hearty dish, with its harmonious blend of spices, textures, and cultures, reminds us that food is more than sustenance; it’s a celebration of heritage and a shared experience around the table. Whether you’re a seasoned cook or a curious newcomer,embracing jambalaya opens the door to a flavorful feast that honors the spirit of Louisiana’s culinary soul. So next time you crave a dish that’s as bold and spirited as it is comforting, remember: a pot of jambalaya is waiting to tell its delicious tale.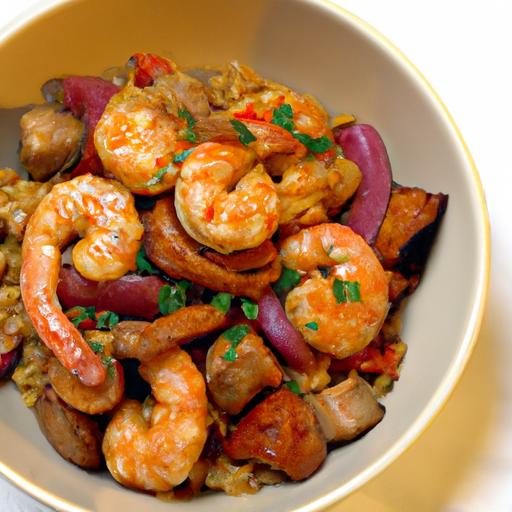
Savor the Flavor: Perfect Grilled Garlic Butter Shrimp Skewers
Savor the flavor of succulent shrimp infused with a luscious garlic butter marinade, kissed by the smoky char of the grill. This dish captures the essence of summer evenings and backyard gatherings, marrying bold, buttery richness with the fresh ocean taste of shrimp. Perfectly balanced and irresistibly fragrant, these skewers are a festivity of simple ingredients elevated through careful preparation.
Prep and Cook Time
- Preparation: 15 minutes
- Marinating: 30 minutes
- Grilling: 8-10 minutes
- Total: Approximately 55 minutes
yield
Serves 4 as an appetizer or light main dish
Difficulty Level
Easy – Perfect for beginners and seasoned grillers alike
Ingredients
- 1 lb large shrimp,peeled and deveined,tails intact
- 4 tablespoons unsalted butter,melted
- 4 garlic cloves,finely minced
- 2 tablespoons fresh lemon juice
- 1 tablespoon finely chopped fresh parsley
- 1 teaspoon smoked paprika
- ½ teaspoon kosher salt
- ¼ teaspoon freshly ground black pepper
- Wooden or metal skewers (if using wooden,soak in water 30 minutes to avoid burning)
- Olive oil for brushing the grill grates
Instructions
- Choose the freshest shrimp for maximum flavor. When selecting shrimp, look for firm, translucent flesh with a mild sea aroma-avoid anything with a strong fishy scent or discoloration. Opt for wild-caught where possible,as it frequently enough offers a superior texture and natural sweetness.
- Craft the ultimate garlic butter marinade. In a medium bowl, whisk together melted butter, minced garlic, lemon juice, paprika, salt, and pepper until vibrant and fragrant. Stir in fresh parsley last to preserve its bright color and aroma.
- Marinate the shrimp. Add shrimp to the marinade, tossing gently to coat all pieces evenly. Cover and refrigerate for 30 minutes to allow the flavors to seep in without over-marinating, which can toughen the shrimp.
- Master the art of skewering for even grilling. Thread 4-5 shrimp per skewer,spacing them about a half-inch apart to ensure even heat distribution. This spacing allows the shrimp to cook uniformly without steaming.
- Preheat the grill. Clean and oil the grill grates with olive oil to prevent sticking. Set the grill to medium-high heat, aiming for a surface temperature around 375°F (190°C).
- Grill the shrimp skewers. place skewers on the grill and cook for about 3-4 minutes per side, turning once until they develop a lovely char and turn opaque pink.Baste occasionally with remaining marinade to enhance juiciness and flavor.
- Serving and final touches. Remove skewers from the grill, let rest for 2 minutes to lock in juices. Garnish with extra chopped parsley and a lemon wedge for squeezing.
Tips for Success
- For an extra flavor boost, add a pinch of red pepper flakes or a dash of cayenne to the marinade for subtle heat.
- If fresh shrimp is unavailable, thaw frozen shrimp thoroughly and pat dry to prevent excess moisture diluting the marinade.
- reserve some marinade before adding raw shrimp to use as a finishing brush during grilling for maximum garlic butter goodness.
- Use metal skewers for ease or soak wooden skewers at least 30 minutes prior to grilling to minimize burning.
- Marinate no longer than 30 minutes-acid in lemon juice can start breaking down the shrimp’s texture if left too long.
Serving Suggestions
These skewers pair beautifully with a crisp green salad, garlic butter rice, or grilled vegetables such as zucchini and bell peppers. For a Mediterranean flair, serve alongside warm pita bread and a dollop of tangy tzatziki. Garnish with fresh herbs like basil or cilantro and a sprinkle of flaky sea salt to highlight the fragrant grilled shrimp.

Nutritional Information
| Calories | Protein | Carbs | Fat |
|---|---|---|---|
| 220 kcal | 28 g | 2 g | 11 g |
Discover more flavorful seafood grilling ideas in our Grilled Seafood Recipes collection. For seafood safety and freshness tips, visit the FDA’s Seafood Safety Guide.
Q&A
Q&A: Savor the Flavor – perfect Grilled Garlic Butter Shrimp skewers
Q1: What makes garlic butter shrimp skewers so irresistible?
A1: its the marriage of succulent shrimp with rich, aromatic garlic butter that creates an unforgettable flavor explosion. The garlic butter seeps into the shrimp during grilling,keeping them juicy while imparting a savory,slightly sweet essence that dances on your taste buds.
Q2: How do I choose the best shrimp for grilling?
A2: for skewers,opt for large,fresh or properly thawed shrimp with shells removed but tails intact for a great grip. Freshness is key-look for shrimp that smell briny and clean, not fishy. Size matters too; large shrimp cook evenly and stay tender without drying out.Q3: Can I prepare the garlic butter marinade ahead of time?
A3: Absolutely! Making your garlic butter marinade a few hours or even a day in advance allows the flavors to meld beautifully.Keep it refrigerated until ready to brush onto your shrimp, and bring it to room temperature before grilling to ensure easy spreading.
Q4: What’s the secret to perfectly grilled shrimp on skewers?
A4: High heat and timing are your best friends. Preheat your grill to medium-high and oil the grates to prevent sticking. Grill shrimp for about 2-3 minutes per side until they turn opaque and develop those gorgeous grill marks. Overcooking shrinks the shrimp and toughens the texture, so watch closely!
Q5: How can I avoid shrimp sticking to the grill?
A5: Marinating shrimp in garlic butter with a bit of oil helps, but don’t stop there. Make sure your grill grates are clean and well-oiled. Also, threading shrimp snugly on skewers and turning them gently will minimize sticking or splitting.
Q6: Are there any creative twists to elevate the classic garlic butter shrimp skewers?
A6: Definitely! Try sprinkling a dash of smoked paprika or chili flakes into your butter for a smoky kick.Fresh herbs like parsley, cilantro, or basil stirred into the butter add vibrant freshness. Serving the skewers over coconut rice or alongside grilled veggies can also turn this treat into a feast.
Q7: What sides pair well with grilled garlic butter shrimp skewers?
A7: Light and zesty sides complement the rich shrimp perfectly. Consider a crisp cucumber salad, lemony quinoa, grilled corn with herb butter, or a tangy mango salsa to brighten each bite.
Q8: Can I grill these shrimp skewers indoors if I don’t have outdoor space?
A8: Yes! Use a grill pan or broiler on high heat to mimic the outdoor grilling effect. The key is to get that speedy sear and caramelization akin to a backyard grill-just monitor closely to prevent overcooking.
Ready to fire up your grill and savor every buttery, garlicky bite? With these tips in your culinary arsenal, your shrimp skewers will go from simple to sensational every time!
To Conclude
As the last succulent bite of these grilled garlic butter shrimp skewers melts away, you’re left not just with a satisfied palate, but with the memory of a perfect harmony between smoky char, rich buttery glaze, and that irresistible garlic punch. whether served at a summer cookout or a cozy weeknight dinner, these skewers prove that simple ingredients, when paired thoughtfully and cooked with care, can create a dining experience that feels both effortless and extraordinary. So next time you fire up the grill, remember: great flavor is just a skewer away. Savor every moment, and let the magic of garlic butter elevate your shrimp to unforgettable heights.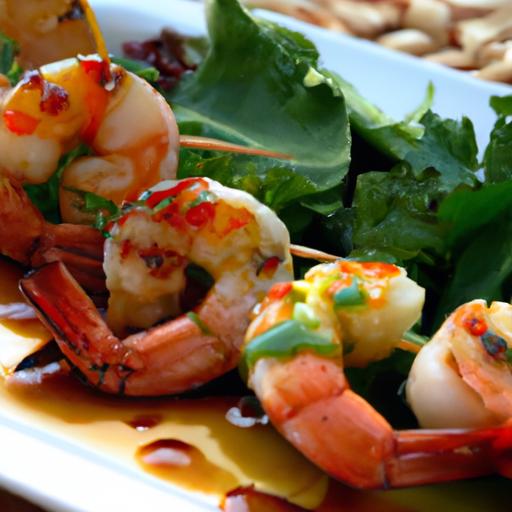
Ingredients that Bring Zesty Shrimp Parmesan Pasta to Life
Zesty Shrimp Parmesan Pasta is an irresistible fusion of fresh shrimp, bright lemon, and creamy Parmesan that turns an ordinary dinner into a festivity of bold, vibrant flavors. This dish captures the essence of coastal Italian cooking with a tangy lemon garlic sauce that perfectly complements each succulent bite.
Prep and Cook Time
- Preparation: 15 minutes
- Cooking: 20 minutes
- Total: 35 minutes
Yield
Serves 4 generous portions
Difficulty Level
Easy – Perfect for weeknights or impressing guests without the fuss.
Ingredients
- 12 oz linguine or spaghetti pasta
- 1 lb large shrimp, peeled and deveined
- 4 tbsp unsalted butter
- 3 tbsp extra virgin olive oil
- 5 cloves garlic, finely minced
- 1/2 cup freshly grated Parmesan cheese
- Zest and juice of 2 large lemons
- 1/2 cup dry white wine (optional, see tips)
- 1/4 tsp crushed red pepper flakes
- 1/2 cup fresh parsley, chopped
- Salt and freshly ground black pepper, to taste
- 1/4 cup reserved pasta water
step by Step Techniques for Succulent Shrimp and Al Dente Pasta
- Cook the pasta: Bring a large pot of salted water to a boil. add the linguine and cook until just shy of al dente, about 8 minutes. Reserve 1/4 cup pasta water, then drain and set aside.
- Sear the shrimp: In a large skillet, heat 2 tablespoons of butter and 2 tablespoons of olive oil over medium-high heat. add the shrimp in a single layer.Sauté until pink and opaque, about 2 minutes per side. Season with salt and pepper. Remove shrimp and set aside.
- Build the lemon garlic sauce: Reduce heat to medium. Add remaining butter and olive oil to the skillet. Toss in minced garlic and crushed red pepper flakes, stirring until fragrant, about 1 minute (avoid browning the garlic).
- Deglaze the pan: Carefully pour in white wine, scraping the pan’s fond to release all flavor. Let it simmer until reduced by half, about 3 minutes. Add lemon zest and lemon juice, stirring to combine for a bright, tangy kick.
- Combine pasta and sauce: Add cooked pasta to the skillet, tossing to coat evenly. Pour in reserved pasta water a little at a time to create a silky sauce that clings perfectly to each strand.
- Incorporate Parmesan and shrimp: Sprinkle Parmesan cheese over pasta, tossing to melt and thicken the sauce. Return shrimp to the pan,folding gently to reheat without overcooking.
- Final touches: Stir in chopped parsley and adjust seasoning with salt and pepper to taste. Serve immediatly for maximum freshness and flavor.
Expert Tips for Garnishing and Serving Yoru Lemon Garlic Delight
- For a fresh herbal note, sprinkle extra parsley or basil just before serving.
- A light drizzle of high-quality olive oil elevates the dish’s richness beautifully.
- To add crunch, garnish with toasted pine nuts or a sprinkle of crispy breadcrumbs.
- Serve alongside a crisp green salad and crusty garlic bread for a complete meal.
- Pair with a chilled Sauvignon Blanc or Pinot grigio to accentuate the zesty lemon tones.
Chef’s Notes
- Don’t overcook the shrimp-removing them promptly keeps them tender and juicy.
- White wine is optional but adds depth; substitute with low-sodium chicken broth if preferred.
- Use freshly grated Parmesan rather than pre-grated for the best melting texture and flavor.
- Make ahead tip: Prepare the sauce and shrimp separately,then quickly toss with freshly cooked pasta just before serving.
- For a gluten-free option, substitute linguine with gluten-free pasta varieties like rice or chickpea pasta.
Serving Suggestions
Serve this vibrant pasta on warm plates, correcting a sprinkle of parmesan and a lemon wedge on the side to let guests customize their tangy experience. For a colorful contrast, add halved grape tomatoes or roasted asparagus alongside. This dish shines best fresh but pairs remarkably with a light glass of crisp white wine-perfect for al fresco dining or cozy dinners alike.

| Nutrient | Per Serving |
|---|---|
| Calories | 450 kcal |
| Protein | 35 g |
| Carbohydrates | 40 g |
| Fat | 15 g |
For more delicious seafood pasta creations, check out our Creamy garlic Shrimp Pasta recipe. To deepen your knowledge of lemon’s culinary uses, consult the expert advice from Serious Eats.
Q&A
Q&A: Zesty Shrimp Parmesan Pasta – A Lemon Garlic Delight Recipe
Q1: What makes this Zesty Shrimp Parmesan Pasta recipe stand out from other pasta dishes?
A1: This recipe combines the bright, invigorating flavors of fresh lemon and garlic with succulent shrimp and creamy Parmesan, creating a perfect balance of zest and richness.It’s not your everyday pasta – it’s a vibrant, quick, and elegant dish that wakes up your taste buds with every bite.
Q2: Can I substitute the shrimp with another protein?
A2: Absolutely! While shrimp is the star here, you can swap it for chicken, scallops, or even tofu for a vegetarian twist. Each option will bring a different texture but the lemon-garlic-Parmesan trio will continue to shine.
Q3: How do I ensure the shrimp is cooked just right?
A3: Shrimp cooks incredibly fast – usually 2-3 minutes per side. Look for a firm texture and an opaque pink colour. Overcooking makes shrimp rubbery,so keep a close eye to maintain that tender,juicy bite.
Q4: What type of pasta works best in this dish?
A4: The recipe shines with long,thin pastas like linguine,spaghetti,or fettuccine which beautifully twirl around the shrimp and capture the lemon-garlic sauce. But feel free to experiment with penne or rigatoni for something heartier.
Q5: Is this dish spicy or mild?
A5: By nature, it’s bright and zesty but mild on heat. However, if you love a little kick, adding crushed red pepper flakes during the garlic sauté will elevate it with a subtle spicy warmth.
Q6: Can I prepare this Zesty Shrimp Parmesan Pasta ahead of time?
A6: Shrimp and fresh pasta dishes are best enjoyed fresh to keep the texture lively. That saeid, you can prep the sauce base in advance or clean and marinate the shrimp ahead for a speedy weeknight meal.
Q7: What sides and drinks pair well with this lemon garlic delight?
A7: A crisp green salad or roasted asparagus complements the zesty flavors wonderfully.For drinks,a chilled Sauvignon Blanc or a sparkling lemonade will echo the fresh citrus notes beautifully.
Q8: How can I make this recipe healthier?
A8: Use whole wheat or gluten-free pasta for added fiber, swap heavy cream with a light Greek yogurt or almond milk, and increase the amount of fresh herbs and vegetables to pack extra nutrients without sacrificing flavor.
Q9: Any tips for getting the perfect lemon garlic flavor without it overpowering the shrimp?
A9: Use fresh lemon zest and juice sparingly at first- you can always add more. Also, gently cooking the garlic in olive oil releases flavor without burning it, which keeps the taste balanced and fragrant.
Q10: What inspired the creation of this recipe?
A10: The desire to marry classic Italian comfort with bold, fresh summer flavors inspired this dish. It celebrates the simplicity of fresh ingredients elevated through bright lemon and savory Parmesan, turning an everyday meal into a delightful experience.
To Wrap It Up
In the vibrant world of pasta dishes, the Zesty Shrimp Parmesan Pasta stands out as a true celebration of bold flavors and simple elegance. With the bright burst of lemon, the savory depth of garlic, and the satisfying richness of Parmesan, this recipe transforms everyday ingredients into a culinary delight.Whether you’re cooking for a weeknight dinner or impressing guests at a weekend gathering, this lemon garlic masterpiece promises to deliver a fresh, zesty punch that’s as nourishing as it is indeed delicious. So,next time you crave a dish that’s both comforting and invigorating,let this shrimp parmesan pasta be your go-to – a perfect harmony of zest and savor in every bite.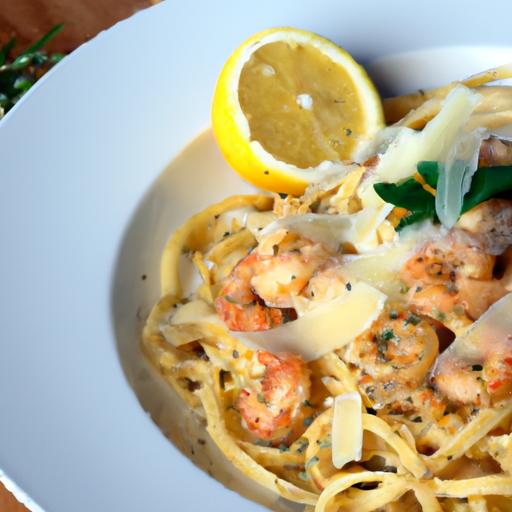
Unlocking Olive Garden’s Shrimp Scampi begins with understanding the delicate dance between garlic butter and white wine sauce, creating a deliciously aromatic base that coats tender shrimp to perfection. This iconic italian-American dish captures the heart with its radiant, zesty notes and irresistible buttery richness-qualities that make every forkful a moment to savor. Whether you’re recreating a beloved restaurant favorite or elevating your weeknight dinner, mastering these secret ingredients unlocks a world of flavor and texture that feels both familiar and extraordinary.
Prep and Cook Time
- Preparation: 15 minutes
- Cooking: 10 minutes
- Total Time: 25 minutes
Yield
- Serves 4 generous portions
Difficulty Level
- Medium – ideal for confident beginners and intermediate home cooks
Ingredients
- 1 lb large shrimp, peeled and deveined, tail-on for presentation
- 4 tbsp unsalted butter, divided
- 3 tbsp extra virgin olive oil
- 5 cloves garlic, finely minced
- ½ cup dry white wine (such as Pinot Grigio or Sauvignon Blanc)
- 1 lemon, zested and juiced
- ¼ cup fresh flat-leaf parsley, finely chopped
- ¼ tsp red pepper flakes (optional, for subtle heat)
- Salt and freshly ground black pepper, to taste
- 8 oz linguine or angel hair pasta, cooked al dente
Instructions
- Prepare the pasta: Cook linguine according to package instructions until al dente. Reserve ½ cup of pasta cooking water, drain, and set aside.
- Sauté the garlic: In a large skillet over medium heat, melt 2 tablespoons of butter with the olive oil.Add minced garlic and red pepper flakes, stirring until fragrant and golden but not burnt, about 1-2 minutes.
- Cook the shrimp: Increase heat to medium-high. Add shrimp in a single layer, seasoning with salt and black pepper. Sauté for 1-2 minutes per side until pink and opaque. avoid overcrowding to ensure even cooking.
- Deglaze the pan: Pour in the white wine, scraping up any browned bits from the skillet’s bottom. Let it simmer gently until reduced by half, about 3-4 minutes-this reduction intensifies the flavor backbone of the sauce.
- Finish the sauce: Stir in remaining butter, lemon zest, and lemon juice. Add chopped parsley, mixing until the sauce emulsifies into a glossy coating.
- Toss with pasta: Add the drained pasta to the skillet along with reserved pasta water. Toss continuously to lift and marry the flavors, ensuring each strand glistens with sauce. Adjust salt and pepper to taste.
- Serve instantly: Plate the shrimp scampi with a sprinkling of extra parsley and a lemon wedge for garnish. For an elevated touch, drizzle a little high-quality olive oil on top.
Tips for Success: mastering the Perfect Balance
- Use fresh shrimp: Freshness directly impacts the texture and flavor. Wild-caught shrimp frequently enough yield better taste and a firmer bite than frozen.
- Don’t overcook shrimp: Shrimp cooks quickly; overcooking results in a rubbery texture. Pull them from heat as soon as they turn pink and curl.
- Choose a quality white wine: The wine’s acidity and depth add brightness and complexity. avoid cooking wines; instead, select something you’d enjoy drinking.
- Add pasta water gradually: This starchy liquid helps bind the sauce to the noodles, making a silky finish that clings beautifully.
- Experiment with fresh herbs: Alongside parsley, basil or chives add depth. For a zesty twist, a touch of fresh tarragon or thyme amplifies the savory notes elegantly.
- Make ahead: Prep shrimp and garlic butter sauce separately, then combine last minute to preserve tenderness.
Serving Suggestions
Serve this scampi atop a bed of perfectly twirled linguine or angel hair pasta that soaks up every drop of garlic-butter sauce. Garnish with vibrant parsley and a fresh lemon wedge to add a lively contrast. Complement the meal with Italian crusty bread to mop up the luscious sauce and a crisp green salad dressed lightly with balsamic vinegar.
For an indulgent twist, drizzle a few drops of high-quality extra virgin olive oil or sprinkle finely grated Parmesan cheese just before serving. Pair with a chilled glass of Sauvignon Blanc or your favorite crisp white wine to mirror the flavors in the dish.
| Nutrition | per Serving |
|---|---|
| Calories | 380 kcal |
| Protein | 32g |
| Carbohydrates | 25g |
| fat | 15g |

Ready to dive deeper into Italian-american classics? Check out our Homemade Olive Garden Fettuccine Alfredo Recipe. For further culinary inspiration,explore the [Serious Eats guide on shrimp](https://www.seriouseats.com/how-to-cook-shrimp) for tips on achieving perfect seafood texture.
Q&A
Q&A: Unlocking Olive Garden’s Shrimp Scampi – A Flavor Dive
Q1: What makes Olive Garden’s Shrimp Scampi so irresistible?
A1: Olive Garden’s Shrimp Scampi is a harmonious blend of tender shrimp sautéed to perfection, mingling with a buttery garlic sauce that’s both rich and bright. The secret lies in the balance-just the right amount of lemon zest and white wine infuse the dish with a zesty freshness, while fresh parsley adds a vibrant, herbaceous finish. Combined with al dente pasta, it’s a dish that dances on your palate.Q2: How dose Olive Garden achieve that silky, buttery sauce?
A2: The magic starts with melting real butter and slowly cooking minced garlic to release its aromatic essence without bitterness. White wine is then deglazed into the pan,lifting all the caramelized flavors from the shrimp. Creamy yet light, the sauce is finished with a splash of fresh lemon juice, which cuts through the richness and adds brightness, resulting in a luscious coating that clings lovingly to every strand of pasta.
Q3: Can you describe the shrimp’s role in the flavor profile?
A3: The shrimp are the stars of the show-plump,juicy,and slightly sweet. They’re seared just right to develop a subtle caramelization that enhances their natural flavor while keeping them tender. This slight crispness contrasts beautifully with the silky sauce and the gentle tang of the lemon, creating layers of taste that keep you coming back for more.
Q4: Is there a particular type of pasta Olive Garden uses, and why?
A4: Olive Garden uses a delicate linguine, which is the perfect noodle for Shrimp Scampi. Its flat, narrow shape allows the buttery garlic sauce to cling effortlessly, ensuring every bite bursts with flavor. The linguine’s tender yet firm texture provides a satisfying mouthfeel that complements the softness of the shrimp without overpowering it.
Q5: How can home cooks replicate Olive Garden’s Shrimp Scampi at home?
A5: Key tips include using fresh, high-quality shrimp and real butter-not margarine-for that authentic richness. Don’t rush the garlic; sauté it gently to avoid bitterness. Deglaze with a crisp white wine, and don’t forget a good squeeze of fresh lemon juice to brighten the dish. Serve immediatly over perfectly cooked linguine and garnish with fresh parsley for that final pop of colour and flavor. Patience and balance are your best friends!
Q6: Why does fresh lemon juice play such a crucial role in this dish?
A6: Fresh lemon juice is the unsung hero, cutting through the richness of butter and garlic to deliver a refreshing tang that enlivens every element on the plate. It creates a beautiful contrast, awakening your taste buds and preventing the dish from feeling too heavy or one-dimensional.
Q7: What makes Olive Garden’s Shrimp Scampi stand out compared to other versions?
A7: Olive Garden’s version strikes the perfect equilibrium between comfort and sophistication. It’s neither overly greasy nor bland.Instead, it skillfully layers savory, bright, and fresh notes, creating a multi-dimensional flavor experience that feels both indulgent and approachable-accessible gourmet dining in a bowl.
Q8: Can this dish be modified for dietary preferences without losing its essence?
A8: Absolutely! For a lighter take, you can reduce the butter slightly and substitute zucchini noodles for linguine. For a dairy-free version, swap butter for olive oil and use gluten-free pasta. The essence remains intact as long as you keep the fresh garlic,lemon,and quality shrimp front and center.
Unlocking Olive Garden’s Shrimp Scampi is like uncovering a treasure chest of culinary delight-each ingredient plays a purposeful role, culminating in a dish that’s as comforting as it is captivating. Dig in and savor the symphony of flavors!
The Conclusion
As we close the chapter on olive Garden’s Shrimp Scampi, it’s clear that this dish is more than just a plate of pasta-it’s a harmonious blend of flavors that tells a story of tradition, technique, and a touch of Italian flair. Whether you’re recreating this classic at home or simply savoring it on your next visit,understanding the ingredients and methods behind it elevates every bite. So next time you twirl those tender shrimp and al dente noodles, remember: you’re not just enjoying a meal-you’re unlocking a flavorful experience crafted with care and passion. Buon appetito!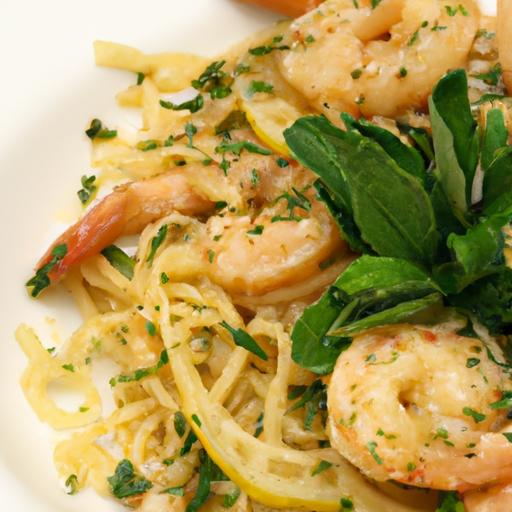
Savory Garlic Butter Shrimp Pasta is the ultimate fusion of simple ingredients that deliver a rich, comforting experience with every forkful. This dish brings together succulent shrimp bathed in a luxurious garlic butter sauce,paired perfectly with al dente pasta that soaks up every bit of flavor. Inspired by coastal Italian kitchens, this recipe celebrates fresh seafood and bold seasonings, making it an irresistible meal for casual dinners or special occasions alike.
Prep and Cook Time
Preparation: 10 minutes
Cooking: 15 minutes
Total Time: 25 minutes
Yield
Makes 4 generous servings
Difficulty Level
Easy – Perfect for cooks of all skill levels
Ingredients
- 12 oz linguine or fettuccine pasta
- 1 lb large shrimp, peeled and deveined
- 4 tbsp unsalted butter, divided
- 6 cloves garlic, minced
- ¼ cup dry white wine (optional)
- ½ tsp red pepper flakes (adjust to taste)
- Salt and fresh ground black pepper, to taste
- 2 tbsp fresh parsley, finely chopped
- Juice of 1 lemon
- ¼ cup freshly grated Parmesan cheese
- 2 tbsp olive oil
Instructions
- Cook the pasta: Bring a large pot of salted water to a boil. Add the linguine and cook until al dente, about 8-10 minutes. Drain, reserving ½ cup of pasta water, and set aside.
- Prepare the shrimp: Pat shrimp dry with paper towels and season lightly with salt and pepper.
- Sauté the shrimp: In a large skillet over medium-high heat, heat 1 tablespoon of butter and 2 tablespoons of olive oil. Add the shrimp in a single layer and cook until pink and opaque,about 2 minutes per side. Remove shrimp and set aside.
- Make the garlic butter sauce: Reduce heat to medium, add remaining 3 tablespoons of butter. Once melted, stir in minced garlic and red pepper flakes. Sauté gently until fragrant, about 1 minute-be careful not to burn the garlic.
- Deglaze the pan: Pour in the white wine and simmer until reduced by half, about 2-3 minutes.(Skip this step if abstaining from alcohol; substitute with ¼ cup low-sodium chicken broth.)
- combine shrimp and pasta: Return cooked shrimp to the pan, then add drained pasta. Toss everything together, adding pasta water little by little to create a silky sauce that coats the strands perfectly.
- Finish with lemon and Parmesan: Stir in lemon juice, chopped parsley, and grated Parmesan cheese. Adjust salt and pepper to taste.
- Serve promptly: plate the pasta with shrimp, making sure each serving includes a generous amount of sauce for that truly rich flavor.
Tips for Success
- Use the freshest garlic possible for the most aromatic sauce-avoid pre-minced jars when possible.
- Don’t overcook the shrimp; they become tough and rubbery quickly. Look for that firm, opaque pink color.
- If you prefer a creamier sauce, add a splash of heavy cream right after the wine reduction step.
- Reserve some pasta water-it’s your best friend for adjusting sauce consistency without watering down flavors.
- This dish can be made ahead by prepping shrimp and sauce separately; reheat gently to maintain texture.
Serving Suggestions
plate this garlic butter shrimp pasta with a fresh green salad tossed in a light vinaigrette to cut through the richness. A crusty baguette or garlic bread on the side is ideal to mop up any extra sauce. Garnish with an extra sprinkle of parsley and Parmesan for a visually stunning presentation and an extra layer of fresh flavor. For an elegant touch, add a lemon wedge on the side to brighten each bite.

| nutrient | Per Serving |
|---|---|
| Calories | 520 kcal |
| Protein | 35 g |
| Carbohydrates | 45 g |
| Fat | 18 g |
For more delightful seafood pasta recipes, check out our Creamy Lemon Garlic Scallop Pasta. To explore the science behind perfect shrimp cooking times, visit Serious Eats.
Q&A
Q&A: savory Garlic Butter Shrimp Pasta – A Flavorful Delight
Q1: What makes savory garlic butter shrimp pasta so irresistible?
A1: It’s the harmonious blend of rich, velvety butter, aromatic garlic, succulent shrimp, and perfectly cooked pasta that creates a symphony of flavors. Each bite bursts with savory goodness, balanced by the subtle sweetness of shrimp and the fragrant punch of garlic-a true taste sensation.
Q2: Can you describe the flavor profile of this dish?
A2: Imagine buttery warmth layered with the pungent zest of garlic, kissed by a hint of lemon zest or juice for brightness. The shrimp adds a tender, slightly sweet seafood essence, while the pasta acts as the comforting canvas. together, they form a luscious, well-rounded dish that’s both comforting and gourmet.Q3: how easy is it to prepare savory garlic butter shrimp pasta at home?
A3: Surprisingly easy! With basic ingredients like shrimp, garlic, butter, olive oil, pasta, and a few seasonings, you can whip up this dish in under 30 minutes. It’s perfect for weeknight dinners or when you want to impress with minimal effort.
Q4: What type of pasta works best in this recipe?
A4: Traditional spaghetti or linguine are classic choices, as their long, slender strands beautifully twirl with the garlic butter sauce and shrimp. Though, fettuccine or even penne can work wonderfully, soaking up the buttery, garlicky goodness.
Q5: Are there any tips for cooking the shrimp perfectly?
A5: Absolutely! Use fresh or thawed shrimp,deveined and peeled for best results. Cook them quickly over medium-high heat until they turn pink and opaque-about 2 minutes per side. Overcooking makes shrimp rubbery, so keep a close watch!
Q6: Can this dish be customized to suit dietary preferences?
A6: Definitely. For a lighter version, swap butter for olive oil or a plant-based choice. Gluten-free pasta options work well, and you can add veggies like spinach or cherry tomatoes for extra nutrition and color. Spicing it up with red pepper flakes adds a delightful kick.
Q7: What sides or drinks pair well with garlic butter shrimp pasta?
A7: A crisp green salad with a tangy vinaigrette complements the richness. Garlic bread or crusty baguette is perfect for sopping up sauce. As for drinks, a chilled Sauvignon Blanc or a light, citrusy beer enhances the seafood flavors beautifully.
Q8: How can leftover garlic butter shrimp pasta be stored and reheated?
A8: Store leftovers in an airtight container in the refrigerator for up to 2 days. Reheat gently on the stovetop with a splash of olive oil or broth to restore moisture,or use a microwave at medium power,stirring occasionally to heat evenly.
Q9: Is garlic butter shrimp pasta suitable for special occasions?
A9: Absolutely! its elegant appearance and rich taste make it a fantastic choice for dinner parties or romantic meals. Pair with a simple dessert and a good bottle of wine, and you have a memorable feast that’s sure to impress.
Q10: Any final tips for making the ultimate savory garlic butter shrimp pasta?
A10: Fresh ingredients are key-garlic shoudl be fragrant, shrimp fresh, and butter real. Don’t rush the sauce; let the butter and garlic meld gently. finish with freshly chopped parsley and a squeeze of lemon to brighten the dish. Simple steps, extraordinary flavor!
Future Outlook
In the grand tapestry of comfort food, Savory Garlic Butter Shrimp Pasta weaves together simplicity and sophistication in every bite. This dish doesn’t just satisfy hunger-it tells a story of rich, buttery indulgence balanced by the bright warmth of garlic and the delicate sweetness of shrimp. Whether you’re crafting a quick weeknight meal or impressing friends at a dinner party, this flavorful delight offers a perfect harmony of textures and tastes that linger long after the last forkful.So next time you crave something both elegant and effortlessly delicious, remember that this pasta is more than a recipe-it’s an experience worth savoring.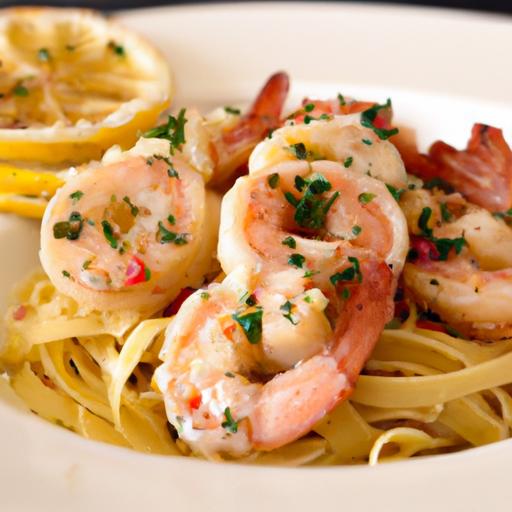
Crab and shrimp Étouffée is a beloved hallmark of Cajun cuisine, capturing the soul of Louisiana with its deeply layered flavors and comforting textures. This dish bursts with the briny sweetness of fresh seafood combined with the earthy, smoky warmth of a perfectly crafted roux. it’s a celebration of tradition, made approachable for every home cook eager to bring a taste of the bayou to their table.
Prep and Cook Time
- Preparation: 20 minutes
- Cooking: 45 minutes
- Total Time: 1 hour 5 minutes
Yield
Serves 4 generous portions
difficulty Level
Medium – Ideal for cooks familiar with basic sauce techniques and ready to hone their skills.
Ingredients
- 1/2 cup unsalted butter
- 1/2 cup all-purpose flour, sifted
- 1 cup yellow onions, finely diced
- 1/2 cup green bell pepper, finely diced
- 1/2 cup celery, finely diced
- 4 garlic cloves, minced
- 2 cups seafood stock or low-sodium chicken broth
- 1 (14-ounce) can diced tomatoes, drained
- 1/2 teaspoon smoked paprika
- 1/2 teaspoon cayenne pepper (adjust to taste)
- 1 teaspoon dried thyme
- 1 teaspoon dried oregano
- 1 bay leaf
- Salt and freshly ground black pepper, to taste
- 1 pound fresh crab meat, picked through for shells
- 1/2 pound large shrimp, peeled and deveined
- 2 tablespoons green onions, sliced
- Cooked white rice, for serving
- Hot sauce (optional), for garnish
Instructions
- Start the Roux: In a large, heavy-bottomed skillet or Dutch oven, melt the butter over medium heat. Gradually whisk in the flour, stirring constantly to avoid lumps. Continue to cook, stirring frequently, until the roux takes on a deep golden brown color-this usually takes about 10-12 minutes. Patience here is key; don’t rush or burn it.
- Add the Holy Trinity: Instantly add onions,bell pepper,and celery to the roux. Sauté until vegetables are tender and translucent, about 5 minutes. Stir in the minced garlic and cook for an additional minute until fragrant.
- Build the Flavor Base: Slowly whisk in the seafood stock a little at a time, incorporating it fully to avoid lumps. Add the drained diced tomatoes, smoked paprika, cayenne, thyme, oregano, and bay leaf.Stir well and bring to a gentle simmer. Let it cook uncovered for 20 minutes,allowing the flavors to meld and the sauce to thicken slightly.
- Seafood Time: Gently fold in the fresh crab meat and shrimp. Cook just until the shrimp turn pink and opaque, approximately 5-7 minutes. Be gentle to keep the crab lumps intact for a beautiful texture.
- Final Touches: Season generously with salt and freshly ground black pepper. Remove the bay leaf. Stir in sliced green onions right before serving for a fresh pop of color and mild bite.
- Serve: Spoon the piping hot étouffée over fluffy white rice. Garnish with extra green onions and a dash of hot sauce if desired for a spicy kick.
Tips for Success
- Freshness matters: Select crab meat that is moist and sweet-smelling, free of any fishy odor. For shrimp,look for firm,translucent bodies with intact shells if buying whole.
- Mastering roux: use medium heat and constant stirring with a wooden spoon to prevent burning. A burnt roux will impart a bitter taste.
- Roux color guide: Aim for a peanut butter color for the best balance of flavor and thickening power-too dark can be bitter, too light may lack depth.
- Make-ahead: Prepare the roux base and vegetables a day in advance, store refrigerated, and add seafood fresh when ready to serve.
- Adjust heat: Cajun spice levels vary; start with less cayenne and add as you go to suit your taste buds.
Serving Suggestions
This Crab and Shrimp Étouffée shines best when served over steaming hot white rice, which absorbs the luscious sauce beautifully. Add a side of crispy Cajun cornbread to soak up every flavorful drop. For vibrant color and extra zest, garnish with freshly chopped parsley or green onions. Pair your meal with a chilled glass of dry white wine or a cold, refreshing lager to balance the richness.
Consider serving a simple side of sautéed greens or a crisp garden salad dressed with a light vinaigrette to add brightness and texture contrast.
Nutritional Information
| Per Serving | Calories | Protein | Carbohydrates | Fat |
|---|---|---|---|---|
| Crab and Shrimp Étouffée | 370 kcal | 32 g | 22 g | 15 g |

Explore more about Cajun cooking techniques at Louisiana Travel Official Cajun Guide.
Q&A
Q&A: Crab and Shrimp Étouffée – A Flavorful Cajun Classic Recipe
Q1: What is étouffée, and why is it so iconic in Cajun cuisine?
A1: Étouffée, pronounced “ay-too-fay,” is a beloved Cajun dish whose name means “smothered” in French. It’s a rich, comforting stew where seafood or meat is cooked in a deeply flavored roux-based sauce with the “holy trinity” of Cajun cooking: onions, bell peppers, and celery. the result? A luscious, savory dish bursting with southern charm and coastal zest.
Q2: Why choose crab and shrimp for this étouffée recipe?
A2: Crab and shrimp bring the best of the gulf Coast’s bounty straight to your plate. The sweetness and delicate texture of crab meat paired with the firm, juicy bite of shrimp create a harmonious blend of flavors.Together, they elevate étouffée from simple comfort food to a festive, crowd-pleasing delicacy.
Q3: What’s the secret behind a perfect étouffée roux?
A3: Patience is the key. The roux-a mix of flour and fat-is cooked slowly until it reaches a rich, peanut butter color, which gives the étouffée its signature depth and earthiness. Rushing this step can lead to a raw flour taste or burnt notes. Stir constantly, keep your heat moderate, and let the aroma guide you.
Q4: Can I make étouffée without traditional cajun spices?
A4: While the holy trinity and roux define étouffée, the Cajun spices like cayenne, paprika, and thyme add soul to the dish. If you’re unfamiliar or prefer milder flavors, start with a lighter hand and adjust. The beauty of étouffée is its adaptability; you can craft it to suit personal tastes while honoring its roots.
Q5: What should I serve with crab and shrimp étouffée?
A5: White rice is the classic partner, soaking up that savory sauce perfectly.For a twist, serve it over creamy grits or crusty French bread.A crisp green salad or sautéed greens on the side can balance the richness and add freshness to your meal.
Q6: Is étouffée complicated to prepare at home?
A6: Not at all! While there are a few steps that demand attention-like making the roux and simmering the sauce-the overall process is approachable for home cooks. With a good recipe and a bit of patience, you’ll have a bowl of soulful Cajun comfort that’s sure to impress friends and family.
Q7: How do I store and reheat leftover étouffée?
A7: Cool leftovers quickly, store in an airtight container, and refrigerate for up to 3 days. To reheat, warm gently on the stovetop over low heat, stirring frequently to maintain the sauce’s silky texture. You might need to add a splash of broth or water to loosen it up.
Q8: Can I swap crab and shrimp for other proteins?
A8: Absolutely! Étouffée is versatile. Crawfish tails, chicken, or even sausage can take center stage. Just adjust cooking times accordingly, and enjoy this adaptable taste of Louisiana wherever you are.
Ready to dive into making this Crab and Shrimp Étouffée? Embrace the Cajun spirit, savor every spoonful, and bring a little Louisiana magic to your kitchen!
Concluding Remarks
As the rich, savory aroma of crab and shrimp étouffée fills your kitchen, you’re not just cooking a meal-you’re savoring a vibrant slice of Cajun culture. This flavorful classic, with its perfectly simmered roux and tender seafood, invites you to experience the heart of Louisiana’s culinary heritage in every bite. Whether you’re a seasoned chef or a curious food lover,making this dish at home is a delicious journey into bold spices,soulful traditions,and the magic that happens when fresh ingredients meet time-honored technique.So next time you crave a meal that warms both the body and spirit, let crab and shrimp étouffée be your flavorful guide to the Bayou’s beloved table.