Miso Soup Magic begins with the soulful crafting of authentic miso broth-a cornerstone of Japanese culinary tradition that transforms humble ingredients into a deeply comforting experience. Rooted in centuries of regional heritage, each miso variety brings its own personality to the bowl, inviting you to explore a spectrum of umami nuances from the sweet and delicate to the robust and hearty. Drawing from my years as a culinary content creator and food stylist, this guide will inspire you to master this savory superbroth, imbuing your kitchen with the warmth and wisdom of Japan’s timeless technique.
Prep and Cook Time
- Prep Time: 15 minutes
- Cook Time: 20 minutes
- Total Time: 35 minutes
Yield
- Serves 4
Difficulty Level
- Easy to Medium – Perfect for adventurous home cooks eager to deepen their understanding of customary Japanese flavors.
Ingredients
- 6 cups water (preferably filtered)
- 1 piece kombu (dried kelp), 4×4 inches
- 1 cup bonito flakes (katsuobushi)
- 4 tablespoons white or yellow miso paste (shiro or shinshu miso for mild flavor)
- 2 tablespoons red miso paste (aka miso for depth and complexity)
- 100g silken tofu, cubed
- 2 scallions, thinly sliced
- 1/2 cup wakame seaweed, soaked and drained
- 1 teaspoon sake or mirin (optional, to enhance sweetness)
- 1 teaspoon toasted sesame oil (optional, for richness)
- Pinch of white pepper (optional)
Instructions
- Prepare the dashi base: Place the kombu in cold water in a medium pot. Slowly bring to a simmer over medium heat, around 10 minutes.Remove the kombu right before the water boils to avoid bitterness.
- Add bonito flakes: Once kombu is removed, bring water to a gentle boil and add bonito flakes.Let simmer for 1-2 minutes, then turn off heat and let flakes steep 10 minutes to extract maximum flavor.
- Strain the dashi: Using a fine mesh sieve or cheesecloth, strain the liquid into a clean pot. Discard the bonito flakes (or save for other recipes).
- Mix miso paste: In a small bowl, ladle some warm dashi and whisk in the white and red miso pastes until smooth. This prevents clumping when added to the pot.
- Add miso mixture: Stir the miso into the pot over low heat. > Critically important: avoid boiling the broth after adding miso to preserve its delicate probiotics and flavor.
- Add tofu and wakame: Gently stir in cubed tofu and rehydrated wakame seaweed. Warm through for about 2-3 minutes without boiling.
- Enhance with optional ingredients: Stir in sake or mirin, toasted sesame oil, and a pinch of white pepper to deepen the flavor profile.
- Finish with fresh scallions: Just before serving, sprinkle sliced scallions atop each bowl for a fresh, vibrant finish.
Tips for Success
- Choose your miso wisely: White miso lends a gentle sweetness perfect for spring and summer,while red miso is ideal for soulful,warming winter bowls.
- Custom dashi blends: Experiment with kombu-only dashi for a vegetarian version or add dried shiitake mushrooms for an earthy twist.
- Batch preparation: Make dashi in advance and store it in the fridge for up to 3 days to speed up weeknight cooking.
- Keep temperature controlled: Always add miso paste to warm,not boiling broth to maintain its probiotic benefits and vibrant taste.
- Texture balance: Soft tofu and chewy wakame create a symphony of textures-feel free to add thinly sliced shiitake mushrooms or daikon for variety.
Serving Suggestions
Pour your marvelous broth into rustic ceramic bowls with a glossy surface that captures light, showcasing the steaming, golden hues of the miso soup magic.Garnish with a sprinkle of toasted sesame seeds, a hint of freshly grated ginger, or a few microgreens for color and aroma contrast. Serve alongside steamed rice, pickled vegetables, or a light sashimi plate to create a balanced, seasonally inspired Japanese meal that comforts and rejuvenates all year round.
| Nutrient | Per Serving |
|---|---|
| Calories | 85 kcal |
| protein | 6 g |
| Carbohydrates | 8 g |
| Fat | 3 g |
For more on the amazing benefits of miso and Japanese cuisine, explore our Umami Essentials Guide, or visit Healthline’s detailed article on miso health benefits.

Q&A
Q&A: Miso Soup Magic – Unlocking Japan’s Savory Superbroth
Q1: What makes miso soup so magical?
A1: Miso soup is more than just a comforting dish-it’s a harmonious blend of tradition, nutrition, and umami-rich flavor that has enchanted palates for over a thousand years.Its magic lies in the delicate fermentation of soybeans and grains, producing miso paste that transforms simple broth into a savory superbroth packed with probiotics, antioxidants, and deep, complex taste.
Q2: Where did miso soup originate, and how has it evolved?
A2: Rooted in ancient Japan, miso soup began as a humble peasant’s staple, valued for its nourishment and ease of preparation. Over centuries, it evolved alongside Japanese culinary culture, embracing regional variations and seasonal ingredients-from silky tofu and seaweed to mushrooms and green onions-each enhancing its flavor and health benefits.
Q3: What ingredients are essential to authentic miso soup?
A3: The heart of miso soup is the miso paste, typically made from fermented soybeans mixed with rice or barley. Complementing this is dashi, a clear broth frequently enough derived from kombu (kelp) and katsuobushi (bonito flakes), wich forms the umami backbone. Toss in tofu cubes, wakame seaweed, and scallions, and you’ve got a bowl where simplicity meets sublime.
Q4: How does miso soup benefit your health?
A4: Beyond its savory allure, miso soup is a wellness powerhouse. Packed with probiotics from fermented miso, it supports gut health and digestion. The broth’s antioxidants help combat inflammation, while its nourishing ingredients provide essential vitamins, minerals, and protein-all wrapped in a low-calorie, comforting package.
Q5: Can miso soup be customized for modern tastes?
A5: Absolutely! Miso soup is incredibly versatile. contemporary chefs and home cooks experiment by adding diverse vegetables, seafood, or even a touch of spice. Whether you prefer a mild white miso or a robust red miso, this superbroth adapts beautifully, inviting creativity while honoring its time-tested roots.
Q6: How can someone new to miso soup start making it at home?
A6: Start simple: combine dashi broth with your choice of miso paste, whisking gently to preserve live cultures. Add bite-sized tofu and wakame seaweed, then finish with scallions. With minimal ingredients and rapid prep,you can unlock the magic of miso soup in minutes-comfort and culture served steaming hot.
Q7: Why is miso soup considered a cultural icon in Japan?
A7: Miso soup is more than food-it’s a daily ritual and a symbol of home. Traditionally served at breakfast and meals throughout the day, it embodies balance, respect for nature, and the Japanese art of umami. Each bowl tells a story of heritage, wellness, and the subtle yet profound joy found in simple ingredients.
The conclusion
As we’ve uncovered in this journey through miso soup’s rich umami depths, this humble broth is far more than a simple starter-it’s a living testament to Japan’s culinary artistry and cultural heritage. Each bowl tells a story of time-honored fermentation, balanced flavors, and nourishing traditions that awaken the senses and soothe the soul. Whether sipped at a bustling ramen shop or crafted lovingly at home, miso soup remains a savory superbroth that unlocks the magic of Japan’s kitchen-inviting us all to savor not just a meal, but a timeless experience steeped in health, harmony, and history. So next time you cradle that warm, fragrant cup, remember: you’re tasting a broth that transcends the ordinary, a liquid love letter from the heart of Japan.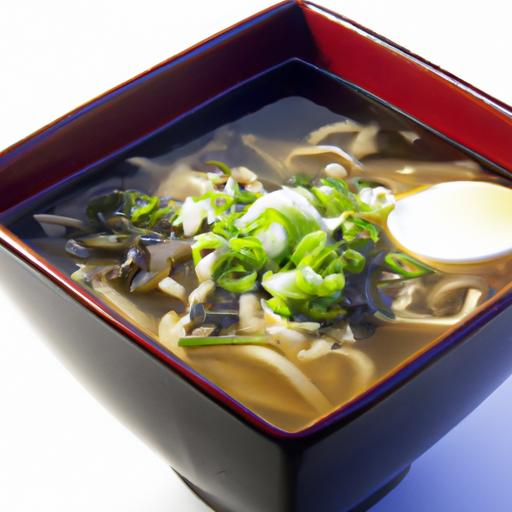
Discovering the Rich History Behind Sesame Korean Grill
Unlocking flavors begins with understanding the deep cultural roots of Sesame Korean Grill, a beloved culinary tradition that marries simplicity with vibrant taste. Originating from Korea’s dynamic food culture, this grill technique celebrates marinated meats enhanced by the nutty aroma of sesame, a seed revered in East Asia for millennia. The dish reflects Korea’s centuries-old practice of communal grilling, where families and friends gather around an open flame, creating unforgettable moments as much as unforgettable tastes.
As a personal insight, my first encounter with Sesame Korean Grill was at a bustling street market in Seoul-where smoky, caramelized chicken pieces infused with sesame oil and toasted seeds instantly stole the show. This flavor journey inspired me to master the marinade and grilling process, ensuring that every bite bursts with rich umami and subtle sweetness, perfectly balanced by the characteristic sesame aroma.
Prep and Cook Time
- Preparation: 20 minutes
- Marinating: 2 hours (or overnight for deeper flavor)
- Grilling: 12-15 minutes
- Total Time: Approximately 2 hours 35 minutes
Yield
Serves 4 satisfying portions-perfect for sharing and savoring together.
Difficulty Level
Medium – approachable for home cooks with basic grilling skills but rewarding enough for more experienced chefs eager to unlock new flavor dimensions.
Ingredients
- 1.5 lbs boneless, skinless chicken thighs, cut into bite-size pieces
- 3 tbsp soy sauce (preferably Korean ganjang for authenticity)
- 2 tbsp toasted sesame oil
- 1 tbsp honey or brown sugar
- 1 tbsp rice vinegar
- 4 cloves garlic, minced
- 1 tbsp freshly grated ginger
- 1 tbsp toasted sesame seeds (plus extra for garnish)
- 1 tsp Korean chili flakes (gochugaru) optional for a mild heat
- 2 green onions, finely sliced (white and green parts separated)
- 1 tbsp vegetable oil for grilling
- Freshly ground black pepper, to taste
Instructions
- Prepare the marinade: In a medium bowl, whisk together soy sauce, toasted sesame oil, honey, rice vinegar, minced garlic, grated ginger, and Korean chili flakes if using. Stir in the white part of the green onions and half of the toasted sesame seeds.
- Marinate the chicken: Add the chicken pieces to the marinade. Toss gently to coat each piece thoroughly. Cover and refrigerate for at least 2 hours,or overnight for a more intense flavor.
- Preheat your grill or grill pan: Brush lightly with vegetable oil to prevent sticking and ensure even searing.
- grill the chicken: Arrange the marinated pieces in a single layer. Cook over medium-high heat for 6-8 minutes per side, turning occasionally, until the chicken reaches an internal temperature of 165°F and has a gorgeous caramelized crust. Avoid overcrowding for maximum crispness.
- Rest the meat: Transfer to a warm plate and let rest for 5 minutes to allow juices to redistribute.
- Garnish and serve: Sprinkle the remaining green onions and toasted sesame seeds on top before serving.
Tips for Success
- Marinating time: Don’t rush-overnight marination ensures the marinade deeply penetrates, amplifying flavors and tenderness.
- Meat choice: Chicken thighs are preferred for their juiciness, though chicken breast can be used if trimmed well and monitored closely to avoid drying out.
- Grilling alternatives: If you don’t have access to a grill, a hot cast-iron skillet or broiler works beautifully to create that signature char.
- Heat balance: Adjust Korean chili flakes to tailor the spiciness-you can omit it entirely for a purely sweet and savory profile.
- Make-ahead: Chicken can be marinated and refrigerated up to 24 hours; grilled chicken keeps well refrigerated for 2 days and reheats beautifully under a broiler.
Serving Suggestions
Serve your savory Sesame Korean Grill chicken alongside steamed jasmine rice or sticky rice to soak up the luscious marinade. Complement the dish with crunchy kimchi or a refreshing cucumber salad that adds a cooling contrast. To elevate the presentation, drizzle a little extra sesame oil and sprinkle toasted seeds on top, garnished with fresh cilantro or microgreens for a vibrant finish.
For drinks, pair it with chilled Korean rice wine (makgeolli) or a crisp, cold lager that cuts through the rich sesame flavors, enhancing your culinary experience.

| nutrient | Per Serving (4 servings) |
|---|---|
| Calories | 280 kcal |
| Protein | 30 g |
| Carbohydrates | 8 g |
| Fat | 12 g |
For more on expert Korean marinade techniques, explore our in-depth guide here.
Q&A
Q&A: Unlocking Flavors – The Art of Sesame Korean Grill Delight
Q1: What exactly is Sesame Korean Grill Delight?
A1: Sesame Korean Grill Delight is a flavorful culinary experience that combines the rich traditions of Korean barbecue with the nutty, aromatic essence of sesame. It’s not just a meal-it’s an artful dance of marinated meats, fresh vegetables, and expertly grilled bites, all enhanced by the subtle crunch and deep warmth of sesame seeds and oil.
Q2: How does sesame transform traditional Korean grilling?
A2: Sesame adds a unique layer of complexity to Korean grilling. Its toasty nuttiness complements the smoky char from the grill, elevating simple cuts of meat into a symphony of taste. Whether drizzled as sesame oil, sprinkled as seeds, or blended in sauces, sesame infuses every bite with a luxurious depth and unforgettable aroma.
Q3: What are the key ingredients that make this dish special?
A3: At the heart of Sesame Korean Grill delight are succulent cuts of beef, pork, or chicken, marinated in a blend of soy sauce, garlic, ginger, and sugar.Add sesame oil’s fragrant warmth and toasted sesame seeds’ crunchy texture, and you have an irresistible flavor combination. Fresh scallions, mushrooms, and kimchi serve as vibrant accompaniments that balance richness with brightness.
Q4: Can you describe the grilling technique used?
A4: The grilling is both precise and passionate. Meats are sliced thin to ensure quick, caramelized searing over high heat. Grill masters pay close attention to the perfect char-charred edges bring smokiness while keeping the interior juicy and tender.The final touch often involves a light brush of sesame oil during the last moments on the grill, locking in flavor and imparting a subtle sheen.
Q5: Are there cultural stories behind using sesame in Korean cuisine?
A5: Absolutely! Sesame has long been revered in Korean cooking for its health benefits and symbolic richness-it represents fertility, prosperity, and life’s nurturing essence. Traditionally, sesame was a prized ingredient, reserved for special occasions and celebratory feasts. today, its integration into Korean grills continues that legacy, blending history with innovation in each savory bite.
Q6: How can home cooks recreate this Sesame Korean Grill Delight experience?
A6: Start with quality ingredients and embrace balance in your marinades-harmonize salty,sweet,and nutty flavors. Invest in a good grill pan or outdoor grill to mimic authentic char and smoke. Don’t rush the process; allow meats to soak up the sesame-infused marinade and cook just enough for those caramelized edges. garnish liberally with toasted sesame seeds and fresh herbs for that signature crunch and freshness.Q7: What beverages pair best with this flavorful dish?
A7: Clean, crisp drinks that cut through the richness work best: think chilled Korean rice wine (makgeolli), light lager beers, or sparkling water with a hint of citrus. If you prefer wine, a bright Riesling or a fruity Pinot Noir complements the depth of sesame and smoky grill flavors beautifully.
Q8: Why has Sesame Korean Grill Delight gained popularity worldwide?
A8: It’s a party of sensory harmony-each bite brings together tradition, technique, and texture in a way that’s both comforting and exciting. The universal appeal of grilled meats combined with the distinctive allure of sesame’s aroma and flavor has made this dish a beloved gateway into korean cuisine for food lovers everywhere.
Unlocking the secrets of Sesame Korean Grill Delight invites you to savor not just a meal, but a story-a flavorful journey where Korean heritage meets sesame’s timeless magic. ready your grill, and let the adventure begin!
In Summary
As the final embers of the sesame Korean grill fade, what remains is more than just a lingering aroma-it’s an invitation to rediscover the rich tapestry of flavors that define this culinary art. Unlocking the secrets behind each charred bite and nutty, savory glaze reveals a tradition steeped in history, culture, and passion. Whether you’re a seasoned griller or a curious foodie, embracing the nuances of sesame Korean grilling transforms every meal into an experience, where technique and taste dance in perfect harmony.So next time you gather around the grill,remember: you’re not just cooking-you’re unlocking a world of flavor waiting to be savored.
Crisp and tangy Korean cucumber salad delights with its refreshing crunch and bold,balanced flavors that dance harmoniously on the palate. Choosing the perfect cucumbers for maximum crispness is the foundation of this iconic dish, ensuring every bite bursts with garden-fresh vitality. This salad’s magic lies in the interplay of its essential ingredients, where vibrant tanginess melds with a subtle hint of sweetness and spice, transforming humble cucumbers into a symphony of flavour.
Prep and Cook Time
- Readiness: 15 minutes
- Marination: 20 minutes
- Total Time: 35 minutes
Yield
Serves 4 as a refreshing side dish
Difficulty Level
Easy – Perfect for cooks at any experience level
Ingredients
- 3 Korean cucumbers (or 2 English cucumbers), thinly sliced
- 1 teaspoon kosher salt
- 2 teaspoons sugar
- 2 tablespoons rice vinegar (mild and slightly sweet)
- 1 tablespoon soy sauce (light soy for subtle depth)
- 1 teaspoon toasted sesame oil
- 1 garlic clove, finely minced
- 1 teaspoon freshly grated ginger
- 1 small red chili, thinly sliced (optional for heat)
- 1 tablespoon toasted sesame seeds, for garnish
- 2 scallions, thinly sliced
Instructions
- Prepare the cucumbers: wash and slice cucumbers into thin rounds, about 1/8-inch thick, for the ideal crisp texture.
- Salt the cucumbers: Place the cucumber slices in a colander and sprinkle with kosher salt. Toss gently and let sit for 10 minutes to draw out excess water. this process intensifies the crispness by preventing sogginess.
- Rinse and drain: Rinse the salted cucumbers under cold water to remove excess salt. Pat dry thoroughly with paper towels or a clean kitchen towel to keep the salad from becoming watery.
- Mix the dressing: In a small bowl,whisk together rice vinegar,sugar,soy sauce,toasted sesame oil,minced garlic,and grated ginger until sugar dissolves completely. The balance of tangy and sweet flavors creates the signature zest of the dish.
- Combine: Toss the cucumbers with the dressing until evenly coated. Add sliced red chili for a gentle kick, if desired.
- Chill and marinate: Refrigerate the salad for at least 20 minutes to allow the flavors to meld beautifully and the cucumbers to absorb the dressing.
- Finish with garnishes: Just before serving, sprinkle toasted sesame seeds and scallions over the top for a nutty crunch and fresh vibrancy.
Tips for Success
- Choosing cucumbers: opt for Korean cucumbers if available-they’re smaller, thinner-skinned, and seedless, lending perfect crispness. English cucumbers are a grate alternative.
- Salt timing: Do not skip salting; it is critical for releasing excess moisture and keeping the salad crisp rather than soggy.
- Make ahead: This salad tastes best chilled for up to 3 hours but avoid overnight storage as cucumbers may release too much water.
- Vegan substitute: Replace soy sauce with tamari or coconut aminos for gluten-free and vegan options.
- Adjust heat level: Add more red chili or a pinch of Korean gochugaru (red pepper flakes) for an authentic spicy kick.
Serving Suggestions
Present this salad in a clear glass bowl to showcase its vibrant hues of emerald cucumber, ruby chili, and bright green scallions. It pairs wonderfully with grilled meats, bibimbap, or alongside a comforting bowl of hot rice.
Garnish with additional sesame seeds and finely chopped fresh herbs like cilantro or mint to add layers of flavor and visual appeal. Serve chilled, straight from the fridge, to preserve its refreshingly crisp texture.
| Nutrient | Per Serving |
|---|---|
| Calories | 45 kcal |
| Protein | 1 g |
| Carbohydrates | 8 g |
| Fat | 2 g |
Explore another classic Korean recipe to complement your cucumber salad experience. For further insights into the health benefits of cucumbers and their role in hydration, visit Healthline’s guide on cucumbers.

Q&A
Q&A: Crisp & Tangy – Unlocking the Secrets of Korean Cucumber Salad
Q1: What makes Korean cucumber salad so irresistibly crisp and tangy?
A: The magic lies in the balance of textures and flavors. korean cucumber salad, or oi muchim, uses fresh cucumbers sliced thinly to maintain a satisfying crunch. The tanginess comes from a vibrant dressing blend-typically rice vinegar provides the zing, while a touch of sugar and garlic add depth. It’s this harmonious blend that awakens your palate with every bite.
Q2: How is Korean cucumber salad diffrent from other cucumber salads around the world?
A: Unlike Western cucumber salads that often rely on creamy dressings or dill, Korean cucumber salad bursts with punchy, umami-rich flavors. Ingredients like gochugaru (Korean red chili flakes), sesame oil, and sometimes fermented elements such as fish sauce, create a layered taste profile that’s spicy, savory, and refreshingly tart all at once.
Q3: Can you share the key ingredients that give this salad its distinct character?
A: Absolutely! The quintessential ingredients are crisp cucumbers, garlic, rice vinegar, sesame oil, and gochugaru. Often, scallions and sesame seeds are sprinkled on top for extra texture and aroma. Optional touches like soy sauce or a dash of sugar balance acidity and heat, making the salad pleasantly addictive.Q4: Is there a special technique to prepare the cucumbers to keep them crunchy?
A: Yes! to keep cucumbers crisp, they are typically salted and left to rest for about 10-15 minutes. This step draws out excess moisture and prevents sogginess. Rinsing off the salt afterward and draining well ensures each slice stays fresh and crunchy under the flavorful dressing.
Q5: How versatile is Korean cucumber salad in Korean meals?
A: Extremely versatile! It’s a classic banchan-a small side dish perfectly complementing heavy mains like Korean BBQ or spicy stews. Its refreshing qualities also make it a fantastic palate cleanser and cooling contrast to fiery dishes. Plus, it’s quick to prepare and loved by all ages.
Q6: Are there creative variations of this salad worth trying?
A: Definitely! Some chefs add thinly sliced onions or carrots for color and crunch, while others experiment with a hint of ginger or even a sprinkle of crushed peanuts for extra texture. If you like heat, ramp up the gochugaru or add a touch of fresh chili. The beauty is in making the salad your own while honoring its crisp, tangy roots.
Q7: Can this salad be made ahead of time, or is it best fresh?
A: For peak crunch, it’s best enjoyed fresh or within a few hours of assembly. However, the flavors deepen if allowed to marinate briefly, so you can prepare it early in the day. just keep it chilled and add any fresh garnishes right before serving to maintain that signature crispness.Q8: What’s the cultural meaning of cucumber salad in Korean cuisine?
A: Korean cucumber salad embodies the nation’s love for fresh, vibrant banchan that bring balance and harmony to meals. It reflects the Korean principle of pleasing all senses-texture, taste, and color-while showcasing simple ingredients elevated by bold, thoughtful seasoning.It’s a small dish with a big personality, bridging tradition and everyday dining delight.
Unlock the crisp, tangy secret of Korean cucumber salad and elevate your mealtime with this refreshing burst of flavor!
Key Takeaways
As the vibrant flavors of Korean cucumber salad dance on your palate-where crisp meets tangy in perfect harmony-you unlock more than just a dish; you uncover a tradition steeped in balance, freshness, and simplicity.Whether served alongside spicy barbecue or enjoyed as a refreshing snack on its own, this humble salad embodies the essence of Korean culinary artistry. So next time you crave something bright and invigorating, remember: the secrets of korean cucumber salad are just a crunch away, ready to transform your meal into a celebration of flavor and heritage.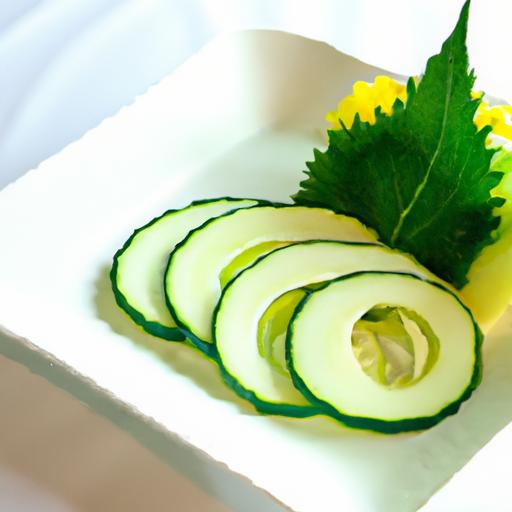
Unlocking flavor begins with understanding the soulful essence that sesame korean grill brings to your table. Rooted deeply in Korea’s vibrant culinary traditions, this technique celebrates the marriage of bold, nutty sesame notes with the rich, smoky char of grilled meats. I vividly remember my first taste of sesame Korean grill at a bustling street market in Seoul, where the aroma alone was hypnotic-each bite bursting with layers of marinated goodness that lingered long after the grill cooled. this dish isn’t just about fire and meat; it’s about mastering the art of balanced marinades, selecting premium cuts, and coaxing out texture that mesmerizes the senses.
Prep and cook Time
- Planning: 30 minutes
- Marinating: 4 hours (preferably overnight for deeper flavor)
- Cooking: 10-15 minutes
- Total Time: Approximately 5 hours including marinating
Yield
Serves 4 hungry diners
Difficulty Level
Medium – approachable for home cooks ready to elevate their grilling skills
Ingredients
- 2 lbs beef ribeye or short ribs, thinly sliced (well-marbled for grilling excellence)
- 3 tbsp toasted sesame oil
- 1/4 cup soy sauce (use Korean soy sauce for authenticity)
- 2 tbsp honey or brown sugar (balances saltiness)$
- 4 cloves garlic, minced
- 1 tbsp freshly grated ginger
- 2 tbsp toasted sesame seeds
- 1 small Asian pear, grated (for tenderizing)
- 2 green onions, finely chopped
- 1 tsp freshly ground black pepper
- 1 tbsp Gochujang (optional, for a spicy kick)
- Vegetable oil for grilling
Instructions
- Prepare the marinade: In a medium bowl, combine toasted sesame oil, soy sauce, honey, minced garlic, grated ginger, grated Asian pear, green onions, black pepper, and toasted sesame seeds. Stir well untill the honey dissolves and the mixture is homogenous.
- Marinate the meat: Add thinly sliced beef to the marinade,tossing to coat each piece evenly. Cover the bowl tightly with plastic wrap and refrigerate for at least 4 hours, ideally overnight, to unlock flavor fully and tenderize the meat.
- Preheat the grill: Bring your grill to medium-high heat and brush the grates lightly with vegetable oil to prevent sticking. A cast-iron grill pan works beautifully indoors.
- Grill the meat: Lay the marinated slices across the hot grill. Cook for 2-3 minutes on each side until you achieve a beatiful char and slightly crispy edges. avoid overcrowding to ensure even cooking.
- Rest and serve: Transfer grilled meat to a platter and let rest for 2 minutes. This preserves juiciness and ensures that each bite is tender and flavorful.
- Optional finishing touch: Sprinkle extra toasted sesame seeds and finely sliced green onions over the meat for a visually stunning presentation.
Tips for Success
- Choose well-marbled cuts like ribeye or short ribs to lock in moisture and enhance flavor during grilling.
- Proper marination time is crucial. Rushing this step will result in less flavorful and tougher meat.
- Use an asian pear for natural tenderizing and sweetness; if unavailable, pineapple juice can be a stand-in but use sparingly.
- For an easier cleanup and char perfection, consider using grill mats or cast iron pans indoors.
- If you want to dial up the heat, adding Gochujang to the marinade provides a splendid spicy dimension without overwhelming the sesame notes.
- Make sure to remove excess marinade before grilling to prevent flare-ups and burning sugars.
Serving Suggestions
This grilled sesame Korean delight pairs exquisitely with fluffy steamed white rice and crisp, fresh kimchi to balance its rich and savory profile.Serve alongside a simple lettuce wrap basket,accompanied by sliced garlic,fresh chili peppers,and a dollop of ssamjang sauce. Garnish with extra toasted sesame seeds and thinly cut green onions for vibrant texture and visual appeal.
| Nutritional Info | Per Serving |
|---|---|
| Calories | 420 kcal |
| Protein | 35 g |
| Carbs | 8 g |
| Fat | 25 g |
For deeper insights on Korean marinades that complement sesame Korean grill,explore our complete marinade guide. To learn more about authentic Korean grilling traditions, visit Korea.net’s official cultural page.

Q&A
Q&A: Unlocking Flavor – A Guide to sesame Korean Grill Delights
Q1: What makes Sesame Korean Grill unique compared to other korean barbecue experiences?
A1: Sesame Korean Grill stands out by marrying conventional Korean grilling with a fresh, nutty twist-sesame. From the signature sesame oil marinades to sprinklings of toasted seeds, this approach adds layers of aroma and flavor that elevate every bite. Unlike more generic grills, the sesame element creates a balance of smoky, savory, and subtly sweet notes that dance on your palate.
Q2: Which dishes should first-timers absolutely try at Sesame Korean Grill?
A2: for newbies, the Bulgogi marinated in sesame-soy sauce is an absolute must-think tender beef glossy with sesame goodness. Next, sample the Samgyeopsal (grilled pork belly) served with sesame dipping sauce and wrapped in fresh lettuce.Don’t miss the Sesame japchae; sweet potato noodles stir-fried with veggies and a hint of sesame oil, delivering comfort in every forkful.
Q3: How does the grilling technique enhance the sesame flavors?
A3: At Sesame Korean Grill, the art of fire meets delicate flavor infusion. Charcoal or gas flames sear meats quickly, locking in juices while subtly toasting the sesame coatings and oils. This caramelization intensifies nuttiness and creates a crispy, fragrant crust that complements the juicy interior. The grill becomes a flavor catalyst, making sesame notes richer and more complex.
Q4: Are there vegetarian options that showcase the sesame flair?
A4: Absolutely! Grilled shiitake mushrooms brushed with sesame oil and dusted with toasted seeds are a savory delight. There’s also a grilled tofu platter, where firm tofu is marinated in sesame-soy and grilled until golden. Paired with sesame-dressed kimchi and fresh veggies,these options prove the grill is just as vibrant without meat.
Q5: how can diners best enjoy the interactive experience of Sesame Korean Grill at the table?
A5: Korean grilling is as much about the experience as the food. Use the tongs to grill your meat bites to your preferred crispness, while chatting and sharing with friends. wrap grilled morsels in lettuce leaves, top with sesame-enriched sauces and kimchi for flavor bursts. Don’t forget to dip each bite in sesame oil mixed with salt and pepper for that authentic touch.The hands-on approach heightens anticipation and makes every flavor finding more satisfying.
Q6: What drinks pair well with the rich, toasted flavors of Sesame Korean Grill?
A6: A chilled Korean rice wine, makgeolli, with its slightly sweet and tangy profile, beautifully cuts through the richness. For those who prefer beer, a crisp lager refreshes the palate between savory bites. If you’re feeling adventurous, a lightly toasted sesame-infused tea offers a warm, complementary harmony that extends the sesame theme beyond the plate.
Q7: Can home cooks recreate Sesame Korean Grill flavors in their own kitchens?
A7: Definitely! Start with high-quality sesame oil-its aroma is the secret weapon. Marinate meats in a mixture of soy sauce, sesame oil, garlic, and a touch of sugar. Use a hot grill or cast-iron skillet to achieve that slight char. Toast sesame seeds separately to sprinkle at the end for crunch and fragrance. While the communal grilling vibe might be tricky at home, the bold, nutty flavors are easily within reach.
Unlocking the secrets of Sesame Korean Grill delights reveals a world where tradition meets innovation. Next time you fire up the grill, remember: a sprinkle of sesame can turn ordinary into remarkable.
In Retrospect
As you close the chapter on this flavorful journey through Sesame Korean Grill Delights, remember that every grain of sesame, every sizzling morsel, and every smoky hint tells a story steeped in tradition and innovation.Unlocking these flavors is more than just a culinary adventure-it’s an invitation to experience Korean culture one bite at a time.Whether you’re a seasoned grill master or a curious food lover,embracing these vibrant tastes will ignite your palate and inspire your next kitchen creation. So fire up the grill, sprinkle those sesame seeds generously, and savor the delicious harmony that awaits. Your gateway to unforgettable flavor has just been unlocked.
Unlocking Olive Garden’s Shrimp Scampi begins with understanding the delicate dance between garlic butter and white wine sauce, creating a deliciously aromatic base that coats tender shrimp to perfection. This iconic italian-American dish captures the heart with its radiant, zesty notes and irresistible buttery richness-qualities that make every forkful a moment to savor. Whether you’re recreating a beloved restaurant favorite or elevating your weeknight dinner, mastering these secret ingredients unlocks a world of flavor and texture that feels both familiar and extraordinary.
Prep and Cook Time
- Preparation: 15 minutes
- Cooking: 10 minutes
- Total Time: 25 minutes
Yield
- Serves 4 generous portions
Difficulty Level
- Medium – ideal for confident beginners and intermediate home cooks
Ingredients
- 1 lb large shrimp, peeled and deveined, tail-on for presentation
- 4 tbsp unsalted butter, divided
- 3 tbsp extra virgin olive oil
- 5 cloves garlic, finely minced
- ½ cup dry white wine (such as Pinot Grigio or Sauvignon Blanc)
- 1 lemon, zested and juiced
- ¼ cup fresh flat-leaf parsley, finely chopped
- ¼ tsp red pepper flakes (optional, for subtle heat)
- Salt and freshly ground black pepper, to taste
- 8 oz linguine or angel hair pasta, cooked al dente
Instructions
- Prepare the pasta: Cook linguine according to package instructions until al dente. Reserve ½ cup of pasta cooking water, drain, and set aside.
- Sauté the garlic: In a large skillet over medium heat, melt 2 tablespoons of butter with the olive oil.Add minced garlic and red pepper flakes, stirring until fragrant and golden but not burnt, about 1-2 minutes.
- Cook the shrimp: Increase heat to medium-high. Add shrimp in a single layer, seasoning with salt and black pepper. Sauté for 1-2 minutes per side until pink and opaque. avoid overcrowding to ensure even cooking.
- Deglaze the pan: Pour in the white wine, scraping up any browned bits from the skillet’s bottom. Let it simmer gently until reduced by half, about 3-4 minutes-this reduction intensifies the flavor backbone of the sauce.
- Finish the sauce: Stir in remaining butter, lemon zest, and lemon juice. Add chopped parsley, mixing until the sauce emulsifies into a glossy coating.
- Toss with pasta: Add the drained pasta to the skillet along with reserved pasta water. Toss continuously to lift and marry the flavors, ensuring each strand glistens with sauce. Adjust salt and pepper to taste.
- Serve instantly: Plate the shrimp scampi with a sprinkling of extra parsley and a lemon wedge for garnish. For an elevated touch, drizzle a little high-quality olive oil on top.
Tips for Success: mastering the Perfect Balance
- Use fresh shrimp: Freshness directly impacts the texture and flavor. Wild-caught shrimp frequently enough yield better taste and a firmer bite than frozen.
- Don’t overcook shrimp: Shrimp cooks quickly; overcooking results in a rubbery texture. Pull them from heat as soon as they turn pink and curl.
- Choose a quality white wine: The wine’s acidity and depth add brightness and complexity. avoid cooking wines; instead, select something you’d enjoy drinking.
- Add pasta water gradually: This starchy liquid helps bind the sauce to the noodles, making a silky finish that clings beautifully.
- Experiment with fresh herbs: Alongside parsley, basil or chives add depth. For a zesty twist, a touch of fresh tarragon or thyme amplifies the savory notes elegantly.
- Make ahead: Prep shrimp and garlic butter sauce separately, then combine last minute to preserve tenderness.
Serving Suggestions
Serve this scampi atop a bed of perfectly twirled linguine or angel hair pasta that soaks up every drop of garlic-butter sauce. Garnish with vibrant parsley and a fresh lemon wedge to add a lively contrast. Complement the meal with Italian crusty bread to mop up the luscious sauce and a crisp green salad dressed lightly with balsamic vinegar.
For an indulgent twist, drizzle a few drops of high-quality extra virgin olive oil or sprinkle finely grated Parmesan cheese just before serving. Pair with a chilled glass of Sauvignon Blanc or your favorite crisp white wine to mirror the flavors in the dish.
| Nutrition | per Serving |
|---|---|
| Calories | 380 kcal |
| Protein | 32g |
| Carbohydrates | 25g |
| fat | 15g |

Ready to dive deeper into Italian-american classics? Check out our Homemade Olive Garden Fettuccine Alfredo Recipe. For further culinary inspiration,explore the [Serious Eats guide on shrimp](https://www.seriouseats.com/how-to-cook-shrimp) for tips on achieving perfect seafood texture.
Q&A
Q&A: Unlocking Olive Garden’s Shrimp Scampi – A Flavor Dive
Q1: What makes Olive Garden’s Shrimp Scampi so irresistible?
A1: Olive Garden’s Shrimp Scampi is a harmonious blend of tender shrimp sautéed to perfection, mingling with a buttery garlic sauce that’s both rich and bright. The secret lies in the balance-just the right amount of lemon zest and white wine infuse the dish with a zesty freshness, while fresh parsley adds a vibrant, herbaceous finish. Combined with al dente pasta, it’s a dish that dances on your palate.Q2: How dose Olive Garden achieve that silky, buttery sauce?
A2: The magic starts with melting real butter and slowly cooking minced garlic to release its aromatic essence without bitterness. White wine is then deglazed into the pan,lifting all the caramelized flavors from the shrimp. Creamy yet light, the sauce is finished with a splash of fresh lemon juice, which cuts through the richness and adds brightness, resulting in a luscious coating that clings lovingly to every strand of pasta.
Q3: Can you describe the shrimp’s role in the flavor profile?
A3: The shrimp are the stars of the show-plump,juicy,and slightly sweet. They’re seared just right to develop a subtle caramelization that enhances their natural flavor while keeping them tender. This slight crispness contrasts beautifully with the silky sauce and the gentle tang of the lemon, creating layers of taste that keep you coming back for more.
Q4: Is there a particular type of pasta Olive Garden uses, and why?
A4: Olive Garden uses a delicate linguine, which is the perfect noodle for Shrimp Scampi. Its flat, narrow shape allows the buttery garlic sauce to cling effortlessly, ensuring every bite bursts with flavor. The linguine’s tender yet firm texture provides a satisfying mouthfeel that complements the softness of the shrimp without overpowering it.
Q5: How can home cooks replicate Olive Garden’s Shrimp Scampi at home?
A5: Key tips include using fresh, high-quality shrimp and real butter-not margarine-for that authentic richness. Don’t rush the garlic; sauté it gently to avoid bitterness. Deglaze with a crisp white wine, and don’t forget a good squeeze of fresh lemon juice to brighten the dish. Serve immediatly over perfectly cooked linguine and garnish with fresh parsley for that final pop of colour and flavor. Patience and balance are your best friends!
Q6: Why does fresh lemon juice play such a crucial role in this dish?
A6: Fresh lemon juice is the unsung hero, cutting through the richness of butter and garlic to deliver a refreshing tang that enlivens every element on the plate. It creates a beautiful contrast, awakening your taste buds and preventing the dish from feeling too heavy or one-dimensional.
Q7: What makes Olive Garden’s Shrimp Scampi stand out compared to other versions?
A7: Olive Garden’s version strikes the perfect equilibrium between comfort and sophistication. It’s neither overly greasy nor bland.Instead, it skillfully layers savory, bright, and fresh notes, creating a multi-dimensional flavor experience that feels both indulgent and approachable-accessible gourmet dining in a bowl.
Q8: Can this dish be modified for dietary preferences without losing its essence?
A8: Absolutely! For a lighter take, you can reduce the butter slightly and substitute zucchini noodles for linguine. For a dairy-free version, swap butter for olive oil and use gluten-free pasta. The essence remains intact as long as you keep the fresh garlic,lemon,and quality shrimp front and center.
Unlocking Olive Garden’s Shrimp Scampi is like uncovering a treasure chest of culinary delight-each ingredient plays a purposeful role, culminating in a dish that’s as comforting as it is captivating. Dig in and savor the symphony of flavors!
The Conclusion
As we close the chapter on olive Garden’s Shrimp Scampi, it’s clear that this dish is more than just a plate of pasta-it’s a harmonious blend of flavors that tells a story of tradition, technique, and a touch of Italian flair. Whether you’re recreating this classic at home or simply savoring it on your next visit,understanding the ingredients and methods behind it elevates every bite. So next time you twirl those tender shrimp and al dente noodles, remember: you’re not just enjoying a meal-you’re unlocking a flavorful experience crafted with care and passion. Buon appetito!
Golden Elixir: Unlocking the Power of Ginger Turmeric Tea offers an inviting gateway to a timeless holistic remedy cherished across cultures. This vibrant infusion, with roots tracing back to Ayurvedic medicine, marries the warming zing of fresh ginger and the radiant glow of turmeric into a harmonious brew that supports digestion, inflammation control, and overall vitality. Whether you’re sipping it to soothe an evening chill or boost your morning wellness routine, this tea captivates not only with its bold golden hue but with its myriad health benefits that elevate everyday self-care.
Prep and Cook Time
Preparation: 5 minutes
Cooking: 15 minutes
Total Time: 20 minutes
Yield
Serves 2 generous cups
Difficulty Level
Easy – Perfect for beginners and seasoned herbal tea enthusiasts alike
Ingredients
- 2 cups filtered water
- 1 tablespoon fresh ginger root, peeled and thinly sliced
- 1 tablespoon fresh turmeric root, peeled and thinly sliced (or 1 teaspoon turmeric powder)
- 1 tablespoon raw honey or maple syrup, adjust to taste
- Juice of ½ a lemon
- Pinch of black pepper (to activate curcumin absorption)
- optional: 1 cinnamon stick or a pinch of ground cinnamon for warm spice notes
Instructions
- Boil the base: In a small saucepan, bring 2 cups of filtered water to a rolling boil.
- Add fresh roots: Once boiling,add the fresh ginger and turmeric slices (or turmeric powder). If using, toss in the cinnamon stick now.
- Simmer gently: Reduce heat to low and let the mixture simmer uncovered for 10-12 minutes,allowing the flavors and beneficial compounds to infuse deeply.
- Strain out solids: Remove from heat and strain the tea into your favorite teapot or directly into mugs, discarding the root pieces and cinnamon stick.
- Add finishing touches: Stir in raw honey (or maple syrup) and freshly squeezed lemon juice to brighten the flavors. Then, sprinkle a pinch of black pepper-a crucial step to enhance turmeric’s powerful absorption.
- Serve warm: Pour the tea into heat-safe cups and garnish with a thin turmeric slice, lemon wheel, or a sprig of fresh mint for an inviting presentation.
Tips for Success
- Use fresh turmeric and ginger for the most vibrant color and optimal health properties, but turmeric powder can be convenient and equally beneficial if fresh root is unavailable.
- The pinch of black pepper is essential-it increases curcumin’s bioavailability considerably, making your golden elixir truly effective.
- If the tea feels too spicy or strong, dilute with a splash of hot water, or add more honey for balance.
- For a creamy twist, substitute honey with a teaspoon of coconut milk or almond milk stirred in post-strain.
- Prepare in batches and store in the refrigerator for up to 48 hours. Reheat gently over low heat to avoid altering the delicate flavors.
Serving Suggestions
Serve this tea in delicate glass cups or rustic ceramic mugs to highlight its rich golden hue. Enhance the experiance by pairing it with light, wholesome snacks such as almond biscotti, spiced dates, or a fresh fruit platter. For an elegant touch, garnish with a lemon wheel or a fresh sprig of mint to contrast the tea’s warm glow.

| Nutrient | Per Serving (1 cup) |
|---|---|
| Calories | 40 |
| Protein | 0.5g |
| Carbohydrates | 10g |
| Fat | 0.1g |
| Curcumin (from turmeric) | ≈100mg |
To deepen your thankfulness and knowledge of herbal infusions, consider exploring our guide on Top Herbal Teas for Health and Wellness. For scientific insights into turmeric’s bioavailability and benefits,the National Center for Biotechnology details offers an in-depth review.
Q&A
Q&A: Golden Elixir – Unlocking the Power of Ginger Turmeric Tea
Q1: What is ginger Turmeric Tea, and why is it called the “Golden Elixir”?
A1: Ginger Turmeric Tea is a warm, invigorating brew made from fresh or powdered turmeric and ginger roots.It’s dubbed the “Golden Elixir” because of its vibrant golden hue and potent health-boosting properties. This ancient blend has been cherished for centuries for its ability to nourish the body and awaken the senses, like a sip of sunshine that fuels your inner vitality.
Q2: What makes turmeric and ginger such a powerful duo?
A2: Turmeric contains curcumin, a compound celebrated for its strong anti-inflammatory and antioxidant effects, while ginger packs a punch with its warming, digestive, and immune-supportive qualities. Together, they create a synergistic effect that not only soothes the body but also invigorates it – a perfect balance of fire and earth in a cup.
Q3: How does Ginger Turmeric Tea benefit overall health?
A3: This golden brew helps reduce inflammation, supports joint health, aids digestion, and strengthens the immune system. Many drink it to combat seasonal colds,alleviate bloating,and even improve mental clarity. Its antioxidant power helps protect cells from damage, making it a natural ally in the quest for vitality and longevity.
Q4: Can Ginger Turmeric Tea improve mood or energy levels?
A4: Absolutely! Both ginger and turmeric have been found to have mood-enhancing properties, helping to reduce stress and fatigue. The gentle warming sensation from ginger can stimulate circulation and boost energy,while turmeric’s ability to support brain health can enhance focus and emotional balance – making your tea time a mindful moment of recharge.
Q5: How do you prepare the perfect cup of Ginger Turmeric Tea?
A5: Start by simmering fresh slices of ginger and turmeric root (or their powdered versions) in water for about 10-15 minutes. Strain the liquid, then add a dash of black pepper to enhance absorption of curcumin, and sweeten with honey or a slice of lemon if you like. Sip slowly and savor the earthy-spicy aroma as it warms your soul.
Q6: Are there any precautions or side effects to consider?
A6: While Ginger Turmeric Tea is generally safe for most peopel, those with certain medical conditions or who are pregnant should check with a healthcare provider before making it a regular ritual. High doses of turmeric can sometiems cause digestive upset or interact with medications. Moderation is key to unlocking its benefits without risk.
Q7: Can this tea be enjoyed year-round?
A7: Definitely! Its warming qualities are perfect for chilly winter days, soothing and comforting like a gentle hug. But its refreshing and invigorating nature also makes it a great choice for sunny afternoons or whenever your body craves a natural pick-me-up. The Golden Elixir is truly a timeless companion for all seasons.
Q8: What’s the best way to incorporate Ginger Turmeric Tea into a wellness routine?
A8: Make it a mindful ritual-perhaps a quiet morning moment before the day begins or a calming pause in the afternoon rush. Pair it with deep breaths or light stretching to enhance its calming effects. Consistency is key; a daily cup can gently support your body’s natural healing and balance over time.
Unlock the magic in every golden sip – Ginger Turmeric Tea isn’t just a drink, it’s a journey to vibrant health and radiant energy.Cheers to the Golden Elixir!
In Summary
As the final sip of Golden Elixir warms your senses, it’s clear that this humble blend of ginger and turmeric is more than just a comforting beverage-it’s a gateway to ancient wellness traditions reinvented for today’s world. By unlocking the synergistic power of these vibrant roots,ginger turmeric tea invites you to embrace vitality,soothe your body,and elevate your daily ritual. So, whether you seek relief, rejuvenation, or simply a flavorful pause, let this radiant brew be your companion on the journey to holistic health and harmony. Cheers to the golden glow within every cup!
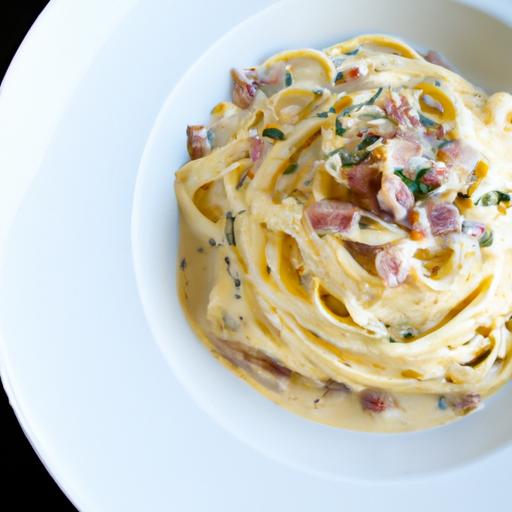
Unlocking Carbonara offers a captivating journey into Italy’s beloved creamy classic, revealing the rich heritage and delicate art behind every luscious forkful. Originating from the heart of Rome, this dish beautifully blends humble ingredients into an iconic symphony of flavors. As a culinary staple, carbonara has evolved distinctively through generations, and mastering its velvety sauce balance is key to capturing the authentic spirit so many adore worldwide.
Prep and Cook Time
Preparation: 10 minutes
Cooking: 15 minutes
Yield
Serves 4 hearty portions
Difficulty level
Medium – Requires careful timing and technique to achieve perfect creaminess without scrambling the eggs.
ingredients
- 400g spaghetti (or customary rigatoni for a classic Roman touch)
- 150g guanciale, diced (cured pork cheek – essential for authentic flavor)
- 3 large egg yolks (room temperature for smooth emulsification)
- 1 whole large egg
- 1 cup finely grated Pecorino Romano cheese (freshly grated for optimal melting)
- Freshly ground black pepper (coarse, for a spicy punch)
- Salt, for the pasta water only
Instructions
- Bring a large pot of salted water to a boil. Cook the spaghetti until al dente, usually 8-9 minutes, stirring occasionally to prevent sticking.
- Simultaneously occurring, in a large skillet over medium heat, sauté the diced guanciale until the fat renders and the pieces become crisp and golden, about 5 minutes.Remove from heat and keep warm.
- In a mixing bowl, whisk together the egg yolks, whole egg, and Pecorino Romano cheese until combined into a creamy, thick batter. Add a generous amount of freshly ground black pepper.
- Once pasta is al dente, reserve about 1 cup of the starchy cooking water and drain the spaghetti quickly.
- Transfer the hot pasta immediately to the skillet with guanciale, tossing to coat in the rendered fat.
- Remove the skillet from heat and slowly pour in the egg and cheese mixture, stirring briskly to create a silky sauce that clings to the pasta strands. Add reserved pasta water, a few tablespoons at a time, to reach the perfect creamy consistency without scrambling the eggs.
- Adjust seasoning with black pepper and a little Pecorino if desired.
- Serve immediately, garnished with additional Pecorino Romano and a dusting of cracked black pepper for that iconic Roman finish.
Tips for Success
- Use guanciale instead of pancetta or bacon. Its unique fattiness and texture are irreplaceable for authentic carbonara.
- Never add cream. Traditional carbonara relies solely on eggs and cheese to achieve its creamy texture.
- Temper the sauce carefully. Stir the egg mixture off the heat and incorporate pasta water gradually to prevent curdling.
- Work swiftly. Carbonara waits for no one – combine and serve immediately to enjoy its sublime lusciousness.
- For a make-ahead shortcut, prepare the guanciale in advance and warm gently just before assembly.
Serving Suggestions
Present your carbonara in shallow bowls to showcase the glistening strands coated in golden sauce. A final sprinkle of Pecorino Romano gives a snowy contrast, while a few twists of fresh black pepper add aromatic complexity. Pair with a crisp Italian white wine like Frascati for a perfect dining harmony. A simple green salad with lemon vinaigrette is a refreshing counterpoint to balance richness.

| Nutrient | Per Serving |
|---|---|
| Calories | 620 kcal |
| Protein | 28 g |
| Carbohydrates | 70 g |
| fat | 22 g |
For deeper insights into traditional Roman pasta sauces, explore this detailed academic resource on Italian culinary history.
Q&A
Q&A: Unlocking Carbonara – Secrets of Italy’s Creamy Classic
Q: What makes Carbonara so uniquely Italian?
A: Carbonara is a soulful symphony of simple ingredients that captures the essence of Italian cucina povera-turning pantry staples into a dish of luxurious comfort. Born in Rome, it speaks the language of tradition, where eggs, cured pork, Pecorino Romano cheese, and black pepper unite to create creamy magic without a drop of cream.
Q: why doesn’t authentic Carbonara include cream?
A: The creaminess of Carbonara comes from the delicate emulsion of egg yolks and cheese,gently coaxed by the heat of the pasta water.Adding cream masks this silky texture and overshadows the nuanced flavors, diluting the artisanal purity that defines the dish.
Q: What type of pork is traditionally used and why?
A: guanciale, pork jowl cured with salt and spices, is the authentic choice. Its rich, fatty profile melts into the pasta, infusing it with a smoky-salty depth unattainable with pancetta or bacon.Guanciale’s unique texture and flavor are key to Carbonara’s irresistible allure.
Q: How do you achieve that perfect creamy sauce without scrambling the eggs?
A: Timing and temperature are everything. Pasta should be sizzling yet not scorching when mixed with the egg and cheese mixture. Toss quickly off the heat, letting residual warmth gently cook the eggs into a silky cloak that clings to every strand-no scrambling, just velvety harmony.Q: Can you use othre cheeses besides Pecorino Romano?
A: Pecorino Romano is the classic choice,offering tangy,sharp notes with a salty bite.However, some recipes blend Pecorino with Parmigiano-Reggiano to balance sharpness with nuttiness. The key is to use aged, hard cheeses that melt into the sauce gracefully and elevate the flavor.
Q: Is Carbonara suitable for a fast weeknight dinner?
A: Absolutely! Carbonara is the epitome of quick gourmet. With just a handful of ingredients and under 20 minutes from start to finish,it’s a culinary secret weapon for busy nights-a fast track to italian indulgence right at home.
Q: are there common mistakes to avoid when making Carbonara?
A: Definitely.The biggest pitfalls include overheating the eggs causing scramble,using the wrong pork,or adding too much cheese,which can thicken the sauce excessively. also, skipping the pasta water can rob the sauce of its smooth texture, so always reserve some starchy cooking water to perfect your blend.
Q: How has Carbonara evolved over time?
A: While honoring tradition, Carbonara has inspired countless riffs worldwide-adding peas, cream, or vegetables-but purists hold tight to the original formula. Its evolution mirrors culinary innovation, yet its heart remains pure: simplicity meeting indulgence, a dish that tells the story of Rome’s vibrant food culture.
Q: What’s the best pasta shape for Carbonara?
A: Spaghetti reigns supreme, its slender strands capturing the sauce effortlessly. However, fettuccine, bucatini, or rigatoni also work beautifully, offering slightly different textures and holding the creamy sauce in unique ways-each bite a new experiance in classic comfort.
Q: what is the secret ingredient that makes Carbonara unforgettable?
A: The soulful interplay of technique and quality ingredients is the ultimate secret. beyond the basic quartet, patience in technique-the gentle folding of eggs into pasta, the right balance of salt and pepper-transforms humble components into a dish that’s nothing short of an Italian treasure.
Concluding Remarks
As the final strands of pasta twirl on your fork and the rich, velvety sauce coats each bite, you begin to understand why carbonara holds a cherished place in Italy’s culinary heart. Beyond its simple ingredients lies a timeless dance of technique and tradition-a tasty testament to the magic of restraint and respect for quality. Whether you’re a seasoned cook or a curious novice, unlocking the secrets of carbonara invites you to savor not just a meal, but a story woven through generations. So next time you gather around the table, remember: in every creamy, pepper-kissed forkful, you’re tasting a piece of Italy itself. Buon appetito!
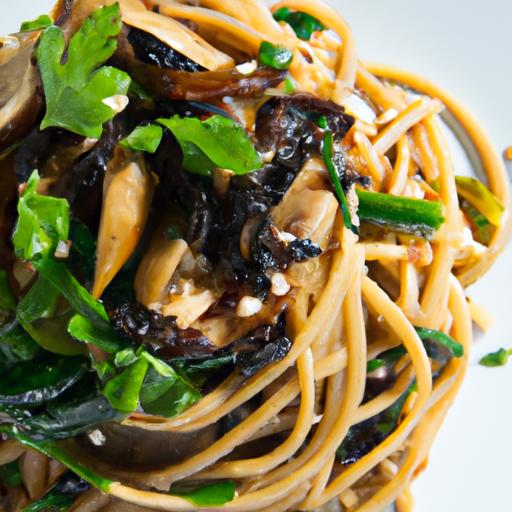
Unlocking flavor through the story behind black bean noodles transports us to the vibrant streets of Seoul, where this beloved dish-known locally as jajangmyeon-serves as a comforting symbol of fusion and tradition. Rooted in Chinese culinary influence but deeply embraced and transformed by Korean home cooks, black bean noodles have evolved as a versatile, soulful meal, perfect for sharing. The rich, savory sauce cloaking chewy noodles offers a harmony of umami, sweetness, and a subtle earthiness, making it an irresistible kitchen classic.
Prep and Cook Time
- Readiness: 15 minutes
- Cooking: 25 minutes
- Total: 40 minutes
Yield
Serves 4 hearty portions
Difficulty Level
Medium – Ideal for home cooks ready to master layering flavors and textures
Ingredients
- 300g fresh wheat noodles or dried Chinese-style wheat noodles
- 200g pork shoulder, finely diced (substitute with firm tofu for vegetarian)
- 1 medium onion, diced
- 2 tablespoons vegetable oil
- 3 cloves garlic, minced
- 1 medium zucchini, diced
- 1 medium potato, peeled and diced
- 100g cabbage, thinly sliced
- 3 tablespoons black bean paste (chunjang)
- 1 tablespoon sugar
- 1 cup chicken or vegetable broth
- 1 tablespoon cornstarch mixed with 3 tablespoons water (slurry)
- 1 teaspoon sesame oil
- Spring onions, thinly sliced for garnish
- 1 tablespoon toasted sesame seeds for garnish (optional)
Instructions
- Prepare the noodles: Cook the noodles in a large pot of boiling water according to package instructions until al dente. Drain, rinse under cold water to stop cooking, and set aside with a drizzle of sesame oil to prevent sticking.
- Cook the pork and vegetables: Heat vegetable oil in a large skillet over medium-high heat. Add diced pork and sauté until browned, about 4-5 minutes.Add onions and garlic,cooking until fragrant and translucent.
- Add vegetables: Incorporate zucchini, potato, and cabbage. Stir and sauté for about 5 minutes, allowing the vegetables to slightly soften but retain texture.
- Create the black bean sauce base: Push the ingredients to the side of the skillet and add the black bean paste directly to the pan. Fry the paste for 1-2 minutes to remove raw bitterness, stirring constantly.
- Combine and simmer: Mix the paste through the meat and vegetables. Add sugar and pour in broth gradually, stirring to create a glossy, aromatic sauce. Allow to simmer on low heat for 8-10 minutes, letting the flavors meld and the potatoes soften fully.
- Thicken the sauce: Slowly add the cornstarch slurry, stirring continuously until the sauce thickens to a smooth, clingy consistency that perfectly coats the noodles.
- Finish with sesame oil: Stir in sesame oil for a nutty aroma and depth.
- Serve: Plate the cooked noodles in bowls and generously ladle the sauce over the top. Garnish with sliced spring onions and toasted sesame seeds for an added crunch and freshness.
Chef’s Notes: Tips for Success
- Use fresh noodles if possible for a pleasantly chewy bite; dried noodles are a sturdy, convenient alternative.
- When frying the chunjang, maintain medium heat to avoid burning and developing bitterness.
- For vegan variations, swap pork with diced mushrooms or tempeh and use vegetable broth.
- The sauce thickens considerably as it cools-feel free to adjust the cornstarch slurry for desired consistency.
- Make the sauce in advance and store refrigerated; reheat gently on the stove with a splash of broth before serving.
Serving Suggestions
Black bean noodles shine with simplicity-serve immediately once sauced to preserve the interplay of textures and temperature.Accompany with Korean-style pickled radish (danmuji) for a crisp, tangy contrast. A light green salad or kimchi on the side enhances the meal’s brightness. For an indulgent touch, add boiled eggs or stir-fried shrimp as toppings.Present each bowl with an elegant sprinkle of sliced scallions and toasted sesame seeds to highlight the deep black sauce’s glossy allure.

| Nutrition | Per Serving |
|---|---|
| Calories | 450 kcal |
| Protein | 25g |
| Carbohydrates | 55g |
| Fat | 12g |
Discover more on how to master noodle sauces and Asian fusion techniques in our Authentic korean Noodle Dishes article. For an authoritative dive into black bean paste’s history and chemistry, visit Serious Eats on Black Bean Paste.
Q&A
Q&A: unlocking Flavor – The story Behind Black Bean Noodles
Q1: What exactly are black bean noodles?
A1: At their core, black bean noodles-often known as “Jajangmyeon”-are a harmonious blend of springy wheat noodles smothered in a rich, savory black bean paste sauce. This sauce, crafted from fermented black soybeans, infuses the dish with deep umami and a subtle sweetness that dances on the palate.
Q2: Where did black bean noodles originate?
A2: Though deeply loved in Korea today,black bean noodles trace their roots back to Chinese cuisine,particularly the dish known as “Zhajiangmian.” When these flavorful noodles crossed borders, Korean cooks adapted them, adding their own regional twist that transformed a humble Chinese noodle dish into a national favorite in Korea.
Q3: What’s the secret behind the black bean sauce?
A3: The sauce’s magic lies in “chunjang”-a fermented black soybean paste. This paste undergoes a meticulous process of fermentation, developing earthy, complex notes.When stir-fried with diced pork, onions, and sometimes vegetables like zucchini or potatoes, it creates a luscious coating that clings lovingly to each strand of noodle.
Q4: How has black bean noodles evolved over time?
A4: Black bean noodles have evolved from simple street food to gourmet interpretations. Modern chefs experiment with everything from premium cuts of meat and fresh seafood to vegetarian versions bursting with earthy mushrooms and tofu. Despite innovation, the essence remains-a comforting balance between starch, savory sauce, and a hint of sweetness.
Q5: Why is black bean noodles so beloved as comfort food?
A5: There’s a nostalgic charm embedded in every bite. The warm, hearty sauce combined with chewy noodles speaks to communal dining and simple pleasures. For many, black bean noodles evoke memories of family dinners, late-night cravings, and the joyous ritual of mixing noodles and sauce just so.
Q6: Can black bean noodles be made at home?
A6: Absolutely! While customary black bean paste can be elusive outside Asia, many specialty stores and online retailers now offer “chunjang.” With fresh noodles and a medley of vegetables and pork or tofu, home cooks can recreate this savory delight and unlock layers of flavor right in their kitchens.Q7: What makes black bean noodles stand out among other noodle dishes?
A7: Unlike broth-based or spicy noodles,black bean noodles offer a unique,velvety sauce that coats the noodles rather of soaking into a soup. This creates a rich mouthfeel and a powerful umami punch that lingers, making it simultaneously simple and profoundly satisfying.
Q8: How do people typically enjoy black bean noodles today?
A8: Often enjoyed piping hot and freshly tossed, black bean noodles can be accompanied by crunchy pickled radishes or a light cucumber salad to cut through the richness. Whether enjoyed solo or shared among friends, the dish invites slow savoring and delightful communal consumption.
Unlocking the story behind black bean noodles reveals more then just an iconic dish-it opens a window into cultural exchange, fermentation artistry, and the simple joy of savoring bold flavors intertwined with tradition.
Final Thoughts
As the rich, earthy aroma of black bean noodles lingers long after the last bite, it’s clear that this humble dish carries far more than flavor-it carries history, culture, and a testament to culinary ingenuity. From ancient origins to modern tables, black bean noodles invite us to savor not just a meal, but a story woven with tradition and innovation. So next time you twirl those glossy, saucy strands, remember: you’re partaking in a tasty narrative that unlocks a world of taste and heritage with every mouthful.
Unlocking Flavor: The Art and Science of Cold Smoked Salmon begins with a discerning eye for the perfect salmon. Selecting prime fish is basic to achieving that delicate balance of taste and texture that defines remarkable cold smoked salmon. Whether you’re sourcing wild-caught king salmon or sustainably farmed Atlantic fillets, the key lies in freshness, fat content, and flesh firmness. A vibrant hue with a slight sheen and a supple but firm texture promises the best smoking outcome.This culinary journey transforms a simple ingredient into an elevated delicacy.
Prep and Cook Time
- Preparation: 20 minutes
- Curing: 12-24 hours
- Cold Smoking: 6-12 hours
- total Time: Approximately 18-36 hours
Yield
Serves 6-8 generously as an elegant starter or appetizer.
Difficulty Level
Medium – requires attention to detail and temperature control but well within reach for excited home cooks.
Ingredients
- 2 lbs (900g) fresh salmon fillet, skin-on, pin-boned
- 1/4 cup kosher salt
- 1/4 cup granulated sugar
- 1 tbsp cracked black pepper
- 1 tsp dill seeds, crushed
- Optional: 1 tbsp juniper berries, crushed
- Wood chips: alder, applewood, or cherry (1 cup, soaked in water for at least 30 minutes)
- Ice packs or cooling trays for temperature maintenance
Instructions
- Prepare the curing mix: In a bowl, combine kosher salt, granulated sugar, cracked black pepper, dill seeds, and crushed juniper berries if using. This blend not only seasons but also draws moisture to enhance texture.
- Apply the cure: Spread a layer of the curing mix on the bottom of a non-reactive container.Place the salmon fillet skin-side down and cover the flesh entirely with the remaining mixture. Ensure it’s evenly coated for consistent curing.
- Refrigerate for 12-24 hours: Cover tightly with plastic wrap and place a weighted plate on top to press. This step intensifies flavor and firms the flesh,making it ideal for cold smoking.
- Rinse and dry: Remove salmon from cure, rinse thoroughly under cold water to remove excess salt and sugar. Pat completely dry with paper towels. For best results,let it air-dry on a rack in the refrigerator for 2-4 hours to develop a tacky pellicle that enhances smoke absorption.
- Set up your cold smoker: Prepare your smoker ensuring it holds temperatures between 70°F to 90°F (21°C to 32°C). Insert soaked wood chips-alder is classic for its mild sweetness, while applewood and cherry add fruity, nuanced smoke.
- Smoke the salmon: Hang or lay the salmon fillet on the rack,skin-side facing downward. Maintain steady low temperatures and smoke for 6-12 hours, depending on desired smokiness. Avoid hot spots to prevent cooking and preserve silky texture.
- Rest and store: once smoking is complete, remove the salmon and let it rest at room temperature for 30 minutes. Wrap tightly in parchment paper, then aluminum foil, and refrigerate.It’s best enjoyed within a week but can be frozen for up to 2 months.
Tips for Success
- consistency is key: Maintain cold temperatures rigorously to prevent cooking the salmon during smoking.
- Pellicle formation: Don’t rush drying; a well-formed pellicle greatly enhances smoke adherence and final flavor.
- Wood variety impacts flavor: Experiment with blends-applewood adds sweetness, alder offers subtle earthiness, and cherry imparts a delicate red hue and fruity notes.
- Use a digital thermometer: Monitor temperature closely to avoid accidental hot smoking.
- Prep in advance: The curing phase develops depth and can be done overnight for convenience.
Serving Suggestions
Present your cold smoked salmon with thin slices on a rustic wooden platter or atop crisp rye toast points. Garnish with fresh dill sprigs,thinly sliced red onions,capers,and a squeeze of lemon to brighten flavors. A dollop of crème fraîche or avocado mash offers luscious creaminess. For a luxe touch, pair with chilled champagne or a crisp Sauvignon Blanc. This dish elevates any occasion, from brunches to intimate gatherings.

Nutrition Facts
| Nutrient | Per Serving (approx.) |
|---|---|
| Calories | 180 kcal |
| Protein | 22 g |
| Carbohydrates | 1 g |
| Fat | 10 g |
For an in-depth exploration of flavor pairings with smoked fish, check out our Perfect Wine Pairings for Smoked Salmon article. To deepen your cold smoking technique knowledge, visit Serious eats – Cold smoking Techniques, an excellent resource on temperature control and smoke selection.
Q&A
Q: What exactly is cold smoked salmon, and how does it differ from hot smoked salmon?
A: Cold smoked salmon is a delicacy crafted by exposing raw salmon to smoke at low temperatures-typically between 68°F and 86°F (20°C to 30°C)-over several hours or even days. Unlike hot smoked salmon,which is cooked by heat and has a flaky texture,cold smoked salmon remains silky,tender,and raw in appearance,offering a delicate balance of smoky flavor and natural freshness.
Q: How does cold smoking unlock unique flavors in salmon?
A: Cold smoking infuses salmon with aromatic compounds from wood smoke without cooking the fish. this process gently imparts complex smoky nuances-ranging from sweet and fruity to robust and earthy-while preserving the fish’s buttery texture. the low temperature allows the salmon’s natural oils and umami to mingle with the smoke, creating a harmonious taste experience that’s both subtle and profound.
Q: What role does the choice of wood play in cold smoking salmon?
A: The type of wood is the artist’s palette in cold smoking. alder wood, for example, lends a mild and slightly sweet smoke, often favored in Scandinavian traditions. Fruitwoods like apple and cherry bring a delicate sweetness and fruity aroma, while hickory offers a stronger, more assertive character.Selecting the wood carefully tailors the flavor profile, turning each batch of smoked salmon into a unique culinary creation.
Q: Is cold smoked salmon safe to eat if it’s not cooked?
A: Absolutely-but with some caveats. Because cold smoked salmon is technically raw, it requires strict handling and curing to ensure safety. Typically, the fish is cured with salt and sugar beforehand, which inhibits bacterial growth and preserves freshness. When purchased from reputable sources and stored properly, cold smoked salmon is safe and delightfully tasty. However, it’s advisable for vulnerable groups, like pregnant women or immunocompromised individuals, to consult their doctors before consuming it.
Q: Can I make cold smoked salmon at home, or is it better left to the experts?
A: While cold smoking at home is possible, it demands patience, precise temperature control, and impeccable hygiene to master.Hobbyists often experiment with curing times, wood choices, and smoking durations to unlock their perfect flavor. However,since the process involves raw fish,beginners should tread carefully and perhaps start with hot smoking before venturing into the delicate art of cold smoking. For the full sensory journey, many recommend experiencing premium cold smoked salmon from artisanal or boutique producers.
Q: Besides flavor, does cold smoking affect the texture of salmon?
A: Definitely. cold smoking transforms salmon into a luscious, velvety delight. Unlike hot smoking, which firms and flakes the fish, cold smoking preserves its silky, almost buttery mouthfeel.The curing step draws out moisture, concentrating flavors and giving the salmon a pleasantly dense, yet tender texture that melts on the tongue-a true hallmark of this culinary art.
Q: What are some classic ways to enjoy cold smoked salmon?
A: The versatility of cold smoked salmon shines beautifully in countless dishes. Think delicate bagels adorned with cream cheese, capers, and dill; elegant canapés with horseradish crème fraîche; or salads kissed with lemon and arugula. it also elevates pasta, risotto, and eggs Benedict, adding layers of smoky sophistication. Essentially, cold smoked salmon can transform simple meals into memorable feasts with a whisper of artisanal charm.
Q: Why has cold smoked salmon maintained its allure throughout culinary history?
A: Cold smoked salmon is a timeless intersection of nature, tradition, and technique. From Nordic coasts to Pacific shores, humans have long sought to preserve and enhance one of the ocean’s finest gifts. The allure lies in its ability to marry preservation with artistry-locking in freshness, heightening flavor, and creating a sensory experience that’s both humble and luxurious. It’s this blend of science and soul that keeps cold smoked salmon a beloved treasure on tables worldwide.
The Way Forward
As the delicate tendrils of smoke weave their way into the flesh of the salmon, a change takes place-one that marries time-honored tradition with precise scientific craft. Unlocking the nuanced flavors of cold smoked salmon is more than a culinary technique; it’s an art form that celebrates patience, temperature, and the subtle alchemy of smoke. Whether enjoyed on a crisp bagel, paired with creamy dill sauce, or savored on its own, this exquisite delicacy reminds us that behind every bite lies a story of careful balance and creative mastery.Embracing both nature and knowledge, cold smoked salmon invites us to taste not just food, but the very essence of flavor unlocked.

Timeless Flavors guide us into the heartwarming world of beloved family recipes, where every bite tells a story of tradition, love, and secret techniques passed down through generations. This cherished dish, inspired by Grandma’s kitchen, embraces the perfect harmony of classic methods and subtle twists that transform simple ingredients into a culinary masterpiece. As you delve into this recipe, you’ll discover how mastering foundational cooking skills and unveiling those hidden ingredients can elevate flavors to new heights, inviting you to preserve heritage while imprinting yoru personal touch.
Prep and Cook Time
Readiness: 20 minutes | Cooking: 40 minutes | Total: 1 hour
Yield
Serves 6-8 hearty portions
Difficulty Level
Medium – perfect for home cooks wanting to refine their culinary technique with approachable guidance
Ingredients
- 2 cups all-purpose flour, sifted
- 1 teaspoon baking powder
- 1/2 teaspoon sea salt
- 1/2 cup unsalted butter, softened
- 3/4 cup granulated sugar
- 3 large free-range eggs
- 1 teaspoon pure vanilla extract
- 1 cup whole milk
- 1 tablespoon Grandma’s secret ingredient: freshly grated lemon zest
- 1/2 cup chopped toasted walnuts (optional)
- Butter or oil for greasing
Instructions
- preheat your oven to 350°F (175°C). Lightly grease your baking pan with butter or oil to ensure a golden crust.
- In a medium bowl, combine the sifted flour, baking powder, and sea salt. Set aside.
- In a larger mixing bowl, cream the softened butter and sugar together until the mixture becomes light and fluffy – about 3-4 minutes using a hand mixer or stand mixer on medium speed. This aeration step is key for a tender crumb.
- Beat in the eggs one at a time, making sure each is fully incorporated before adding the next. Stir in the vanilla extract and the freshly grated lemon zest to awaken radiant citrus notes hidden within the mix.
- Alternately add the dry ingredients and milk to the butter mixture, beginning and ending with the dry ingredients. mix gently after each addition – overmixing can toughen the batter, so fold with care.
- If using, fold in the toasted walnuts now for texture and a subtle richness.
- Pour the batter evenly into the prepared pan, smoothing the top with a spatula for uniform baking.
- Bake for 35-40 minutes,or until a toothpick inserted in the center comes out clean. Rotate the pan halfway through baking for even cooking.
- Remove from oven and let the cake cool in the pan for 10 minutes before transferring to a cooling rack.This resting period ensures the cake sets beautifully and slices cleanly.
Tips for Success
- Use room temperature eggs and butter for smooth blending and better rise.
- If lemon zest isn’t your favorite, experiment with orange or lime zest for unique citrus undertones.
- To enhance moisture, add 2 tablespoons of sour cream or Greek yogurt to the batter.
- Make ahead: This cake actually tastes better the next day, wrapped tightly at room temperature.
- For a gluten-free option, substitute the flour with a 1:1 gluten-free baking blend, adjusting liquid slightly if needed.
Serving Suggestions
This classic cake pairs beautifully with a dollop of freshly whipped cream or a scoop of vanilla bean ice cream for an indulgent touch. Garnish with a sprinkle of extra lemon zest or a handful of walnuts to echo the cake’s flavor profile and add a rustic charm. Serve alongside a cup of fragrant Earl Grey tea or freshly brewed coffee to recreate those cozy, timeless moments shared around Grandma’s kitchen table.

Nutritional Information (per serving)
| calories | Protein | Carbs | Fat |
|---|---|---|---|
| 310 | 5g | 42g | 13g |
To deepen your culinary journey with more cherished recipes from the past, consider exploring our Classic Dessert Collection. For expert guidance on perfecting baking techniques, visit King Arthur Baking, an industry-leading resource.
Q&A
Q&A: Timeless Flavors – Unlocking Grandma’s Secret Recipes
Q1: What makes grandma’s recipes so special and timeless?
A1: Grandma’s recipes carry more than just ingredients-they carry memories, stories, and a sprinkle of love handed down through generations. They blend simplicity with soulful flavor, frequently enough rooted in local traditions and seasonal produce, making each dish a comforting taste of the past that transcends time.
Q2: How can modern cooks recreate these treasured dishes without having the original recipe?
A2: Start by focusing on the fundamentals: fresh, quality ingredients and slow, patient cooking. Many grandma-style recipes rely on intuition rather than measurements, so trust your senses-taste, smell, and texture. Don’t be afraid to ask family members for hints, or explore regional cooking methods that inspired the dish. most importantly, embrace the spirit of experimentation and love in the kitchen.
Q3: What role do secret ingredients play in these family recipes?
A3: secret ingredients are frequently enough the heart of family recipes, a unique twist or unexpected addition that sets grandma’s dishes apart. It might very well be a pinch of a rare spice, a splash of homemade vinegar, or a special technique like slow caramelization. These little secrets create an unmistakable signature flavor that transforms everyday meals into treasured heirlooms.
Q4: Why is it vital to preserve and share these recipes today?
A4: Preserving grandma’s recipes is like preserving a cultural and emotional heritage. In a fast-paced world dominated by convenience, these recipes remind us of patience, connection, and the joy of nurturing loved ones. Sharing them keeps family histories alive and inspires new generations to value tradition while adding their own creative touches.
Q5: Can unlocking grandma’s secret recipes influence modern culinary trends?
A5: Absolutely! Many contemporary chefs and food enthusiasts are rediscovering the magic of traditional cooking, tapping into timeless techniques and flavors to create fusion dishes that honour the past while innovating for the future. Grandma’s recipes offer a blueprint for authentic, flavorful, and heartfelt cuisine that modern palates crave.
Q6: What’s the best way to start your own journey in uncovering family recipes?
A6: begin with conversations-sit down with relatives, jot down memories, and collect any handwritten notes or scrapbooks. Taste the dishes together, ask about each technique, and document what you learn. From there, experiment in your kitchen, making adjustments while preserving the essence. Each attempt is a step closer to unlocking your family’s secret flavors.
Unlocking grandma’s secret recipes invites us not only to savor astonishing flavors but also to connect deeply with our roots, bridging generations through every lovingly prepared bite.
Final Thoughts
As we close the chapter on these treasured recipes, it’s clear that Grandma’s culinary secrets are more than just ingredients and instructions-they are heirlooms of flavor, stories woven through generations, and bridges connecting past and present. Unlocking these timeless flavors invites us to savor not only the dishes but also the love and tradition simmering beneath every bite. So, whether you’re stirring a pot passed down from your grandmother or crafting your own version, remember: in every recipe lies a appetizing invitation to keep family history alive, one plate at a time.