Savoring Sardines Pasta instantly transports you to the sun-drenched coastal villages of Sicily, where fresh, simple ingredients transform humble sardines into an unforgettable culinary masterpiece.This dish embodies the essence of Mediterranean cooking-robust flavors, fresh herbs, and the sea’s bounty combined in perfect harmony. My first encounter with this classic was during a family trip to Sicily, where the aromatic blend of garlic, fennel, and sardines served over al dente pasta ignited a deep gratitude for coastal Italian cuisine. It’s a dish that celebrates tradition while embracing effortless elegance,inviting home cooks to savor every bite of this coastal treasure with confidence and creativity.
Prep and Cook Time
- Readiness: 15 minutes
- Cooking: 20 minutes
- Total: 35 minutes
Yield
Serves 4 generous portions
Difficulty Level
Medium – ideal for cooks looking to hone their balancing of bold flavors and textural contrasts
Ingredients
- 350g spaghetti or bucatini pasta
- 120g fresh sardines, cleaned and filleted (or quality canned sardines in olive oil)
- 3 tbsp extra virgin olive oil
- 3 cloves garlic, finely minced
- 1 medium bulb fennel, thinly sliced (reserve fronds for garnish)
- 1/2 tsp chili flakes (adjust to taste)
- 1/2 cup white wine (dry)
- 2 tbsp toasted pine nuts
- 1/4 cup golden raisins, soaked in warm water for 10 minutes and drained
- 1 tbsp capers, rinsed
- Fresh parsley, finely chopped, for garnish
- Salt and freshly ground pepper, to taste
- Juice of 1/2 lemon
Instructions
- Cook the pasta: Bring a large pot of salted water to a boil. Add pasta and cook until just shy of al dente (about 2 minutes less than package instructions). Reserve 1 cup of pasta water, then drain the pasta and set aside.
- Sauté the aromatics: Heat olive oil in a large skillet over medium heat. Add minced garlic and sliced fennel. Sauté until fragrant and tender, about 5-7 minutes, stirring frequently enough to prevent burning.
- Add chili flakes and sardines: Stir in chili flakes, then gently fold in the sardine fillets. If using fresh sardines, cook until they flake easily, about 3 minutes. For canned sardines, gently warm through without breaking them down too much.
- Deglaze the pan: Pour in the white wine and let it simmer until mostly evaporated,3-4 minutes,enhancing the dish’s depth and balancing the fatty richness of the sardines.
- Integrate pine nuts, raisins, and capers: Toss in toasted pine nuts, plump raisins, and capers. they add a lovely harmony of crunchy, sweet, and briny notes that define this dish’s soulful flavor profile.
- Combine pasta and sauce: Add the drained pasta to the skillet.Toss everything together, adding reserved pasta water a little at a time to loosen the sauce and coat the pasta evenly. Season with salt, pepper, and finish with a squeeze of fresh lemon juice for brightness.
- Garnish and serve: Transfer to serving plates. Sprinkle generously with chopped parsley and reserved fennel fronds for a refreshing herbal lift. Serve immediately for the best texture and aroma.
Tips for Success
- Fresh vs. canned sardines: Fresh offer brighter flavor and firmer texture, while canned are more accessible and add richness from the oil.
- Don’t skip soaking raisins: This simple step plumps them up,giving bursts of juicy sweetness that complement the savory components.
- Control your heat: Keep the sauté on medium to avoid burning garlic, which can add unneeded bitterness.
- Make ahead: Prep your sauce ahead and rewarm gently. Toss with freshly cooked pasta right before serving for best results.
Serving Suggestions
Serve your Sardines Pasta plated elegantly in shallow bowls for showcasing the vibrant colors and textures. Accompany with crusty artisan bread to soak up the savory sauce. A crisp green salad with lemon vinaigrette adds a refreshing contrast. For wine pairing, a chilled Vermentino or dry Sauvignon blanc beautifully complements the dish’s coastal herbs and briny punch. garnish with freshly grated bottarga or pecorino Romano for an elevated, umami-rich finish.
| Nutritional Info (per serving) | Calories | Protein | Carbs | Fat |
|---|---|---|---|---|
| Sardines Pasta | 430 kcal | 25 g | 50 g | 12 g |

Explore more Mediterranean recipes like this in our Mediterranean Classics Collection. For an in-depth history of sardine fishing and its impact on coastal communities,visit National Geographic.
Q&A
Q&A: Savoring Sardines Pasta – A Coastal Classic Reimagined
Q1: What makes sardines pasta a “coastal classic”?
A1: Sardines pasta hails from the sun-kissed shores of Sicily, where the sea’s bounty meets rustic Italian cooking. It’s a dish rooted in tradition, blending simple, fresh ingredients-like sardines, wild fennel, pine nuts, and saba-with al dente pasta to celebrate the flavors of the Mediterranean coast.Q2: Why are sardines such a beloved ingredient in this dish?
A2: Sardines pack a savory punch-rich in umami, oily texture, and a touch of briny sweetness. They’re not only delicious but also sustainable and nutrient-dense, making them a timeless treasure of coastal kitchens. Their robust flavor pairs beautifully with herbs, citrus, and crunchy toppings, turning humble pasta into a complex, soulful experience.
Q3: How can this conventional dish be reimagined for a modern palate?
A3: Reimagining sardines pasta means playing with textures and complementary flavors.Think adding crispy breadcrumbs toasted with chili flakes for a satisfying crunch, or infusing the sauce with preserved lemon for a shining zing. Some chefs experiment with different pastas-like trofie or bucatini-to vary the mouthfeel,while others introduce subtle smoky or spicy twists to elevate the classic profile.
Q4: What herbs and aromatics are essential to capturing the coastal essence?
A4: Wild fennel fronds are the hallmark herb, lending a sweet anise note that recalls seaside breezes. Garlic and onion form the aromatic base, while fresh parsley or mint can add freshness and color. The occasional splash of saffron or a drizzle of quality extra virgin olive oil finishes the dish with golden warmth and depth.
Q5: Is sardines pasta difficult to prepare at home?
A5: Not at all! Sardines pasta is wonderfully approachable. The key is sourcing fresh or high-quality canned sardines and balancing the flavors delicately. with just a handful of pantry staples-pasta, sardines, aromatics, nuts, and herbs-you can bring this coastal classic to your table in under 30 minutes, impressing guests with an authentic taste of the Mediterranean.
Q6: what wine or beverage pairs best with sardines pasta?
A6: A crisp, mineral-driven white wine shines alongside this dish. Try a Vermentino, Gruner Veltliner, or a chilled Sauvignon Blanc-their bright acidity cuts through the richness of sardines and harmonizes with the herbal, citrus highlights. For a non-alcoholic option, sparkling water with a lemon twist refreshes the palate beautifully.
Q7: Can sardines pasta be adapted for dietary preferences?
A7: Absolutely. For a gluten-free twist, swap traditional pasta for gluten-free varieties or spiralized vegetables like zucchini ribbons. To tone down the fishiness,opt for smoked mackerel or anchovies in smaller amounts. Vegan adaptations might replace sardines with sautéed mushrooms and a splash of seaweed-infused broth to echo the oceanic notes.
Q8: Why should chefs and food lovers explore sardines pasta today?
A8: Beyond its comforting flavors, sardines pasta embodies a story of place-of coastal communities, sustainability, and culinary creativity.In a world craving authentic, healthy, and environmentally kind food, revisiting this classic with fresh ideas offers a vibrant connection to the sea, tradition, and the art of simplicity done well. It’s a dish that invites savoring-not just eating.
In Summary
As the last forkful of Sardines Pasta disappears, you’re left with more than just a satisfied palate-you carry with you a taste of coastal tradition, lovingly reimagined for the modern table. this dish, where humble sardines meet the comfort of pasta, reminds us that culinary magic often lies in simplicity and the boldness to innovate. So next time you crave a meal that tells a story of sea-swept shores and timeless flavor, remember this coastal classic-elevated, vibrant, and ready to inspire your own kitchen creations.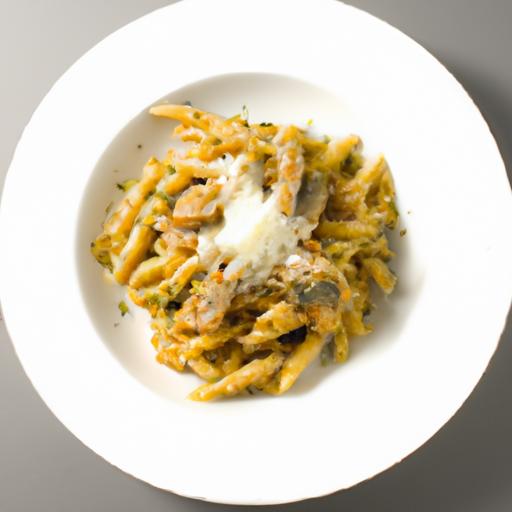
Crunchy mornings come alive with a vibrant bowl that marries creamy oatmeal and the irresistible snap of toasted nuts-an unbeatable duo that brings both nutrition and crave-worthy texture to your start of day. This wholesome breakfast tradition traces back centuries, where oats first fueled hardworking souls with enduring energy, and today’s nutty additions elevate that legacy with a delightful crunch and rich flavor. Whether you’re fueling a busy morning or seeking calm with a comforting ritual,this dish is as versatile as it is satisfying.
Prep and Cook Time
- readiness: 5 minutes
- Cooking: 10 minutes
- Total Time: 15 minutes
Yield
Serves 2 hearty portions
Difficulty Level
Easy
Ingredients
- 1 cup rolled oats (old-fashioned)
- 2 cups water or milk (dairy or plant-based)
- 1/4 cup mixed nuts (almonds,pecans,walnuts),roughly chopped
- 1 tablespoon honey or maple syrup
- 1/2 teaspoon ground cinnamon
- Pinch of sea salt
- 2 slices whole-grain bread
- 1 tablespoon unsalted butter or nut butter (for toast)
- Fresh berries or sliced banana for garnish (optional)
- 1 teaspoon chia seeds or flaxseeds (optional)
Instructions
- Warm the nuts: In a dry skillet over medium heat,toast the chopped nuts until fragrant and golden,about 3-5 minutes,stirring frequently to avoid burning. Set aside to cool.
- Cook the oatmeal: In a medium saucepan, bring 2 cups of water or milk to a gentle boil. Stir in the rolled oats, sea salt, and ground cinnamon. Reduce heat to low and simmer, stirring occasionally, until the oats are soft and creamy, about 7-10 minutes.
- sweeten and enrich: Remove the oatmeal from heat and stir in honey or maple syrup. For extra creaminess, add a splash of milk if desired.
- Prepare the toast: While oats cook, toast the bread slices to golden perfection. Spread with butter or your favorite nut butter for a luscious, nutty layer.
- Assemble the bowl: Divide the cooked oatmeal between bowls. Sprinkle the toasted nuts generously on top,adding chia seeds or flaxseeds for a nutritional boost.
- Garnish and serve: Top with fresh berries or banana slices, then serve alongside the nut-butter toast for a complete crunchy mornings experience.
Tips for Success
- Nut variations: Feel free to swap almonds and walnuts for hazelnuts, pistachios, or even pepitas-each brings its unique flavor and crunch.
- Make ahead: Cook the oatmeal the night before and refrigerate. Reheat with a splash of milk and add the nuts fresh for maximum crunch.
- Texture tuning: For a creamier texture, use steel-cut oats but increase cooking time accordingly. Rolled oats remain the best choice for quick, creamy bowls.
- Nut toast upgrade: Lightly drizzle honey or sprinkle sea salt on the nut butter toast to add a sweet-salty contrast.
- Allergy-amiable: Substitute nuts with toasted seeds like sunflower or pumpkin seeds for those avoiding tree nuts.
Serving suggestions
Enjoy your crunchy mornings bowl by serving it in a wide, shallow bowl to showcase the textures.A drizzle of warm honey glistening over the nuts visually invites indulgence, while edible flowers add a stunning pop of color for brunch presentations. Pair this with a hot mug of spiced chai or freshly brewed coffee for a soul-warming start.Leftover nut toast can be transformed into mini crackers by slicing thinly and baking until crisp, perfect for savory spreads or cheese boards.
| Nutrient | Per Serving |
|---|---|
| Calories | 350 kcal |
| Protein | 9 g |
| Carbohydrates | 45 g |
| Fat | 12 g |

Discover more nourishing breakfast ideas like this in our Healthy Breakfast Recipes collection. For a deeper dive into the science of oats and heart health, visit American Heart Association’s Oatmeal Guide.
Q&A
Q&A: Crunchy Mornings - Oatmeal with Nuts and Toast Delight
Q1: What makes “Crunchy Mornings” oatmeal different from your regular bowl of oats?
A1: Unlike customary creamy oatmeal, “Crunchy Mornings” transforms the humble oat into a delightful medley of textures and flavors.The secret lies in the toasted nuts sprinkled on top and a side of perfectly browned toast, offering a satisfying crunch that dances with the warmth and softness of the oats. It’s breakfast with a little extra oomph!
Q2: Which nuts work best to achieve that ideal crunch?
A2: Walnuts, almonds, and pecans are your crunchy champions here. Toasting them lightly enhances their nutty aroma and crispiness, creating a delightful contrast against the creamy oatmeal. Plus, these nuts add a hearty depth of flavor and a boost of nutrients to jumpstart your day.
Q3: Is this breakfast just about taste, or does it offer health benefits too?
A3: It’s a win-win! Oatmeal is a fantastic source of soluble fiber, promoting heart health and steady energy release. Nuts bring healthy fats, protein, and antioxidants to the table, while whole-grain toast adds complex carbs and fiber. Together, they create a balanced, nutrient-rich meal that keeps you full and focused until lunch.
Q4: How can I make my toast “delightful”? Any toppings or techniques?
A4: Think golden-brown perfection-thinly sliced, buttered or drizzled with olive oil, and toasted until crisp. For extra flair, spread a layer of almond butter, a touch of honey, or a sprinkle of cinnamon.The toast should not only complement the oatmeal but also add its own flavorful crunch to the morning ensemble.
Q5: Can I customize “Crunchy Mornings” to suit different dietary preferences?
A5: Absolutely! Swap dairy milk for almond, oat, or coconut milk for a plant-based version.Use gluten-free oats and bread for gluten sensitivity. Sub in seeds like pumpkin or sunflower if nuts aren’t your thing. The beauty of this recipe is its versatility-personalize your crunch and savor every bite your way.
Q6: Any tips for making the oatmeal itself more exciting?
A6: Yes! cook your oats with a pinch of cinnamon or a splash of vanilla extract to elevate the flavor. Stir in fresh fruits like berries or diced apples for natural sweetness and color.A dash of sea salt can also enhance the overall taste by balancing the sweetness and nutty notes.
Q7: What’s the best time to enjoy “Crunchy Mornings”?
A7: Anytime your day calls for a cozy, comforting boost! It’s perfect for a slow weekend breakfast, a quick weekday energizer, or even a late-night snack. Wherever you are, “Crunchy Mornings” invites you to slow down and savor the simple joy of a thoughtfully crafted meal.
Enjoy turning your mornings into a celebration of crunch,comfort,and wholesome goodness!
Insights and Conclusions
As the sun rises and sets the day in motion,nothing quite matches the satisfying crunch and wholesome warmth of a morning ritual featuring oatmeal with nuts paired alongside a golden toast delight. This simple yet nourishing combo not only fuels your body with essential nutrients but also awakens your senses with every bite. Whether you prefer the subtle sweetness of toasted almonds or the zing of honey-drizzled oats, embracing crunchy mornings turns the everyday breakfast into a vibrant celebration of texture and taste. So next time dawn breaks, let your breakfast table tell a story of comfort, health, and a little bit of crunch – as great mornings start with great choices.
Smoky BBQ Pulled Pork with Sweet Potatoes: A Flavorful Feast
Smoky BBQ pulled pork with sweet potatoes promises a soul-satisfying meal that combines tender, slow-cooked meat with naturally sweet, caramelized sides – a match made in BBQ heaven. This dish draws inspiration from Southern barbecue traditions where patience and flavor-building techniques transform humble ingredients into an unforgettable feast. I still recall my first backyard cookout mastering this recipe, where the aroma of smoked pork mingling with sweet potatoes teased every guest’s appetite long before the first bite.
Prep and Cook Time
- Preparation: 20 minutes
- Cooking: 6 to 8 hours (low and slow smoking)
- Resting: 30 minutes
Yield
Serves 6 to 8 hungry guests, perfect for family dinners or casual weekend parties.
Difficulty Level
Medium – requires time and attention but well within reach for most home cooks eager to embrace barbecue techniques.
ingredients
- 4 to 5 lbs pork shoulder (Boston butt), bone-in and trimmed of excess fat
- 2 tbsp smoked paprika
- 1 tbsp coarse kosher salt
- 1 tbsp brown sugar, packed
- 1 tsp black pepper, freshly ground
- 1 tsp garlic powder
- 1 tsp onion powder
- ½ tsp cayenne pepper
- 1 cup apple cider vinegar
- 1 cup water (for spraying)
- 4 large sweet potatoes, scrubbed and halved lengthwise
- 2 tbsp olive oil
- Salt and pepper, to taste
- For the homemade BBQ sauce:
- 1 cup ketchup
- ⅓ cup apple cider vinegar
- ¼ cup brown sugar
- 2 tbsp Worcestershire sauce
- 1 tbsp smoked paprika
- 1 tsp chili powder
- 1 tsp garlic powder
- ½ tsp black pepper
Instructions
- Prepare the pork rub: In a small bowl, combine smoked paprika, kosher salt, brown sugar, black pepper, garlic powder, onion powder, and cayenne pepper. rub this mixture generously all over the pork shoulder, massaging it into every nook.
- Preheat your smoker or grill: Aim for a steady temperature of 225°F to 250°F. Use hardwoods like hickory or apple wood for that rich, authentic smoky flavor.
- Smoke the pork: Place the shoulder fat-side up directly on the smoker rack. Smoke low and slow for 6 to 8 hours, spraying every hour with a mixture of apple cider vinegar and water to keep the meat moist and enhance bark formation.
- Check the internal temperature: Your target is 195°F to 205°F, at which the pork is tender enough to pull apart effortlessly.
- Rest the meat: remove from the smoker, tent loosely with foil, and let rest 30 minutes before shredding. Resting steadies the juices, resulting in juicy pulled pork.
- Prepare the sweet potatoes: While pork rests, preheat the oven to 400°F. Brush sweet potato halves with olive oil, season with salt and pepper, and roast on a baking sheet for 40-50 minutes, turning halfway, until soft and caramelized. The natural sweetness beautifully contrasts the smoky, savory pork.
- Make the BBQ sauce: In a saucepan over medium heat, whisk together ketchup, apple cider vinegar, brown sugar, Worcestershire sauce, smoked paprika, chili powder, garlic powder, and black pepper.Simmer for 15 minutes, stirring occasionally, until slightly thickened and glossy.
- Pull the pork: Using two forks, shred the pork shoulder into bite-sized pieces. Mix in half of the BBQ sauce for extra flavor, reserving the rest for serving.
- Plate and serve: Arrange smoky pulled pork beside golden roasted sweet potatoes. Drizzle additional BBQ sauce and garnish with fresh chopped parsley or sliced jalapeños for a pop of colour and heat.
Tips for Success
- Choose the right cut: Opt for pork shoulder or Boston butt as they have the perfect fat marbling essential for moist pulled pork.
- Control your smoke: To much smoke can turn bitter-aim for a thin, steady smoke cloud and avoid over-smoking.
- Patience is key: Avoid rushing the smoke time. The low-temp, long-cook process breaks down collagen for that tender, fall-apart texture.
- Make sauce ahead: BBQ sauce can be refrigerated up to one week and often tastes better the next day as flavors meld.
- Customize your rub: Feel free to experiment by adding mustard powder, cumin, or even coffee grounds to deepen your smoky profile.
- Storing leftovers: Refrigerate pulled pork in an airtight container for up to 4 days or freeze for up to 3 months. Reheat gently with a splash of apple juice or water to keep moist.
Serving Suggestions
Serve your smoky BBQ pulled pork with roasted sweet potatoes alongside crisp coleslaw or pickled red onions to add crunch and tang. Offer soft brioche buns or corn tortillas for DIY sandwiches and tacos. Garnish with fresh green onions, cilantro, or a dollop of cool sour cream to balance the heat. Complement this feast with a side of grilled corn or smoky baked beans for an authentic BBQ spread.
| Nutrient | Per Serving |
|---|---|
| Calories | 520 kcal |
| Protein | 45 g |
| Carbohydrates | 25 g |
| Fat | 26 g |
Discover more BBQ secrets in our Ultimate BBQ Guide or learn to master smoke control with expert advice from Serious Eats.

Q&A
Q&A: Smoky BBQ Pulled Pork with Sweet Potatoes – A Flavorful Feast
Q1: what makes smoky BBQ pulled pork paired with sweet potatoes such a winning combination?
A1: It’s all about balance! The rich, smoky, and savory notes of the pulled pork are beautifully complemented by the natural sweetness and creamy texture of roasted or mashed sweet potatoes. Together, they create a harmonious bite that satisfies both comfort food cravings and a touch of healthy indulgence.
Q2: How do you achieve that perfect smoky flavor in BBQ pulled pork?
A2: The secret lies in a slow cooking process paired with a smoky spice rub or smoked wood chips if you’re grilling or smoking. Using paprika, cumin, garlic powder, and a hint of chili pepper can build that deep, layered flavor. low-and-slow cooking helps the meat absorb thes spices and become fall-apart tender.
Q3: Are sweet potatoes just a side, or can they be incorporated into the dish?
A3: Sweet potatoes are versatile stars here! They can be served as a simple roasted side, mashed with a touch of butter and cinnamon, or even shredded and tossed into the pulled pork for added texture and flavor bursts. They bring a subtle sweetness that balances the smoky meat’s boldness.
Q4: What’s the best cut of pork to use for pulled pork in this recipe?
A4: Pork shoulder (also called pork butt) is your go-to choice. It’s well-marbled with fat, which melts during long cooking, keeping the meat juicy and tender. This cut easily shreds into strands that soak up sauces and spices beautifully.
Q5: Can this dish be made ahead of time?
A5: Absolutely! Pulled pork actually benefits from resting in the fridge overnight, allowing flavors to deepen. sweet potatoes can be roasted in advance and reheated. This makes it a perfect meal for gatherings or busy weeknights where you crave something hearty but hassle-free.
Q6: How can you adjust the spice level in this recipe?
A6: The beauty of BBQ pulled pork is its adaptability. To turn up the heat, add cayenne pepper or hot smoked paprika to your rub. for a milder experience, stick with sweet paprika and a small pinch of black pepper. Sweet potatoes also naturally mellow the spice, giving a well-rounded flavor profile.
Q7: What sides or garnishes work best with smoky BBQ pulled pork and sweet potatoes?
A7: Fresh, crisp sides like coleslaw or a tangy cucumber salad add brightness and crunch, cutting through the richness. Pickled jalapeños or a drizzle of tangy BBQ sauce can enhance the smokiness. for toppings, go with fresh herbs like cilantro or parsley, and a dollop of creamy sour cream or Greek yogurt.
Q8: Is this dish suitable for meal prepping or freezing?
A8: Yes! Both pulled pork and sweet potatoes freeze well.Portion them into airtight containers for convenient lunches or dinners.When reheating, warm gently to retain moisture and flavor. this makes your smoky BBQ pulled pork with sweet potatoes a delicious, ready-to-go feast anytime.
Q9: Can this recipe be adapted for a vegetarian or vegan diet?
A9: While the conventional recipe centers on pork, you can swap in smoked jackfruit or shredded mushrooms as plant-based alternatives. Pair these with roasted sweet potatoes and a smoky BBQ sauce to mimic that hearty, satisfying mouthfeel and flavor complexity.
Q10: What beverage pairs best with a smoky BBQ pulled pork and sweet potato feast?
A10: For drinks, think bold and refreshing! A cold craft beer, like a hoppy IPA or a malty amber ale, complements the smoky and sweet flavors. If you prefer wine, a fruity Zinfandel or a chilled Rosé balances the richness perfectly. Non-alcoholic options like iced tea with lemon or sparkling water with a splash of apple cider vinegar also refresh the palate beautifully.
To Conclude
As the smoky aroma of tender pulled pork mingles effortlessly with the natural sweetness of roasted sweet potatoes, this dish proves that comfort food can be both bold and balanced. Whether you’re gathering around the table for a casual weekend meal or aiming to impress guests with a hearty, soulful feast, smoky BBQ pulled pork paired with sweet potatoes offers a flavor combination that’s truly unforgettable. Give this recipe a try, and let each bite transport you to a place where savory meets sweet in perfect harmony-a delicious celebration that’s sure to become a staple in your culinary repertoire.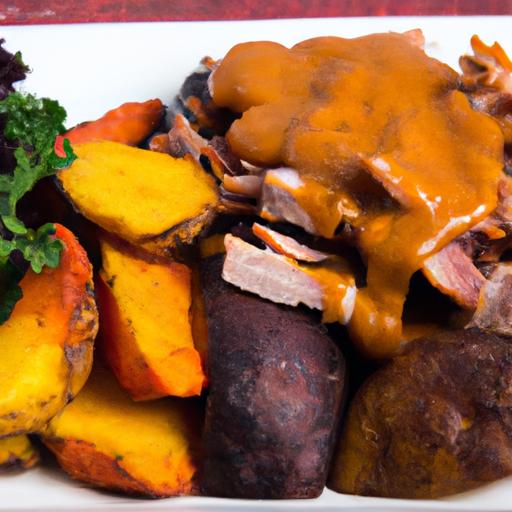
Choosing the Perfect Strawberries for Maximum Flavor
Sweet Sunrise recipes truly shine when using the freshest, ripest strawberries. When selecting your berries, look for fruit that is deeply red with a vivid glow-avoid any pale or green tips, as these indicate underripe berries that lack sweetness. Gently press the strawberries; they should be firm but yield slightly to touch, signaling juiciness. buying locally sourced or organic strawberries when in season can elevate your dish by delivering intense aroma and sweetness.Remember, strawberries do not continue to ripen after picking, so choose the best at the market. Wash them gently under cool water just before use and remove the green tops carefully to maintain their structure and flavor integrity.
Crafting the Ideal Custard Mixture for Creamy French Toast
A velvety custard base is the heart of this Sweet Sunrise delight. To achieve a custard mixture that is rich yet light enough to soak perfectly into the bread,combine whole milk,heavy cream,and farm-fresh eggs for balance. Add a touch of pure vanilla extract and a pinch of ground cinnamon to impart warmth and subtle spice notes.For smoothness, beat the eggs thoroughly before slowly whisking in the dairy.Don’t forget a gentle sprinkle of granulated sugar-just enough to enhance sweetness without overwhelming. For a creamy, luscious texture, let your custard rest in the fridge for 15 minutes; this allows flavors to meld and thickens the mixture slightly for ideal bread absorption.
Step by step guide to Assembling and Cooking Strawberry Stuffed French Toast
- Prepare the strawberries: Slice about 1 cup of fresh strawberries thinly and lightly toss with a teaspoon of sugar to macerate, enhancing their natural juices.
- Assemble the sandwich: Lay out 8 slices of hearty brioche or challah bread.Spread 2 tablespoons of softened cream cheese evenly over 4 slices. Pile the macerated strawberries over the cream cheese, than sandwich each with the remaining 4 slices, pressing gently to seal.
- Soak the bread: Submerge each stuffed sandwich into the chilled custard mixture for 20-30 seconds per side. This ensures the bread absorbs the creamy custard without becoming soggy.
- Preheat your pan or griddle: set to medium heat and melt 1 tablespoon of unsalted butter, swirling to coat evenly.
- Cook the toast: Place each soaked sandwich in the pan.Cook until golden brown and crispy, about 3-4 minutes per side. Flip carefully using a spatula to keep the filling intact.
- Keep warm: As you finish cooking batches, place finished French toast on a baking sheet in a warm oven (200°F/90°C) to stay fresh and hot.
- Final touch: Once cooked, slice each sandwich diagonally to reveal the luscious strawberry and cream cheese center-the heart of this Sweet Sunrise ambition.
Creative Toppings and Serving Suggestions to Elevate Your Sweet Sunrise
To bring your strawberry stuffed French toast to life, consider an array of vibrant toppings. Dust with powdered sugar for a snowy finish, or drizzle with warm maple syrup or homemade honey-balsamic reduction for a sophisticated twist. A dollop of freshly whipped cream or a scoop of vanilla bean ice cream transforms this breakfast into a decadent brunch treat. Add texture and contrast with toasted slivered almonds or crushed pistachios. Fresh mint leaves, edible flowers, or a sprinkle of lemon zest inject brightness and visual appeal.Pair this with a steaming cup of rich coffee or a mimosa for the ultimate morning indulgence. For nutritional balance, serve alongside a fresh green salad, such as baby arugula with citrus vinaigrette, to complement the richness with a peppery bite.
Prep and Cook Time
- Preparation: 20 minutes
- Cooking: 15 minutes
- Total Time: 35 minutes
Yield
Serves 4 hungry guests
Difficulty Level
Medium – approachable with a rewarding outcome
Ingredients
- 8 slices brioche or challah bread, slightly stale for best soaking
- 1 cup fresh strawberries, thinly sliced
- 4 tablespoons cream cheese, softened
- 3 large eggs, farm-fresh preferred
- 1 cup whole milk
- ½ cup heavy cream
- 1 teaspoon pure vanilla extract
- 1 teaspoon ground cinnamon
- 1 tablespoon granulated sugar
- 1 tablespoon unsalted butter, for cooking
- Powdered sugar, maple syrup, and fresh mint (optional, for serving)
Instructions
- Slice and sugar toss strawberries; set aside to macerate.
- Spread cream cheese on half the bread slices.
- Top cream cheese with strawberries, then sandwich with remaining bread slices.
- Whisk eggs, milk, cream, vanilla, cinnamon, and sugar until smooth; chill 15 minutes.
- dip each sandwich into the custard mixture, soaking 20-30 seconds per side.
- Heat butter in a skillet over medium; cook sandwiches until golden, about 3-4 minutes per side.
- Keep cooked sandwiches warm in a low oven until serving.
- Slice diagonally, dust with powdered sugar, drizzle syrup, and garnish with mint.
Chef’s Notes
- For a dairy-free version, substitute coconut milk and vegan cream cheese without compromising creaminess.
- If strawberries are out of season, fresh raspberries or blueberries work beautifully as stuffing alternatives.
- Use day-old bread to prevent overly soggy French toast.
- Prep the custard the night before and soak the sandwiches just before cooking to save time on busy mornings.
- Leftover strawberry stuffed French toast can be stored in the fridge and gently reheated in a skillet or oven to crisp up.
Serving Suggestions
Present these strawberry stuffed delights on a rustic wooden board or a white ceramic plate to amplify the color contrast. Serve with a side of fresh fruit salad or a small bowl of Greek yogurt sprinkled with honey. For a festive twist, top with edible flowers or a sprinkling of toasted coconut flakes. Pair with a chilled glass of freshly squeezed orange juice for a shining, energizing start to your day.
| Nutrient | Per Serving |
|---|---|
| Calories | 420 kcal |
| Protein | 12 g |
| Carbohydrates | 48 g |
| Fat | 18 g |
Explore more classic French toast recipes for breakfast inspiration.
For strawberry nutrition benefits, visit the USDA fooddata Central.

Q&A
Q&A: sweet Sunrise – How to Make Strawberry Stuffed French Toast
Q1: What makes Strawberry Stuffed French Toast different from regular French toast?
A1: Unlike classic French toast that’s simply dipped and cooked, strawberry stuffed French toast is a delightful sandwich of fluffy bread filled with sweet, fresh strawberries and creamy fillings like cream cheese or mascarpone. When cooked, it creates a warm, gooey surprise inside each bite-a breakfast treat that’s as beautiful as a sunrise!
Q2: What kind of bread works best for this recipe?
A2: thick, sturdy bread like brioche, challah, or Texas toast is ideal. Their soft, slightly sweet texture soaks up the egg mixture without falling apart, and their density helps hold the strawberry filling inside during cooking.
Q3: How do you prevent the bread from getting soggy with the strawberry filling?
A3: To keep sogginess at bay,it’s significant to pat dry the strawberries and mix them with a bit of cream cheese or mascarpone. This creamy layer acts like a barrier, sealing the fruit juices in while adding richness.Also, assembling the sandwich tight and cooking it over medium heat helps keep everything nicely contained.
Q4: What’s the secret to making the egg custard batter just right?
A4: The egg custard is the heart of great French toast. For a tender but rich batter, whisk together eggs, milk (or cream), a dash of vanilla extract, cinnamon, and a pinch of salt. Using whole milk or half-and-half creates a luscious custard that fries into a golden, tender shell.
Q5: Can I prepare this breakfast ahead of time?
A5: Absolutely! You can prepare the strawberry filling and assemble the sandwiches the night before. Keep them wrapped and refrigerated, then gently dip into the egg mixture and cook fresh in the morning. For a luscious brunch option, this prep saves time without sacrificing flavor.
Q6: How should I serve Strawberry Stuffed French Toast?
A6: Serve it warm, dusted with powdered sugar and drizzled with pure maple syrup or strawberry sauce. Fresh mint leaves or a dollop of whipped cream add an elegant touch. Pair it with a cup of freshly brewed coffee or a mimosa to welcome your “sweet sunrise” perfectly.
Q7: Are there variations for dietary preferences?
A7: Definitely! for a dairy-free version, substitute the cream cheese with coconut cream or almond-based spread and use plant-based milk in the batter. Gluten-free bread varieties can replace customary bread to suit gluten sensitivities while still maintaining that cozy, stuffed delight.
Turn your mornings into a festivity of flavor and color with this irresistible Strawberry Stuffed French Toast. A sweet sunrise you’ll look forward to every day!
Final Thoughts
As the morning sun spills its golden light, there’s no better way to start your day than with a plate of Strawberry Stuffed French Toast-a harmonious blend of fluffy bread, luscious strawberries, and a touch of sweetness that transforms breakfast into a celebration. With this simple yet indulgent recipe, you’re not just making a meal; you’re crafting a moment of pure delight, one bite at a time. So next time the dawn breaks and hunger calls, remember: a sweet sunrise is just a few steps-and a few strawberries-away.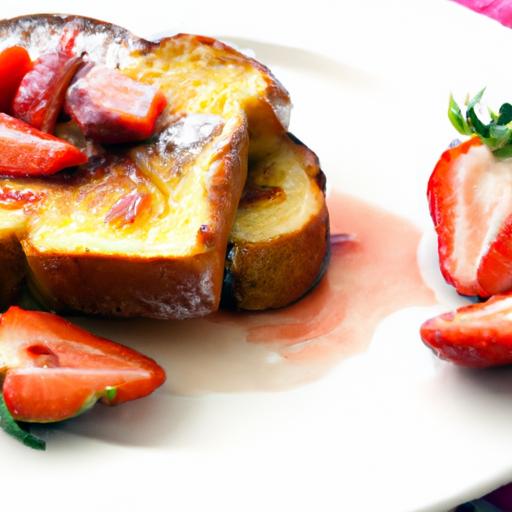
Ocean’s Bounty: squid Ink Pasta with Clams & Scallops Delight is an exquisite dish that marries the briny depths of the ocean with the rich, velvety allure of squid ink pasta. This recipe evokes coastal charm and timeless elegance, drawing inspiration from Mediterranean shores where seafood and pasta reign supreme. As both a vibrant centerpiece and a treasure trove of umami, the combination of fresh clams and tender scallops elevates this plate into a culinary party, inviting you to explore the ocean’s freshest flavors with every bite.
Prep and Cook Time
- Preparation: 20 minutes
- Cooking: 15 minutes
- Total: 35 minutes
Yield
serves 4
Difficulty Level
Medium – Perfect for home cooks ready to impress with seafood mastery
Ingredients
- 300g squid ink pasta (linguine or spaghetti works beautifully)
- 500g fresh clams, scrubbed and soaked in cold water to purge sand
- 400g sea scallops, cleaned and patted dry
- 4 tbsp extra virgin olive oil
- 4 garlic cloves, finely sliced
- 1 shallot, finely chopped
- 150ml dry white wine (such as Sauvignon Blanc)
- 1 small bunch fresh flat-leaf parsley, chopped
- 1 tsp red chili flakes (optional, to add warmth)
- Zest and juice of 1 lemon
- Salt and freshly ground black pepper, to taste
- 50g unsalted butter
- Flaked sea salt and extra parsley for garnish
Instructions
- Prepare the Pasta: Bring a large pot of generously salted water to a boil. Cook the squid ink pasta according to package instructions until al dente, about 8 minutes. Reserve 1 cup of pasta water, then drain and set aside.
- Clean and Cook the Clams: In a large skillet over medium heat, warm 2 tablespoons of olive oil. Add half the garlic slices and the shallot, sauté until fragrant and translucent, approximately 2 minutes. Pour in the white wine and increase heat to medium-high.Add the clams, cover with a tight-fitting lid, and steam for 4-6 minutes until the clams open. Discard any unopened ones. Remove clams with a slotted spoon and set aside, reserving the flavorful cooking liquid.
- sear the Scallops: Pat the scallops dry and season lightly with salt and pepper. heat the remaining 2 tablespoons of olive oil in a separate pan over high heat. Sear the scallops for 1.5 minutes per side, forming a golden crust but keeping the center tender. remove from heat and keep warm.
- Build the Sauce: Stir the reserved clam cooking liquid into the skillet used for the scallops. Add lemon zest, chili flakes (if using), and lemon juice. simmer gently for 3 minutes. Stir in the butter until melted and emulsified to create a glossy sauce.
- Combine Everything: Add the drained squid ink pasta to the sauce, tossing gently to coat. If the sauce feels thick,loosen it with reserved pasta water a little at a time. Fold in the cooked clams and half the parsley, stirring carefully to preserve the textures.
- Plate and Garnish: Divide the pasta between warmed serving bowls. Top each with seared scallops and sprinkle with remaining parsley and a pinch of flaked sea salt for an added briny crunch. Finish with a drizzle of olive oil for shine and fragrance.
Tips for Success
- Clams Selection: Opt for small, tightly closed clams like littlenecks or Manila clams. They provide tender meat and clean flavors essential for this recipe’s harmony.
- Scallop Care: Ensure scallops are dry before searing to achieve that perfect golden crust and avoid steaming.
- Squid Ink Pasta: Fresh pasta can be used but is more delicate, so adjust cooking time accordingly.
- Make-Ahead: Clams can be cleaned earlier in the day but cook just before assembling the dish.
- Herb Variations: Try fresh thyme or basil for a subtle herbaceous twist if parsley isn’t available.
Serving Suggestions
This dish pairs wonderfully with a crisp, chilled glass of dry white wine, enhancing the ocean’s natural flavors. Serve alongside a fresh green salad with lemon vinaigrette or roasted seasonal vegetables to balance richness. Garnish with vibrant microgreens or edible flowers for a refined presentation. A warm, crusty baguette is perfect for sopping up the luscious butter-and-wine sauce, making every bite truly unforgettable.
| Nutrient | Per Serving |
|---|---|
| Calories | 485 kcal |
| Protein | 38 g |
| Carbohydrates | 45 g |
| Fat | 15 g |

For an in-depth guide on perfect seafood cooking techniques, explore our related article. To learn more about the nutritional benefits of seafood and marine-based dishes, visit the Seafood Nutrition Partnership.
Q&A
Q&A: Ocean’s Bounty – Squid Ink Pasta with Clams & Scallops Delight
Q1: What makes “Ocean’s Bounty: Squid Ink Pasta with Clams & Scallops Delight” a standout seafood dish?
A1: This dish is a symphony of the sea, where the rich, briny flavors of fresh clams and succulent scallops dance alongside the striking, ebony squid ink pasta. The ink not only colors the pasta in dramatic waves of midnight black but infuses it with a subtle, oceanic depth that perfectly complements the sweet, tender shellfish. Together, they create a culinary experience that’s as visually stunning as it is deliciously complex.
Q2: Why use squid ink in pasta, and how does it affect the taste?
A2: Squid ink is nature’s gift to adventurous palates, offering both color and flavor. When incorporated into pasta dough, it imparts a savory umami essence reminiscent of the sea, with hints of brine and a slight mineral tang. This bold addition elevates a simple pasta to an extraordinary level, transforming every bite into a voyage across ocean waves.
Q3: How should the clams and scallops be prepared for this dish?
A3: Freshness is key.Clams should be scrubbed and soaked to rid them of sand, then steamed gently until they burst open, releasing a flavorful broth. Scallops, prized for their delicate texture, are best seared just until golden on the outside but tender inside. This careful preparation ensures each shellfish shines individually while harmonizing within the pasta ensemble.
Q4: What complementary ingredients best enhance this oceanic pasta?
A4: To highlight the sea’s bounty, subtle yet vibrant flavors work wonders. A drizzle of high-quality olive oil,a splash of white wine,minced garlic,and a sprinkle of fresh parsley awaken the palate without overwhelming the dish. A hint of chili flakes adds a whisper of heat, while lemon zest or juice brings a radiant, citrusy accent that cuts through the richness.
Q5: Can this dish be adapted for different dietary preferences?
A5: Absolutely! For those unable to consume gluten, squid ink is available as a sauce or can be mixed into gluten-free pasta alternatives like rice or chickpea pasta. Vegetarians can recreate the color and flavor by using seaweed or mushroom-infused black pasta paired with a medley of sautéed vegetables in place of shellfish. However, the authentic ocean’s bounty experience truly comes alive with fresh seafood.
Q6: What wine or beverage pairs best with Squid Ink Pasta with Clams & Scallops?
A6: A crisp, mineral-driven white wine-think Sauvignon Blanc or Albariño-is a classic companion, echoing the briny freshness of the shellfish. For those who prefer bubbles, a dry Prosecco provides a lively contrast to the dish’s richness.Non-alcoholic options like sparkling water with a twist of lemon also refresh the palate perfectly.
Q7: What’s the story behind the inspiration for this dish?
A7: “Ocean’s Bounty” draws inspiration from coastal traditions where the sea’s freshest treasures mingle on the plate.Squid ink pasta has deep Mediterranean roots, and combining it with clams and scallops celebrates the synergy of land and sea.this dish is a tribute to the ocean’s generosity, passion for vibrant flavors, and artistry in simplicity.
Q8: Any tips for home cooks attempting this dish?
A8: Keep the flavors balanced and the cooking times precise. Don’t overcook the scallops-they should remain tender-and resist the urge to drown the pasta in heavy sauces. Let the natural flavors of squid ink and shellfish sing. Lastly, use fresh ingredients and a light hand with seasoning to create a masterpiece that honors the ocean’s bounty on every forkful.
To Conclude
As the last forkful of tender pasta twirls away and the briny kiss of clams and scallops lingers on your palate, you’re reminded that the ocean’s bounty is as versatile as it is divine. Squid ink pasta, with its dramatic hue and subtle brine, transforms a simple seafood medley into a culinary masterpiece that celebrates the depths of flavor beneath the waves. Whether you’re a seasoned seafood lover or a curious culinary adventurer, this dish offers a tasty invitation to explore the sea’s gifts in a whole new light. So next time you crave a meal that’s both elegant and evocative, let the ocean guide your kitchen-and your appetite-to a truly unforgettable dining experience.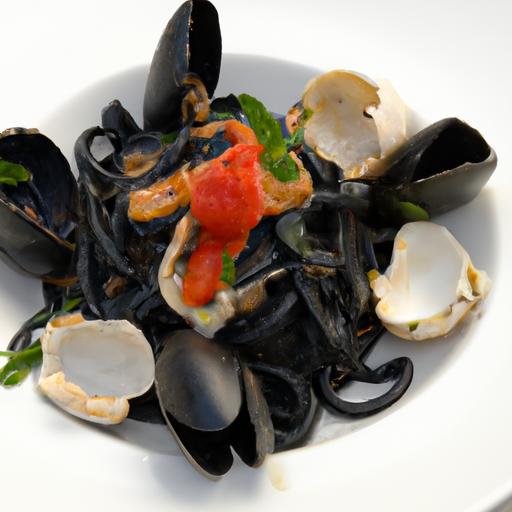
Savor the Sea with a vibrant sardines pasta dish that combines coastal tradition and bold Mediterranean flavors. This recipe celebrates the understated brilliance of sardines, delivering a rich, velvety texture balanced with zesty brightness-perfect for an inspiring weeknight dinner or an elegant gathering.
Prep and Cook Time
- Preparation: 15 minutes
- Cooking: 20 minutes
- Total Time: 35 minutes
Yield
Serves 4 generous portions
Difficulty Level
Easy to Medium – ideal for anyone pleasant with basic sautéing and pasta cooking techniques
Ingredients
- 350g spaghetti or linguine
- 2 cans (120g each) high-quality sardines in olive oil, drained and roughly flaked
- 4 cloves garlic, thinly sliced
- 1 small red chili, finely chopped (adjust to taste)
- 1 medium shallot, finely diced
- 2 tbsp extra virgin olive oil
- Zest and juice of 1 lemon
- 1/4 cup fresh flat-leaf parsley, chopped
- 1/4 cup toasted breadcrumbs (optional, for garnish)
- Salt and freshly ground black pepper, to taste
- Grated Pecorino Romano or Parmesan, to serve (optional)
Instructions
- Cook the pasta: Bring a large pot of salted water to a rolling boil. Add the spaghetti and cook according to package instructions until al dente (usually 9-11 minutes). Reserve ½ cup of pasta water before draining.
- Prepare the flavor base: While pasta cooks, heat the olive oil over medium heat in a large skillet. Add the sliced garlic, chopped shallot, and chili. Sauté gently until fragrant and golden, about 3-4 minutes. Stir frequently to avoid burning.
- Incorporate sardines: Add the flaked sardines to the skillet, breaking them up further with a spoon. Cook for 3 minutes, allowing the sardines to warm and meld with the garlic and chili.
- Brighten with lemon: Stir in the lemon zest and juice, instantly lifting the rich sardines with a fresh, zesty brightness.Season with salt and plenty of black pepper, tasting carefully because the sardines and oil add natural saltiness.
- Combine pasta and sauce: Add the drained pasta directly to the skillet with the sardine mixture.Toss well to coat, adding reserved pasta water a tablespoon at a time until the sauce reaches a smooth, creamy consistency that clings lovingly to each strand.
- Finish with herbs: Remove from heat and fold in the fresh parsley, infusing a vibrant green note and depth.
- Serve: Plate the pasta, sprinkle with toasted breadcrumbs for crunch, and finish with freshly grated Pecorino Romano if desired for a sharper, salty accent.
Tips for Success
- Sardines Selection: Choose sardines packed in quality olive oil for richness; if oily sardines aren’t available, those in tomato sauce create a tangier choice.
- Oil Control: Drain sardines well but reserve a teaspoon of the oil to preserve flavor when cooking.
- Heat Management: Keep heat moderate when adding garlic and chili to avoid bitterness.
- Make-ahead: Prepare the sardine sauce ahead, refrigerate, and quickly toss with freshly cooked pasta when ready.
- Gluten-Free Option: Substitute pasta for gluten-free varieties-gluten-free pasta absorbs sauce best when heated with the sardine mixture briefly.
Serving Suggestions
Serve your sardines pasta with a crisp, chilled white wine-like a dry Vermentino or Sauvignon Blanc-that complements the oceanic flair and lemon zest. A simple green salad with a sharp vinaigrette or grilled vegetables adds contrast without overwhelming the dish’s delicate complexity.
For garnishes, consider fresh basil leaves or a light drizzle of chili oil for added heat and visual appeal. Rustic crusty bread or garlic focaccia are perfect for soaking up every last bit of the luscious sauce.
| Nutrient | Per serving |
|---|---|
| Calories | 440 kcal |
| Protein | 25 g |
| Carbohydrates | 55 g |
| Fat | 12 g |

For more detailed pairing tips and exploring sardine varieties, visit Food & wine’s Seafood Wine Pairings. Don’t miss our guide on Mediterranean Pasta Recipes for more culinary inspiration rooted in sun-soaked shores.
Q&A
Q&A: Savor the Sea - A Guide to Flavorful Sardines Pasta Recipes
Q1: Why are sardines a great choice for pasta dishes?
A1: Sardines bring the ocean’s essence straight to your plate with their rich, savory flavor and healthy omega-3 boost. Their natural oiliness and slight brininess elevate simple pasta into an remarkable culinary experience. Plus, they’re lasting and budget-friendly-proof that great taste doesn’t have to come at a high cost.
Q2: What types of pasta pair best with sardines?
A2: Think rustic and hearty to balance sardines’ bold character. Bucatini,spaghetti,and linguine are ideal as their long,slender shapes allow the flavorful sauce to coat every strand. Twists like trofie or fusilli can also catch sardine bits and herbs beautifully, making every bite a sea-inspired delight.
Q3: how can I avoid the “fishy” overpowering taste some people fear with sardines?
A3: The trick is balance.Combine sardines with fresh ingredients like lemon zest, garlic, chili flakes, and vibrant herbs (think parsley or mint). These brightness boosters lift the sardines’ flavor, turning it from “fishy” to ”flavorful and fresh.” Toasted breadcrumbs add crunch and depth, too, mellowing any excess intensity.
Q4: Can canned sardines be used interchangeably with fresh ones for pasta recipes?
A4: Absolutely! High-quality canned sardines, especially those preserved in olive oil, are convenient and packed with flavor, often more tender and mellow than fresh. fresh sardines deliver a different texture and a slightly more delicate taste but require cleaning and cooking finesse. Either way, both make stellar pasta partners with the right seasoning.
Q5: What are some creative twists to try in sardine pasta recipes?
A5: don’t be afraid to get adventurous.Add capers or olives for a salty punch, sun-dried tomatoes for sweetness, or a splash of white wine to brighten the sauce. For a smoky note, toss in some toasted almonds or smoked paprika. And for herb lovers,fresh dill or basil can transform the dish into something uniquely aromatic.
Q6: How do I ensure the pasta and sardine sauce come together perfectly?
A6: Timing is everything. Cook your pasta al dente and reserve some pasta water before draining.Use that starchy water to emulsify the sardine sauce,binding the flavors and creating a glossy,luscious coating. Finish with a drizzle of good-quality olive oil and a squeeze of lemon for that final pop of freshness.
Q7: Are sardine pasta recipes suitable for beginners?
A7: Definitely! Simple, quick, and forgiving, these recipes are perfect for cooks of any skill level.With just a handful of ingredients and straightforward steps, you can whip up a gourmet-feeling meal that celebrates the sea-no culinary degree required.
Q8: What’s the best way to serve sardine pasta for maximum impact?
A8: Serve it fresh and hot, garnished with a sprinkle of toasted breadcrumbs and freshly chopped parsley or chives. pair it with a crisp white wine or a light citrusy cocktail to complement the flavors. And don’t forget a wedge of lemon on the side-for that satisfying squeeze just before the first bite.
Dive into the depths of flavor with sardine pasta-it’s an unexpected,appetizing way to savor the sea right at your dinner table!
To Conclude
As the final forkful of your sardine pasta lingers on the palate,you’ll recognise that this humble fish is more than just a pantry staple-it’s a gateway to oceanic depth and vibrant flavor. From zesty lemon twists to garlic-kissed olive oil drizzles, these recipes invite you to dive into the rich, savory world of sardines with confidence and creativity. Whether you’re a seasoned seafood lover or a curious culinary adventurer, savoring sardines in pasta promises a meal that is as nourishing as it is memorable.So next time you seek a dish that bridges simplicity and sophistication, remember: the sea’s tiny treasure is ready to transform your plate into a celebration of bold, unforgettable taste.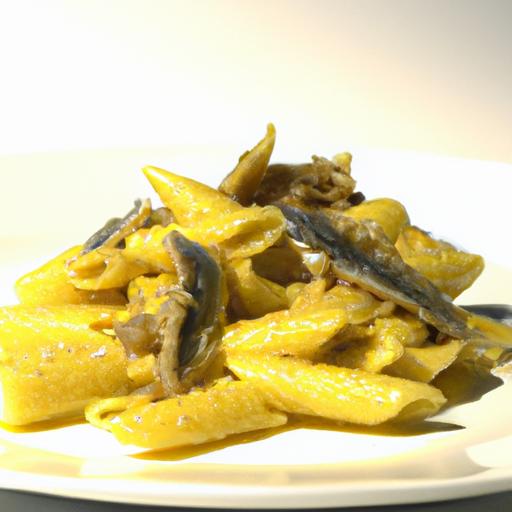
seaside Elegance: Crafting the Perfect Scallops and Risotto
seaside Elegance: Crafting the Perfect Scallops and Risotto begins with selecting the freshest, most flavorful scallops that will truly shine in this creamy, coastal-inspired dish. Nothing compares to the tender sweetness of perfectly seared scallops nestled atop a luxurious risotto infused with the briny essence of the sea and delicate herbs that elevate every bite.
Prep and Cook Time
- Prep time: 20 minutes
- Cook Time: 35 minutes
- Total Time: 55 minutes
Yield
This recipe serves 4 elegantly plated portions.
Difficulty Level
Medium – Ideal for home cooks looking to impress with a refined seaside meal.
Ingredients
- 16 large sea scallops, patted dry
- 1 ½ cups Arborio rice
- 4 cups low-sodium seafood stock, kept warm
- 1 small shallot, finely minced
- 2 cloves garlic, minced
- 3 tbsp unsalted butter, divided
- ¾ cup dry white wine
- ½ cup freshly grated Parmesan cheese
- 2 tbsp olive oil
- 1 tbsp fresh thyme leaves, chopped
- 1 tbsp fresh flat-leaf parsley, finely chopped
- 1 tsp smoked paprika
- Salt and freshly ground black pepper, to taste
- Fresh lemon zest, for garnish
Instructions
- select and Prepare Scallops: Begin by choosing scallops with a clean, ocean-fresh aroma – firm and opaque, not slimy or overly wet. Pat them thoroughly dry with paper towels to ensure a perfect sear.
- Infuse the Risotto Base: In a large skillet or heavy-bottomed saucepan, melt 1 tablespoon of butter and 2 tablespoons of olive oil over medium heat. Add the minced shallots and garlic, sautéing until translucent and fragrant, about 3 minutes.
- Toast the Rice: Stir in the Arborio rice, coating each grain with the butter and oil mixture. toast the rice for 2 minutes until slightly translucent around the edges, stirring continuously to prevent sticking.
- Deglaze with Wine: Pour in the white wine, stirring gently as the liquid is absorbed. This adds brightness and depth to the risotto’s flavor.
- Simmer with Stock: Add the warm seafood stock one ladle at a time, stirring frequently and waiting for each addition to be nearly absorbed before adding the next. This gradual process creates the risotto’s signature creamy texture and takes around 20 minutes.
- Finish the Risotto: Once the rice is tender yet firm (al dente),stir in the remaining butter,Parmesan cheese,fresh thyme,and parsley. Adjust seasoning with salt and pepper. Keep risotto warm.
- Sear the Scallops: Heat a large non-stick skillet over high heat. Season scallops generously with salt, pepper, and smoked paprika. Add a tablespoon of butter and a drizzle of olive oil to the skillet. Carefully place the scallops, leaving space between each. Sear undisturbed for 2-3 minutes until a golden crust forms, then flip and cook the other side for 1-2 minutes until just opaque in the center.
- Plate with Elegance: Spoon a velvety mound of risotto onto warm plates. Arrange four scallops atop each portion. Garnish with fresh lemon zest and a sprinkle of parsley.Serve promptly to enjoy the perfect harmony of flavors and textures.
Tips for Success
- Scallop Selection: When possible, opt for dry-packed scallops rather than wet-packed to avoid excess water that hinders browning.
- Risotto Stirring Tip: Stir frequently to coax out the rice’s starch, creating that unmistakably creamy risotto texture.
- Herb Substitutions: Tarragon or chervil can be used for a slightly sweeter, more floral herbaceous note.
- Make Ahead: Prepare the stock and chop herbs in advance. Risotto is best enjoyed fresh, but you can pre-toast the rice to save time.
- Cooking Scallops: Avoid overcrowding the pan; this ensures each scallop sears beautifully rather than steams.
Serving Suggestions
Present this dish alongside a chilled glass of crisp Sauvignon Blanc or a lightly oaked Chardonnay to complement the coastal flavors. Garnish further with microgreens, edible flowers, or a light drizzle of herb-infused olive oil to add visual finesse and aromatic complexity. A wedge of fresh lemon on the side invites diners to brighten the dish further.

| Nutrient | Per Serving |
|---|---|
| Calories | 420 |
| protein | 36g |
| Carbohydrates | 38g |
| Fat | 14g |
For more inspiration on elegant seafood dishes, check out our Coastal Seafood Feasts. To understand more about the benefits and sourcing of scallops, visit the NOAA Fisheries Scallop Profile.
Q&A
Q&A: Seaside Elegance – Crafting the Perfect Scallops and Risotto
Q1: What makes scallops the star ingredient in a seaside-inspired dish?
A1: Scallops are nature’s little gems from the sea-delicately sweet, tender, and boasting a subtle brininess that instantly transports you to ocean breezes and sun-dappled shores. Thier elegant texture and mild flavor provide the perfect canvas for creative seasoning, making them the quintessential centerpiece of any seaside dish.
Q2: How do you select the freshest scallops for your recipe?
A2: Fresh scallops should smell like the sea-clean and slightly salty, never fishy. Look for plump, creamy-white scallops that are firm to the touch, with no discoloration or dryness around the edges. If buying frozen, opt for dry-packed scallops without added phosphates to preserve natural sweetness.
Q3: What is the secret to perfectly searing scallops?
A3: The magic lies in simplicity and timing. Pat your scallops dry to ensure a golden crust, season lightly, and sear them in a hot pan with a drizzle of olive oil or butter-about 1.5 to 2 minutes per side. Resist the urge to overcrowd the pan or move them around; letting them develop that caramelized surface is the key to seaside elegance on your plate.
Q4: Risotto can be intimidating. How do you achieve the perfect creamy consistency?
A4: Patience is your best freind. Slowly add warm broth, one ladle at a time, stirring frequently to coax the starch from the Arborio rice gently. This slow absorption, combined with continual stirring, creates that luscious, velvety texture. Finish with a touch of butter and Parmesan for richness that sings harmoniously alongside the scallops.Q5: which flavor profiles complement scallops and risotto in a seaside dish?
A5: Luminous, fresh, and slightly herbal notes elevate the dish beautifully. Think lemon zest for zing, fresh thyme or tarragon for subtle earthiness, and a whisper of garlic or shallots sautéed into the risotto for depth. A splash of white wine in the risotto’s cooking liquid adds refinement and complexity without overshadowing the natural sweetness of the scallops.
Q6: How can one plate scallops and risotto to evoke seaside elegance visually?
A6: Presentation is an art-mimic the sea’s effortless beauty by plating a creamy bed of risotto gently swirled on the plate, nestling the golden scallops atop like treasures from the tide. Garnish with a sprig of fresh herbs, a drizzle of olive oil, and perhaps a wedge of lemon for color and brightness. Light, airy plating invites the senses to dive into the meal, much like a breath of salty coastal air.
Q7: Can this dish be paired with a particular wine or beverage to enhance the seaside experience?
A7: Absolutely! A crisp, mineral-driven white wine like Sauvignon Blanc or a lightly oaked Chardonnay pairs elegantly, complementing the scallops’ sweetness and the risotto’s creaminess. For non-wine drinkers, a sparkling water infused with a twist of citrus or a herbal iced tea can refresh the palate perfectly.
Q8: What is the overall feeling you want diners to experience with “Seaside Elegance”?
A8: The goal is to evoke a sensory journey-each bite should conjure the gentle rhythm of waves, the warmth of sun on skin, and the simple luxury of refined flavors. This dish isn’t just about nourishment; it’s an ode to coastal beauty and timeless elegance, crafted lovingly in your kitchen to share moments of culinary serenity.
The Way Forward
As the gentle whisper of ocean waves fades into memory, so too does the lingering taste of your perfectly crafted scallops and risotto-a harmonious dance of flavors inspired by the seaside’s timeless elegance. Whether you’re a seasoned chef or a curious home cook, embracing the art of balancing delicate seafood with creamy, al dente risotto invites you to savor not just a meal, but an experience. So next time you yearn for a dish that marries simplicity with sophistication, let the essence of the sea guide your hands and palate, transforming humble ingredients into a celebration of coastal charm and culinary grace.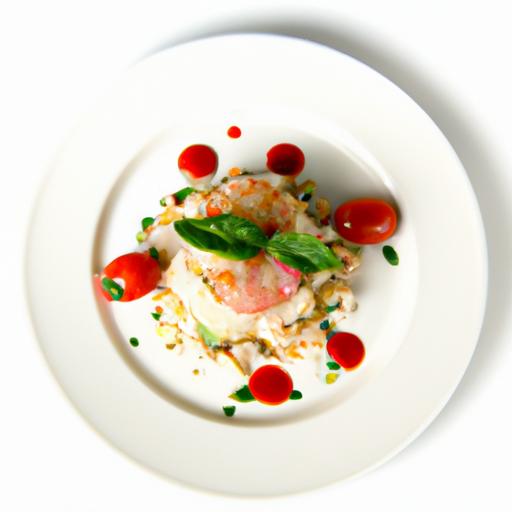
Savor Steamed Clams in their finest form by mastering the art of selecting the freshest shellfish, infusing them with vibrant garlic and parsley, and steaming them to juicy, briny perfection. This simple yet elegant dish carries whispers of coastal kitchens, where the combination of sea air and fragrant herbs conjures an unforgettable experience. Whether for a weeknight treat or a dinner party centerpiece, these clams offer a tender, succulent bite that pairs beautifully with rustic bread and crisp, refreshing wine.
Prep and Cook Time
- Readiness: 15 minutes
- Cooking: 10 minutes
- Total Time: 25 minutes
Yield
- Serves 4 as an appetizer or light entrée
Difficulty Level
- Easy – Perfect for beginners and seafood lovers alike
ingredients
- 3 pounds fresh clams (such as littlenecks or manila,scrubbed clean)
- 4 tablespoons unsalted butter
- 6 cloves garlic,minced finely
- 1 cup fresh flat-leaf parsley,chopped
- 1 cup dry white wine (such as Sauvignon Blanc)
- 1 lemon,zested and juiced
- 1 teaspoon crushed red pepper flakes (optional)
- Salt and freshly ground black pepper,to taste
- Crusty bread,for serving (optional but highly recommended)
Instructions
- Prepare the clams: Rinse clams under cold running water,scrubbing away any grit on the shells. Discard any clams that are cracked or remain open when gently tapped.
- Infuse the butter: In a large wide pot or sauté pan, melt the butter over medium heat.Add the minced garlic and sauté until golden and fragrant, about 2 minutes, stirring often to avoid burning.
- Add parsley and seasonings: Stir in the chopped parsley and red pepper flakes (if using), cooking for another 1 minute to release the herb’s aroma. season lightly with salt and pepper.
- Deglaze with wine: Pour in the white wine and bring to a gentle simmer. Let it reduce slightly, about 2 minutes, concentrating the flavors.
- Steam the clams: Add the cleaned clams to the pan, cover immediately with a tight-fitting lid. Steam for 6-8 minutes, shaking the pot gently once or twice during cooking to ensure even heat distribution. The clams are done when all shells have opened fully.
- Finish with lemon: Remove from heat and immediately drizzle lemon juice over the clams. Toss gently to mix; discard any clams that haven’t opened.
- Serve piping hot: Transfer clams and their fragrant broth to a large bowl.Garnish with extra parsley and lemon zest.
Tips for Success
- Freshness is key: Always buy clams from a trusted seafood market and check for tight shells.
- Pre-soak: Soaking your clams in cold salted water for 20 minutes helps purge sand for a cleaner bite.
- Don’t overcook: Steaming beyond 8 minutes risks tough, rubbery clams.
- Butter alternative: Olive oil can be substituted for a lighter infusion but butter adds a luscious richness.
- Make ahead: Prepare the garlic-parsley butter mixture earlier in the day and gently reheat before adding clams.
Serving Suggestions
A bowl of these juicy clams is best enjoyed with freshly toasted baguette slices to soak up the aromatic broth. Pair with a chilled glass of dry white wine for an elevated coastal dining experience. For a vibrant presentation, garnish with a sprig of fresh parsley and a scattering of lemon zest. Consider a side salad with crisp fennel or arugula dressed in lemon vinaigrette for balance. Don’t forget a dash of sea salt and cracked pepper to finish each bite with a perfect seasoning.

| Nutrient | Per Serving |
|---|---|
| Calories | 220 |
| Protein | 25g |
| Carbohydrates | 4g |
| Fat | 9g |
Explore More Seafood Recipes
For further culinary inspiration,check out our Lemon Butter Shrimp recipe,which complements this dish beautifully.For in-depth guidance on selecting shellfish, seafood Watch offers invaluable advice on sustainable seafood choices here.
Q&A
Q&A: Savor Steamed Clams – Garlic & Parsley Delight Unveiled
Q1: What makes steamed clams with garlic and parsley such a beloved dish?
A1: Steamed clams are a timeless seafood treat,prized for their tender,briny sweetness.when infused with the aromatic warmth of garlic and the fresh, herbaceous zing of parsley, they transform into a culinary experience that’s both simple and celebratory-perfectly balancing the ocean’s essence with garden-fresh brightness.
Q2: How do garlic and parsley enhance the natural flavor of clams?
A2: Garlic introduces a rich, savory depth that complements the clams’ subtle saltiness without overpowering it. Parsley adds a clean,vibrant note that cuts through the richness,highlighting the clams’ freshness and creating a harmonious flavor interplay between sea and herb garden.
Q3: What’s the secret to perfectly steamed clams?
A3: Timing and heat are key. Start by selecting fresh clams and giving them a good soak to purge sand. Then, steam them over a flavorful broth-often white wine, garlic, and butter-just until they open (usually 5-7 minutes). Overcooking toughens the meat; undercooking leaves grit behind. The goal is tender clam meat, bursting with juiciness and infused with your infused garlic-parsley broth.Q4: Can you suggest variations on the garlic and parsley theme for steamed clams?
A4: Absolutely! For a spicy kick, add a pinch of red pepper flakes or a splash of chili oil. Citrus zest (lemon or orange) brightens the dish even more. Swap parsley for fresh cilantro or basil for a different herbaceous twist. for richer flavor, stir in a dollop of cream or finish with crisp pancetta bits.
Q5: What sides pair well with garlic and parsley steamed clams?
A5: Crusty rustic bread is a must-its perfect for soaking up that garlicky, parsley-infused broth. Light pasta tossed in olive oil, lemon, and fresh herbs complements without overshadowing the clams. For a fresh contrast, crisp green salads or roasted seasonal vegetables round out the plate beautifully.Q6: is this dish accessible for home cooks new to seafood?
A6: Definitely! Steamed clams with garlic and parsley are wonderfully approachable. Minimal ingredients, speedy preparation, and straightforward techniques make this dish an excellent gateway into seafood cooking-impressively elegant yet surprisingly simple.Q7: How can one ensure the clams are fresh and safe to eat?
A7: Fresh clams should be tightly closed or close when tapped, indicating they’re alive and healthy. they should smell like the ocean-clean, not fishy or sour. Purchase clams from reputable sources and store them properly on ice or in the fridge covered with a damp cloth. Discard any that remain open or have broken shells.
Dive into this garlicky, herby delight and let each clam whisper stories of the sea-your perfect plate awaits!
Concluding Remarks
As the delicate aroma of garlic and fresh parsley mingles with the briny sweetness of perfectly steamed clams, you’ve uncovered more than just a recipe-you’ve embraced a culinary tradition that celebrates simplicity and depth of flavor. Whether enjoyed as a cozy weeknight treat or the star of a festive gathering, this Garlic & Parsley steamed clams dish invites you to savor each tender bite and reconnect with the timeless joy of fresh, thoughtfully prepared ingredients. So next time you crave a taste of the sea, remember that pure delight is just a steam away.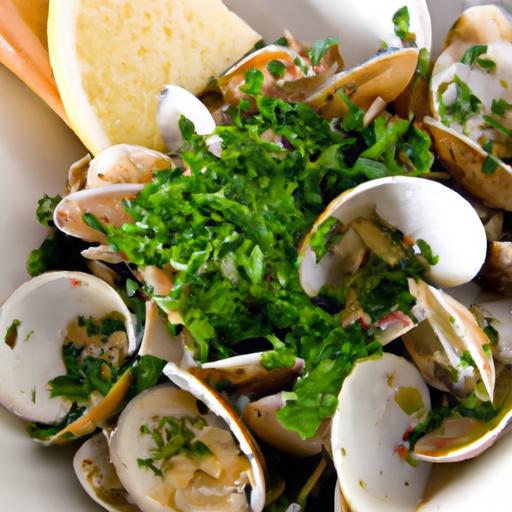
Discover Carrabba’s Creamy Fettuccine Alfredo Delight begins with a timeless italian classic redefined by a meticulous balance of rich, velvety textures and authentic, robust flavors. This dish artfully blends al dente pasta with a luxuriously smooth sauce, crafted to elevate every bite and create an unforgettable dining experience at home. inspired by Carrabba’s passion for quality ingredients and culinary tradition, this recipe invites you to savor a comforting meal that transcends the ordinary Alfredo.
Prep and Cook Time
Preparation: 10 minutes Cooking: 20 minutes Total: 30 minutes
Yield
Serves 4 generously
Difficulty level
Medium – perfect for home cooks ready to impress with a restaurant-quality dish
ingredients
- 12 oz fettuccine pasta, cooked al dente
- 1/2 cup unsalted butter (1 stick), cut into pieces
- 2 cups heavy cream, fresh and cold
- 1 1/2 cups freshly grated Parmesan cheese, plus extra for garnish
- 2 cloves garlic, finely minced
- Salt and freshly ground black pepper, to taste
- 1 tbsp extra virgin olive oil
- Fresh Italian parsley, finely chopped for garnish
- Optional: Pinch of freshly grated nutmeg
Instructions
- Bring a large pot of salted water to a boil. Add the fettuccine and cook until just al dente (usually about 1-2 minutes less than package instructions). Reserve 1 cup of pasta water, than drain the pasta and set aside.
- In a large skillet, warm the olive oil over medium heat. Add the minced garlic and sauté until fragrant, about 1 minute. Be careful not to let it brown.
- Reduce heat to low and melt the butter slowly. Once melted, pour in the heavy cream, stirring gently to combine. Let the mixture warm but do not boil-this ensures the sauce remains silky.
- Gradually whisk in the grated Parmesan cheese. Stir continuously until the cheese melts fully, forming a thick, creamy sauce. If the sauce thickens too much, add reserved pasta water a little at a time to loosen it to your preferred consistency.
- Season with salt, freshly ground black pepper, and a touch of nutmeg (if using). Taste and adjust seasonings accordingly.
- Toss the cooked fettuccine directly into the sauce. Gently coat each strand, ensuring the pasta is enveloped in the sauce’s rich creaminess. Warm together for 1-2 minutes to allow the flavors to meld.
- Remove from heat and serve immediately. Garnish with chopped parsley and an extra sprinkle of Parmesan for that signature Carrabba’s touch.
Chef’s notes and Tips for Success
- Cheese choice: use the freshest, high-quality parmesan you can find, ideally Parmigiano-Reggiano for its nutty, complex flavour that defines authentic Alfredo sauce.
- Texture tricks: Slowly melt butter and mix cream over low heat to prevent curdling and achieve that characteristic velvety smoothness of Carrabba’s signature sauce.
- Pasta water magic: The reserved pasta water contains starch which helps the sauce cling perfectly to the fettuccine without becoming too thick or gloopy.
- Make-ahead option: Prepare the sauce and pasta separately. When ready to serve, gently reheat the sauce over low heat and toss with freshly cooked pasta for optimal texture.
- Customize it: Add grilled chicken, sautéed mushrooms, or steamed broccoli to introduce exciting layers and textures that complement the creamy sauce.
Serving Suggestions
Serve your creamy Alfredo with a side of crunchy garlic bread or a light arugula salad dressed simply with lemon and olive oil to cut through the richness. For the ultimate visual impact, plate the fettuccine in a shallow bowl, garnish with vibrant parsley, freshly cracked black pepper, and a curl of Parmesan. A glass of chilled Pinot Grigio or a sparkling water with lemon completes this indulgent Italian feast.
| Nutritional Info (Per Serving) | Amount |
|---|---|
| Calories | 620 kcal |
| Protein | 18 g |
| Carbohydrates | 56 g |
| Fat | 36 g |

For deeper inspiration and to expand your Italian culinary repertoire, explore our Homemade Italian Classics. To understand the science behind creamy sauces, visit Serious Eats’ expert guide.
Q&A
Q&A: Discover Carrabba’s Creamy Fettuccine Alfredo Delight
Q1: What makes Carrabba’s creamy Fettuccine Alfredo Delight stand out from other Alfredo dishes?
A1: Carrabba’s Creamy Fettuccine Alfredo Delight is a decadent twist on the classic Italian favorite. What sets it apart is the perfect balance of rich,velvety Alfredo sauce made from real cream and Parmesan,delicately tossed with freshly cooked fettuccine pasta. The dish is finished with a subtle hint of garlic and Romano cheese, giving it a depth of flavor that’s both comforting and sophisticated.
Q2: Can you describe the texture and flavor profile of this dish?
A2: Imagine silky ribbons of fettuccine embraced by a luscious, creamy sauce that clings lovingly to every strand. The flavor is a harmonious blend of buttery richness and sharp, nutty cheese notes, rounded out by a gentle garlic undertone. Each bite melts in your mouth, leaving a warm, satisfying aftertaste that invites another forkful.
Q3: Are there any signature ingredients or techniques Carrabba’s uses in preparing this alfredo?
A3: Absolutely! Carrabba’s commitment to authenticity shines through in their use of freshly grated Parmesan and Romano cheeses, combined with high-quality cream and butter.The alfredo sauce is crafted slowly to achieve that creamy consistency without overwhelming the pasta. The fettuccine is cooked al dente to provide just the right bite, ensuring the sauce and noodles complement each other perfectly.
Q4: Is Carrabba’s Creamy Fettuccine Alfredo Delight suitable for vegetarians?
A4: Yes, the dish is vegetarian-amiable as it contains no meat. However, it is rich in dairy, so those who are lactose intolerant shoudl proceed with caution or consult with the restaurant for any possible modifications.
Q5: What are some delicious ways to elevate the dish or pair it with other menu items?
A5: To elevate the Creamy Fettuccine Alfredo Delight, consider adding grilled chicken or sautéed shrimp for a protein boost that complements the creamy sauce beautifully. Pairing it with a fresh arugula salad tossed in a tangy vinaigrette can cut through the richness and refresh the palate.for beverages, a crisp Chardonnay or a sparkling water with lemon enhances the dining experience by balancing the creamy indulgence.
Q6: Where can diners enjoy Carrabba’s Creamy Fettuccine Alfredo Delight?
A6: This luscious dish is featured on the menu at Carrabba’s Italian Grill locations nationwide. Whether dining in a vibrant atmosphere that echoes Italian charm or opting for convenient takeout, food lovers can indulge in this classic with a signature Carrabba’s touch anytime.
Q7: Why should someone try Carrabba’s Creamy Fettuccine Alfredo Delight?
A7: if you crave comfort food with a gourmet edge, Carrabba’s Creamy Fettuccine Alfredo Delight is a must-try. it’s an expertly crafted dish that celebrates classic Italian flavors with a creamy, dreamy sauce that satisfies both the soul and the palate. Perfect for a cozy night out or a special treat, this dish invites you to savor the simple joy of authentic Italian cuisine done right.
To Wrap It Up
Whether you’re a longtime fan of classic Italian comforts or a curious foodie eager to explore rich, velvety flavors, Carrabba’s Creamy Fettuccine Alfredo Delight promises a dining experience that’s both indulgent and authentic. With its perfectly al dente pasta enveloped in a luxuriously smooth Alfredo sauce, this dish is more than just a meal-it’s a celebration of simplicity and quality combined.Next time you crave a hearty, satisfying plate that warms both heart and palate, let Carrabba’s creamy Alfredo be your delicious destination. bon appétit!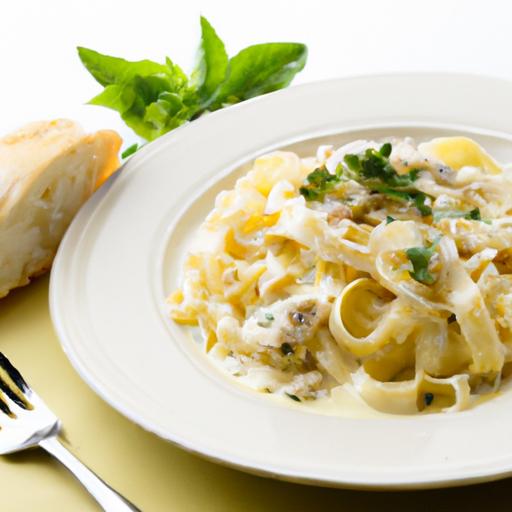
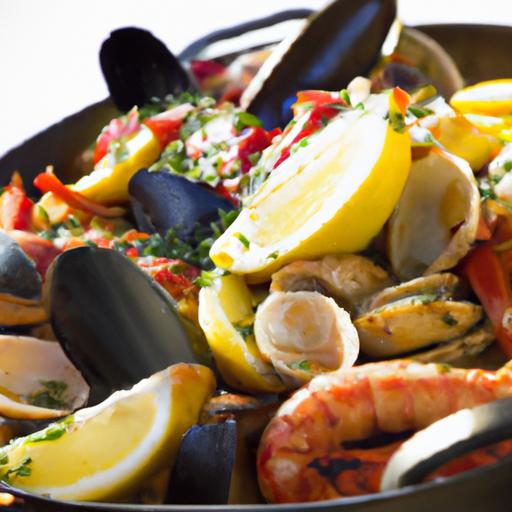
Savor Northwest Flavors: Campfire Seafood Paella Delight
Savor Northwest Flavors takes you on a culinary voyage to the rugged coasts where the Pacific Northwest’s rich maritime heritage meets vibrant Spanish tradition.Drawing from an abundance of fresh local seafood, this campfire paella marries smoky outdoor cooking with the ocean’s bounty in a way that tantalizes the senses and sparks memories of seaside gatherings around an open flame. Whether you’re a seasoned forager or a passionate home cook, preparing this dish outdoors offers an authentic, immersive experience that brings family and friends closer with every aromatic, colorful bite.
Prep and Cook Time
- Readiness: 30 minutes
- Cooking: 45 minutes (over campfire)
- Total Time: 1 hour 15 minutes
Yield
Serves: 6 generous portions
Difficulty Level
Medium – Ideal for adventurous cooks pleasant with open flame cooking
Ingredients
- 2 cups of short-grain Arborio or paella rice
- 4 cups seafood stock (homemade or low-sodium store-bought)
- 1 lb fresh Northwest shrimp, peeled and deveined
- 1 lb fresh Pacific rockfish fillets, cut into chunks
- 1/2 lb fresh mussels, scrubbed and debearded
- 1/2 cup extra virgin olive oil
- 1 large yellow onion, finely chopped
- 1 large red bell pepper, diced
- 4 cloves garlic, minced
- 1 cup diced fresh tomatoes
- 1 tsp smoked paprika
- 1/2 tsp saffron threads, soaked in 2 tbsp warm water
- 1/4 cup dry white wine
- Salt and freshly ground black pepper, to taste
- Fresh parsley and lemon wedges, for garnish

Instructions
- Prepare Your Campfire: Establish a steady medium heat with glowing embers and minimal direct flames. You want consistent warmth for even paella cooking.
- Heat the Olive Oil: Place your paella pan over the campfire. Add ½ cup olive oil and heat until shimmering.
- Sauté Aromatics: Add the onion, bell pepper, and garlic. Sauté until softened and fragrant, about 5 minutes, stirring occasionally to prevent sticking.
- Add Tomatoes and Spices: Stir in diced tomatoes, smoked paprika, and saffron with its soaking water. Cook for 3-4 minutes to deepen flavors.
- Toast the Rice: add the 2 cups rice to the pan, stirring to coat each grain with the oil and spices. toast for 2 minutes without letting it burn.
- Deglaze with Wine: Pour in white wine to lift any stuck bits. Let it reduce slightly for 2 minutes.
- Pour in Seafood Stock: Gradually add the seafood stock. Spread the rice evenly and do not stir afterward to encourage socarrat (toasted crust formation).
- cook the Base: Let the mixture simmer over the fire for 20 minutes,adding more stock if necessary to keep rice moist but not soupy.
- Add the Seafood: Nestle the shrimp, rockfish chunks, and mussels on top of the rice. Cover loosely with foil or a lid, and cook for an additional 10-15 minutes until seafood is cooked and mussels open.
- Final Touches: Remove from heat. Allow the paella to rest, covered, for 5 minutes. Sprinkle fresh parsley and squeeze lemon wedges over the top before serving.
Tips for Success
- Marine Freshness: When selecting your seafood,opt for the freshest local catches like wild shrimp and lasting rockfish from trusted vendors or fish markets.
- Control Your Fire: Maintaining a consistent heat source is key to perfect rice texture; embers work better than open flames.
- Socarrat Perfection: Resist stirring after adding stock to encourage the beloved golden crispy crust on the bottom – a hallmark of an authentic paella.
- Vegetarian Variation: Replace seafood with seasonal vegetables such as artichokes, green beans, and roasted red peppers for a delightful land-based version.
- Make-Ahead: Prepare the seafood stock and toasted rice base at home, then finish campfire cooking fresh for ease.
serving Suggestions
Serve your paella straight from the pan, surrounded by rustic wooden boards lined with fresh lemon wedges to brighten the smoky flavors. Complement the meal with grilled sourdough bread brushed lightly with garlic butter. Elevate the feast with chilled Northwest whites such as a crisp pinot Gris or a lightly oaked Chardonnay. For non-alcoholic options,sparkling elderflower lemonade pairs beautifully with the seafood’s natural brininess.
| Nutrient | Per Serving (approximate) |
|---|---|
| Calories | 480 kcal |
| Protein | 38 g |
| Carbohydrates | 52 g |
| Fat | 14 g |
For more inspiration, check out our Northwest seafood recipe collection and learn about sustainable selections. To deepen your knowledge of the region’s fishery heritage, visit the NOAA Fisheries official site.
Q&A
Q&A: Savor Northwest Flavors – Campfire Seafood Paella Delight
Q1: What makes the Campfire Seafood Paella Delight special to the Northwest?
A1: This dish captures the essence of the Pacific Northwest by blending the region’s freshest seafood-think succulent Dungeness crab, plump prawns, and sweet clams-with locally foraged herbs and vibrant, smoky campfire flavors. It’s a celebration of the rugged coastline and forest bounty, all simmered together in a single, hearty skillet over an open flame.
Q2: Why cook paella over a campfire instead of indoors?
A2: Cooking paella over a campfire adds an unrivaled depth of flavour. The crackling wood smoke infuses the rice and seafood with subtle earthy notes, creating a rustic aroma that transports you right into the wild Northwest outdoors. Plus, the communal, open-air setting makes the meal as memorable as the taste itself.
Q3: What are the essential ingredients for this Northwest take on paella?
A3: Key ingredients include Pacific Northwest seafood such as Dungeness crab, wild Gulf prawns, and fresh Manila clams. Arborio or bomba rice acts as the creamy, tender base, while locally inspired elements like wild garlic, smoked paprika, and coastal sea salt enrich the flavor. Don’t forget a splash of white wine or a squeeze of fresh lemon to brighten the dish!
Q4: How do you achieve the perfect socarrat (crispy rice crust) on a campfire?
A4: timing and heat control are crucial. Once your paella liquid has mostly absorbed, allow the fire’s embers to gently caramelize the bottom of the pan. Stirring sparingly at this point lets the rice crisp up without burning. The result? A golden, crunchy bottom layer that adds a delightful texture contrast to the tender seafood and rice.
Q5: Can this dish be adapted for vegetarian or other dietary preferences?
A5: Absolutely! To keep the spirit of the Northwest, swap out seafood for local mushrooms like chanterelles or oysters, and add hearty seasonal vegetables such as wild asparagus or sweet peas. Using smoked paprika and a dash of liquid smoke can mimic that campfire essence, ensuring everyone can savor the flavors of the region and the campfire experience.
Q6: What tips do you have for a successful outdoor paella cooking experience?
A6: Bring a sturdy, wide paella pan and a reliable grill grate that fits over your campfire.Prepare your ingredients in advance since timing is key once you’re cooking. Keep your fire steady-too high and you risk burning, too low and the rice won’t cook evenly. And most importantly, embrace the outdoor vibe: share stories, pour a glass of Northwest wine, and enjoy the magic of cooking and eating under the open sky.
Q7: Why is campfire cooking a perfect match for the Pacific Northwest lifestyle?
A7: The Pacific Northwest is synonymous with rugged, natural beauty and a deep gratitude for fresh, local food. Campfire cooking echoes this ethos by encouraging connection-both to nature and to one another. It’s a way to slow down, savor the moment, and celebrate the rich flavors born from land, sea, and fire.
Closing Remarks
As the final embers of your campfire glow softly beneath the starry Northwest sky, the lingering aroma of smoky saffron and ocean-fresh seafood tells a story of land, sea, and fire united in perfect harmony. This Campfire Seafood Paella not only captures the essence of the region’s rich flavors but also transforms an outdoor meal into a memorable celebration of nature’s bounty. Whether you’re a seasoned camper or a curious foodie, embracing this dish invites you to savor the vibrant spirit of the northwest-one delicious bite at a time. So gather your ingredients, light the flames, and let your taste buds embark on a coastal adventure that’s as wild and fantastic as the Pacific Northwest itself.